Kaimusailing
s/v Kaimu Wharram Catamaran
| Vessel Name: | Kaimu |
| Vessel Make/Model: | Wharram Custom |
| Hailing Port: | Norwalk, CT |
| Crew: | Andy and the Kaimu Crew |
| About: | Sailors in the Baltimore, Annapolis, DC area. |

17 April 2024 | St Marys, GA
Dinghy Skeg
I was suffering with what seemed like a cold and also had allergy symptoms. I awoke and felt fine. The green pollen that was coating everything was gone. Maybe it will return.

07 April 2024 | St. Marys, GA
Clammy Hands
Items came in from TEMU, the Chinese cut rate retailer. One was a nice little drone that cost about twelve and a half dollars. It looked like an easy thing to play with while I coughed and sneezed. I was fighting a summer cold, even though it is not summer elsewhere, it seems like it here. A nice [...]

02 April 2024 | St. Marys, GA
Sun Doggie
After laminating the cedar strips onto the gunwales of the dinghy I found the screws I used wouldn’t come out. The epoxy had seized them. The screw heads were stripped so I cut a straight slot in the heads with the cut off wheel. The cedar smoked when the screw heads got red hot. I could remove [...]

21 March 2024 | St. Marys, GA
Just Add Water
The rainy weekend started off with overcast and fog but no rain. It looked like I might be able to get something done on the D4 dinghy. I wanted to change the bow seat which is really the bow deck. The sailing option uses the deck to hold the freestanding mast. I didn’t like how the deck looked, [...]

01 March 2024 | St. Marys, GA
D4 Dinghy Alternative Seats
The rain event was more wind than rain, strong winds with gusts up to 44 mph. We drove into town to see what the harbor was like. There was a small sailboat that had dragged anchor and was sitting close to shore. The tide was out. We left and played with Bleu at Notter’s Pond.

23 February 2024 | St. Marys, GA
D4 Inside Seams
Day two of the dinghy build started out with me finishing wiring the hull bottoms together on the centerline of the bottom panels. This was much easier than the wiring of the chine edges of the bottom panels and the side panels.
Ye Pilothouse
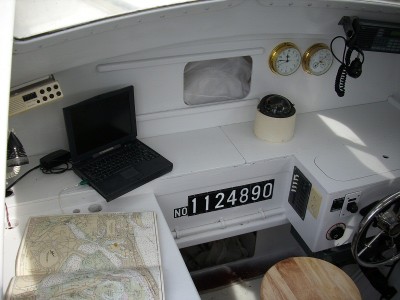
installation of ground plane, or "counterpoise", would wait till later. After mounting the radio and its control head, I powered it on and it came to life.
It could be used in receive mode and I listened to a conversation, so it appears to work. The VHF radio was installed on the other side of the pilothouse
and tested OK. I ordered adapters so that the masthead antenna, which has a PL259 connector matching the radio, could be adapted to feed the AIS receiver.
Also an adapter was ordered to enable the AIS antenna to be used for the radio. The idea is that it is unlikely to have VHF radio contact offshore, but the
higher masthead antenna would enable the AIS to have greater range, which would be beneficial to avoid large vessels.
The LED bulbs for the capri lights came in and I compared the 4 different types. The best was a 3 LED bulb that only draws 3 watts. I installed it
above the little chart table and a different bulb that had 4 LED's in the light on the aft overhead. Also the flourescent fixtures came in and I installed
one on the overhead near the hatch. The idea is to have a light at each hatch in the same relative place so that when crew enters a space from on deck they
will have a familiar spot to grab for a light switch.
This completed this stage of work in the pilothouse. It now has an autopilot, radios, a little chart table with provisions for computer navigation with
GPS and AIS. Next space to work on is the head and chartroom.
There were a few impending projects on deck. The windlass controls and navigation lights needed to be wired. The foot controls for the windlass were
placed so that the deckhand could tail an anchor line on the windlass drum while stepping on the switches. I decided to refresh my memory about which way
the windlass contactor operated. It has spade contacts for the switch wires. One is for up, the other down. When I applied power to the windlass nothing
happened. Then I found there was no current coming from the engine battery. It looks like it has an open cell. A spare battery didn't operate the windlass
either. Could it be bad again? I had just taken it apart and got it working again just a few weeks ago. All this was depressing. Instead of installing
I'd have to be repairing, again.
In the head I took a quick look around. The previous builder had installed laminate on the bulkhead, but it warped in the humidity, and now looked like
it had to be removed. That would entail removing almost everything in the head, refinishing what was underneath the laminate, and then trying to match the
joinery which would come up short without the thickness of the laminate. Then I got the idea that I could install a new shelf over the toilet and use its
brackets to bolt through the laminate and bulkhead to draw it all back into place. I tested the idea out by putting large C clamps out through the aft
portlight of the head and tightening the clamps until the laminate was straight again.
The engine battery was put on charge and it didn't hold it. Looks like battery shopping time. I had an automotive booster battery and brought it from
the car and tried the windlass motor again. It turned! The anchor rode was gobbled up by the windlass and dropped into the chain locker. The rode is made
of rope spliced to chain. The windlass can accommodate both the chain and the rope and has a spring loaded finger that holds the rode in contact so that the
operator can haul in or let out the anchor without having to handle the rode. The installation of switches for the windlass included foot switches right on
deck near the windlass, a rocker switch in the pilothouse, and a new switch to be installed at the helm on deck. I had purchased a pair of momentary contact
waterproof pushbuttons to install at the on deck helm station.
When I was checking out the upcoming work in the head/chartroom, I found the original pushbutton switch for the electric head. I had a nice mounting
plate and consisted of a pushbutton to flush and a rocker switch to fill or drain the toilet bowl. The electric head that is on the boat is a model that
uses a macerator motor that macerates and discharges waste at one end and pumps water into the bowl at the other end. The motor does both functions at the
same time and only needs a single pushbutton switch to both fill and drain the bowl at the same time. The original switch was for an electric head that uses
a separate motor for the macerator and the supply pump. The original switches were corroded, so I purchased a similarly sized pushbutton to replace the
pushbutton and removed the rocker switch and replaced it with a new toggle switch that could be used as a light switch. The new switches were installed with
the help of a glue gun. The original plate had already been planned into the installation by the previous builder and there was a prepared mounting for it.
I noticed the original rocker switch looked very similar to the windlass rocker switch in the pilothouse. I cleaned up the contacts with a little
dremel tool and tested it with a meter. It functioned properly. It would be used as the windlass switch at the on deck helm station. A blank spot on the
helm control panel had a plastic filler. I used a multifunction tool to cut a rectangular hole for the rocker switch. Control wire was pulled from the
windlass to the on deck helm station and then into the pilothouse helm station. The wires were hooked up and polarity confirmed that UP was UP on both
rocker switches. Now they had to be joined to the foot switch wires at the windlass. For this I needed to use the inflatable dinghy and air tools. Working
from a dinghy with electric tools is a no-no. The foot switch wires were extended so that they too could reach the windlass contactor, the relay that
controls the windlass. Confirmation of the rocker switches showed that the on deck helm station wasn't making contact for the UP control. This switch was
the one I had removed from the old head toilet switch. It had gone bad, maybe during the soldering process. Some say to use only crimp connections for
wiring, but I like soldered connections, as long as they are mil-spec, that is, folded over before soldering. Also it helps to dress the cabling so that it
doesn't flex abruptly, such as a sudden change in stiffness, such as at a solder joint, or at a connector. One way is to use a silicone or urethane dressing
and drawn out along the wire so that it is thick near the connector and thins out along the wire. There is no point where it will flex like a hinge. It
will bend in a smooth arc. Glue gun can also be used to dress wire. Fortunately my problems with the rocker switch had a solution. I only used the switch
because it was the same as the original windlass switch in the pilothouse. I was goingn to throw this switch out and had tried to resurect it. I had two
momentary contact waterproof pushbutton switches, brand new, that were planned as windlass switches for the on deck helm station. Now I had to backtrack and
remove the rocker switch and install the pushbuttons. After installing them and wiring all the switches together to the contactor, the windlass was tested
and worked properly.
Now the project was moving to the head/chartroom in the port hull. All the stuff that came out of the pilothouse was restowed, plus some stuff from the
head/chartroom was stored on the big deck table. The new power panel was cut down to 2/3's its size by moving the breakers around and using a multifunction
tool to saw it, then smooth out the edge. All the breakers that came with the panel are still in it, but in different locations. All the blank breaker
locations were filled and the right hand side of the panel had all the empty slots, allowing it to be removed. Also the panel wiring was removed and it will
have both AC and DCs breakers.
The UPS was disassembled and the heavy duty DC contacts were exposed. New contacts were ordered to allow the UPS's batteries to be connected to larger
wet cells which will also receive a charge from the port side solar panels.
The picture is of the pilothouse nearly complete.
