Kaimusailing
s/v Kaimu Wharram Catamaran
| Vessel Name: | Kaimu |
| Vessel Make/Model: | Wharram Custom |
| Hailing Port: | Norwalk, CT |
| Crew: | Andy and the Kaimu Crew |
| About: | Sailors in the Baltimore, Annapolis, DC area. |

07 April 2024 | St. Marys, GA
Clammy Hands
Items came in from TEMU, the Chinese cut rate retailer. One was a nice little drone that cost about twelve and a half dollars. It looked like an easy thing to play with while I coughed and sneezed. I was fighting a summer cold, even though it is not summer elsewhere, it seems like it here. A nice [...]

02 April 2024 | St. Marys, GA
Sun Doggie
After laminating the cedar strips onto the gunwales of the dinghy I found the screws I used wouldn’t come out. The epoxy had seized them. The screw heads were stripped so I cut a straight slot in the heads with the cut off wheel. The cedar smoked when the screw heads got red hot. I could remove [...]

21 March 2024 | St. Marys, GA
Just Add Water
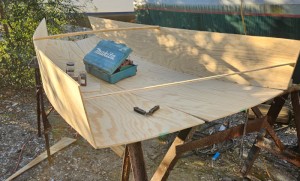
The rainy weekend started off with overcast and fog but no rain. It looked like I might be able to get something done on the D4 dinghy. I wanted to change the bow seat which is really the bow deck. The sailing option uses the deck to hold the freestanding mast. I didn’t like how the deck looked, [...]

01 March 2024 | St. Marys, GA
D4 Dinghy Alternative Seats
The rain event was more wind than rain, strong winds with gusts up to 44 mph. We drove into town to see what the harbor was like. There was a small sailboat that had dragged anchor and was sitting close to shore. The tide was out. We left and played with Bleu at Notter’s Pond.

23 February 2024 | St. Marys, GA
D4 Inside Seams
Day two of the dinghy build started out with me finishing wiring the hull bottoms together on the centerline of the bottom panels. This was much easier than the wiring of the chine edges of the bottom panels and the side panels.
15 February 2024 | St. Marys, GA
D4 Dinghy Day One
A Wharram Pahi 26 had been anchored in the river nearby the boatyard and was hauled out with the travel lift. I went around to look at it and talked to the owner couple. I was surprised that it had been built in Martinique in 1988. The boat is more than 30 years old.
Head Work
The ship's artist, Bev Rocco, paid us a visit and we had a smashing time at a local restaurant and a visit to the boat project. I had selected some hardwood tongue and groove planks to make new steps at the chartroom hatch. On a boat, stairs are called a ladder, so these were ladder steps. The existing steps were narrow and dangerous, the new ones will be wider, look better, and be safer.
The next day was very warm, up in the 80's, so it would be a good day to tackle all the epoxy work that has been awaiting a warm day. The tongue and groove planking was glued, clamped with bar clamps, then air nailed with stainless brads. There were a few items from the cottage that were glued. The overhead in the head had some delamination, so it was glued with the porta power forcing it back into shape. The portlight in the head was puttied with epoxy microballoon mixture. The printer table was painted with epoxy and a few carpentry imperfections were puttied.
It's hard to paint the proper picture of the work a few days later. It was rainy and overcast. The tongue and groove planking was cut into 2 foot wide stair steps. The dilemna was how to remove the old stair steps and install the new stair steps without having stair steps to get in and out of the chartroom. Additionally, the epoxy that was needed to set the steps took at least a day to properly cure. Alternatively, the forward hatch and steps could be used to access the hull, but the craw space that lead aft to the chartroom was full of stuff that was pushed out of the way while the chartroom was in progress. On Tuesday I bailed out. I just put everything away in the rain and gave up on trying to climb in and out to fit some little blocks of wood. It was depressing. The next day I slept in. I'm retired. I can do that. I watched the weather out side and on the TV. It looked like the rain was ending. I made some lobster ravioli and took a nap. Eventually I had to go out and get to work. I ran the portable bandsaw up on the deck and found I could cut the wood pieces I needed. At some point the old stair steps would be scavenged for parts for the new stair steps. I could climb in and out like a mountain goat on the stubs of wood left in the sairway. Then the work started to put in the new supports for the new stair steps. How do you position a support, add a level to get it trimmed right, then grab an air nailer, with only two hands. And apply the epoxy glue. The procedure was take the support in hand, inspect it and brush on some epoxy glue, hold it in place, put a level on top of it and switch hands, holding it in place and perfectly level, and then grab the air nailer and shoot a stainless brad into it. It it slips while you're doing all this, pull it out, and pull out or cut off the brad and try again. Then the braces that will help the steps can be added. They will be nailed to the supports and when the stair steps are added, will support them. They went in with no trouble. The problem was that they were cut off from the original stair steps and they were a little short. Well, I'll just put some epoxy putty in there to make up the gap. The proper filler in the putty was colloidal silica. I had some on hand and after doing all that nailing of the supports, mixed the silica in the remaining epoxy. I knew the mix had to be thick and stiff. I kept adding silica unlit it was very stiff. Then I started working the putty into the gaps and carefully fairing the mixture and working my way from one joint to the next. After I was at the end, I was surprised that the first one was sagging a little bit. How could it sag, when I had made such a stiff mix? I reworked that joint, then continued to the next, then went back to the first. As the epoxy began to set up, it became even more fluid. It was amazing. The mix would be sticking to everything, tearing the nitrile gloves apart, but at the same time it would sag and start to drip. I grabbed some masking tape and tried to tape up the sags, then see if they would hold. After a while it looked like I could try to shore up all the rest of the epoxy. A while later, when it began to rain even harder, I secured everything and called it quits.
Next the door to the head was trimmed to pass the new larger steps. My work in the head was far from complete. The shower sump pump needed to be installed as well as the plumbing for the head's water inlet. Originally it was plumbed to a through hull fitting to take seawater, and it had a vented loop to make sure the head wouldn't siphon seawater until it overflowed. The vented loop prevented the head's lid from staying up. Now that the head would be taking water from the shower sump, the vented loop was no longer needed. The inlet plumbing was rerouted when the loop was removed and now the lid stayed up. The shower sump pump was mounted under the chartroom sole and discharge plumbing was lead to a new through hull fitting under the printer table and above the waterline. The electrical wiring was installed and enabled the pump to be turned on by a float switch in the shower sump or by a toggle switch located under the head's FLUSH pushbutton.
It was time to start preparing the head and chartroom for paint. Loose paint was removed with a rotary fiber brush and the surfaces were sanded. All that sanding dust and other debris had to be cleaned up. The artsy fartsy laminate in the head was masked off with tape and plastic dropcloth. All surfaces that would receive white or clear urethane were left exposed, all else was masked off. It took all day to mask off the head and about 20 minutes to mask off the chartroom. It had never been painted, so it all had to be left exposed, except for the capri lights, the port, and the flourescent light. After shooting the clear urethane, the stair steps, coathook, and counters in the head will be masked and then the white urethane will be shot.
The next blog post should be after this painting is complete. It will probably take one day.
