Kaimusailing
s/v Kaimu Wharram Catamaran
| Vessel Name: | Kaimu |
| Vessel Make/Model: | Wharram Custom |
| Hailing Port: | Norwalk, CT |
| Crew: | Andy and the Kaimu Crew |
| About: | Sailors in the Baltimore, Annapolis, DC area. |

17 April 2024 | St Marys, GA
Dinghy Skeg
I was suffering with what seemed like a cold and also had allergy symptoms. I awoke and felt fine. The green pollen that was coating everything was gone. Maybe it will return.

07 April 2024 | St. Marys, GA
Clammy Hands
Items came in from TEMU, the Chinese cut rate retailer. One was a nice little drone that cost about twelve and a half dollars. It looked like an easy thing to play with while I coughed and sneezed. I was fighting a summer cold, even though it is not summer elsewhere, it seems like it here. A nice [...]

02 April 2024 | St. Marys, GA
Sun Doggie
After laminating the cedar strips onto the gunwales of the dinghy I found the screws I used wouldn’t come out. The epoxy had seized them. The screw heads were stripped so I cut a straight slot in the heads with the cut off wheel. The cedar smoked when the screw heads got red hot. I could remove [...]

21 March 2024 | St. Marys, GA
Just Add Water
The rainy weekend started off with overcast and fog but no rain. It looked like I might be able to get something done on the D4 dinghy. I wanted to change the bow seat which is really the bow deck. The sailing option uses the deck to hold the freestanding mast. I didn’t like how the deck looked, [...]

01 March 2024 | St. Marys, GA
D4 Dinghy Alternative Seats
The rain event was more wind than rain, strong winds with gusts up to 44 mph. We drove into town to see what the harbor was like. There was a small sailboat that had dragged anchor and was sitting close to shore. The tide was out. We left and played with Bleu at Notter’s Pond.

23 February 2024 | St. Marys, GA
D4 Inside Seams
Day two of the dinghy build started out with me finishing wiring the hull bottoms together on the centerline of the bottom panels. This was much easier than the wiring of the chine edges of the bottom panels and the side panels.
BEP Meter Maid
The carbs were removed. It was becoming a quick task now. I had had them off so many times. I found the leak easily, the float bowl fitting on #3 carb had been repaired with a brass fitting and epoxy. It was leaking where the epoxy had separated from the float bowl. It was now re-repaired with a brass barbed elbow with one of the barbs sawed off and the stub drilled and threaded for a small metric bolt. The size of the hole and threading was chosen to match the size of the hole in the carb body, which was also threaded. A small diameter PVC semi-rigid tube was cut to match the depth of both holes. JB Weld was applied to mating surfaces, the tubing was screwed into the brass fitting and then they were screwed into the carb body. After letting it set up for a day, the carbs were reassembled onto the engine and it was fired up. There was no leak, but the funny high idle was still there. The idle set screw was readjusted and the engine purred better than before.
The problem with the galley pumps were another bother. The manual pump acted as if the valves were incorrectly installed, no water ever made it up to the spigot. The electric pump wouldn't come on when the tap was opened. Because I had just gone through these pumps, it irked me that they were on the fritz again.
I spent a whole day working on the pumps. The manual pump was working properly, but its output was backwashing through the electric pump, so a one way valve will have to be put in the line *someday*. Instead of taking the electric pump out of the system and totally rehabbing it, I did one thing at a time, trying to find out what was causing the problem. The circuit breaker was only a 5A breaker, so that was doubled to 10A. A rubber washer was removed from around the motor shaft in case that was binding. Finally, the plastic tubing for the water feed was carefully reorganized to prevent any kinks. The end result was the pump ran fine again, but I wouldn't be surprised if it has another failure. No pump parts were needed this time.
The amp meter in the pilothouse was wired to one of the new shunt resistors. A simple arrangement was to remove the battery minus cable from its terminal block near the power panel, bolt one end of the shunt resister to the block, and bolt the minus cable to the other end of the shunt resistor. Now any current in the system will have to flow back to the battery through the shunt resistor. The leads of the ammeter were attached to the two ends of the shunt resistor, thus measuring the voltage drop through the calibrated resistor. A test of the system showed that the meter worked. This installation took about 20 minutes.
The work shifted to the port hull electrical system. A couple of circuits had to be added to power the main bunk and the forward bunk. It would be like the Cook's Bunk, with a terminal block, a Harbor Freight voltage box, and a reading lamp. Another job was to add meters to the electrical panel.
The electrical panel was removed from the chartroom and the 500 VAC (!) analog meter in the panel was removed. Some trimming of the meter bezel and it would fit a PM128E digital panel meter. There was a place on the panel for a switch, that would take a switch to allow the digital meter to read DC volts or DC amps. The switch and a voltage regulator to power the meter were ordered from Marlin Jones in Florida when I found Radio Shack was out of stock.
I found the original Blue Sea System shunt resistor, so I cleaned it up and installed it in place of the Chinese shunt resistor in the pilothouse. They seemed to work identically, but I wanted the Blue Sea panel there to have a Blue Sea shunt resistor.
Back in the port hull, the cable run for the forward bunk was started. Holes had to be drilled and conduit installed in the bunk. The terminal block was mounted with the power cables, voltage box, and reading lamp already connected. The cable run was secured using a glue gun working from the end of the run back toward the power panel. Each blob from the glue gun took a couple of minutes to cool and harden, so other tasks were carried out in between.
A similar terminal block/power box installation was made in the vanity in the cabinet above the vanity sink. The wire runs were brought to the electrical panel along with a run from the water maker.
The PM128E LCD meter is readily available online. Some of the PM128's are back lit, some are preset to a voltage range. The E model is programmable with jumpers for voltage range, AC or DC, decimal point position, and polarity indication. The jumpers for voltage ranges (2V and 200mV) were wired to 1/2 of a DPDT toggle switch, common end of the jumpers to the center pole of the switch, the other two ends of the jumpers to each end of the switch. The other half of the switch has the + side of the input of the meter to the switch center pole, the panel ground side of the shunt resistor to one end pole of the switch, and the +12 volts feeding the panel to the other end pole of the switch. Thus, the dual switch will feed the plus side of the shunt resistor to the input of the meter and make contact with the 200 mV range jumper. The shunt resistor is 75 mV/75 A, so each amp of current through the shunt resistor will produce a millivolt and the meter reading in millivolts will indicate how many amps are flowing. When the switch is thrown to the other position, the +12 V feeding the panel is fed to the meter and the 2V range jumper is connected. The meter then shows the battery voltage feeding the panel.
There are additional jumpers on the back of the meter. We set them for +5 V power which allows the same ground to be used for power to the meter as well as the negative side of meter input (- sense). The ground wire was connected to the - side of the shunt resistor, which is battery ground. The +5 V to power the meter comes from a 7805 voltage regulator which has 3 leads: input, ground, and output. The +12 V from the electrical panel buss feeds the input, the ground is the same ground to the battery ground, and the output is +5 V. The voltage regulator was connected directly to a diode at the meter power input. The regulator input wired directly to the panel power buss.
There are also jumpers for decimal points in a column labeled P1, P2, and P3, along with adjacent columns labeled ON and OFF. To turn on a decimal point, the jumper is connected from the ON column to the desired point. I found that unwanted decimal points had to be turned off by jumpering to the OFF column. On our meter we had P1 ON and P2 OFF, and didn't bother with P3 or the polarity indicator (+-).
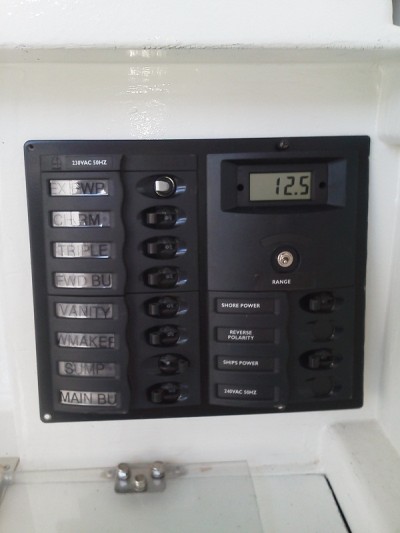
The picture is of the BEP meter panel, which still has some of its New Zealand AC voltage labels, and it shows 12.5 volts on the meter, it should be higher, but the batteries are recharging from a low state. It looks like we can back light the panel to make the breaker labels stand out. That will require another switch installation, probably below the panel, and another of the 5W CCF lamps, maybe with a white diffuser....
