Kaimusailing
s/v Kaimu Wharram Catamaran
| Vessel Name: | Kaimu |
| Vessel Make/Model: | Wharram Custom |
| Hailing Port: | Norwalk, CT |
| Crew: | Andy and the Kaimu Crew |
| About: | Sailors in the Baltimore, Annapolis, DC area. |

17 April 2024 | St Marys, GA
Dinghy Skeg
I was suffering with what seemed like a cold and also had allergy symptoms. I awoke and felt fine. The green pollen that was coating everything was gone. Maybe it will return.

07 April 2024 | St. Marys, GA
Clammy Hands
Items came in from TEMU, the Chinese cut rate retailer. One was a nice little drone that cost about twelve and a half dollars. It looked like an easy thing to play with while I coughed and sneezed. I was fighting a summer cold, even though it is not summer elsewhere, it seems like it here. A nice [...]

02 April 2024 | St. Marys, GA
Sun Doggie
After laminating the cedar strips onto the gunwales of the dinghy I found the screws I used wouldn’t come out. The epoxy had seized them. The screw heads were stripped so I cut a straight slot in the heads with the cut off wheel. The cedar smoked when the screw heads got red hot. I could remove [...]

21 March 2024 | St. Marys, GA
Just Add Water
The rainy weekend started off with overcast and fog but no rain. It looked like I might be able to get something done on the D4 dinghy. I wanted to change the bow seat which is really the bow deck. The sailing option uses the deck to hold the freestanding mast. I didn’t like how the deck looked, [...]

01 March 2024 | St. Marys, GA
D4 Dinghy Alternative Seats
The rain event was more wind than rain, strong winds with gusts up to 44 mph. We drove into town to see what the harbor was like. There was a small sailboat that had dragged anchor and was sitting close to shore. The tide was out. We left and played with Bleu at Notter’s Pond.

23 February 2024 | St. Marys, GA
D4 Inside Seams
Day two of the dinghy build started out with me finishing wiring the hull bottoms together on the centerline of the bottom panels. This was much easier than the wiring of the chine edges of the bottom panels and the side panels.
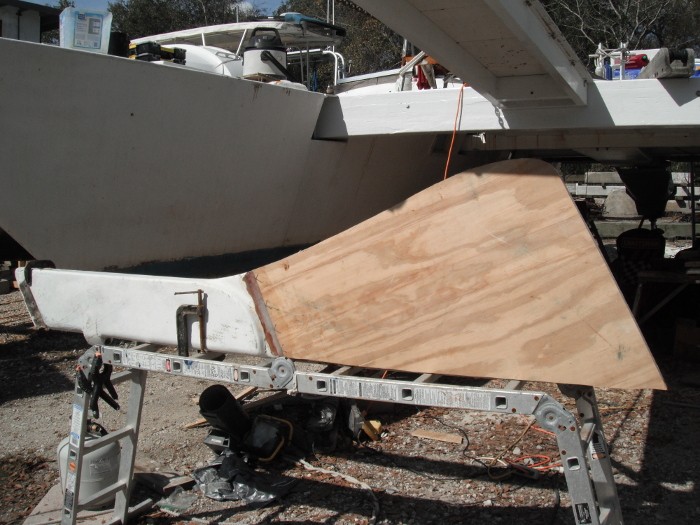
More Rudder
.
As with most carpentry of this kind, the first attempt was not very good, but I made allowance for that and left a margin for error. The scarf bevel was cut back a bit and redone. I used the power planer to cut the bevel and the belt sander to smooth any planing marks. The tendency is for the belt sander to round off the surface of the bevel so that it is crowned. Ron the woodworker looked at it and said it would be better to use the angle grinder with the flap disk to remove the crown. I also changed the scarf’s position slightly to better match the rudder stock.
.
My plan was to then cut the scarf on the second piece of plywood and use it to help guide the gluing of the first piece onto the stock. I would use wax paper to keep the second piece from gluing, then glue it in a later separate step.
.
Instead of doing that, I glued the first piece to the stock, carefully positioning the two pieces on an aluminum scaffold. The next day the glue was still rubbery, but by the end of the day I could think about getting the second piece of ply ready to glue to the rudder.
.
The scarf bevel for the second piece of ply went more quickly and came out flatter, no crown. I lined it up against the rudder stock and the first piece of ply and it looked like it was ready to glue. The bevel on the stock needed some reshaping which was quickly done with the flap disk. This is a 7 inch flap disk on a 4 1/2 inch angle grinder with its safety guard removed. One has to be extra careful working that tool, both to keep the woodworking from getting gouged and also to keep the hands and arms from getting gouged.
.
At the end of the day the first glue joint seemed stiff enough to allow the second piece of ply to be glued. The first glue joint was only the scarf joint of the blade to the stock, the second piece of ply would need both the scarf joint and the whole face of the ply to be epoxied. This meant priming both pieces of ply with epoxy on the inside faces that would be glued together and priming the surfaces of the second scarf joint. I found that following Russell Brown’s advice of putting down two coatings of epoxy as primer was excessive. The surface has too much epoxy which liquefies the thickened glue mixture, the glue mixture then can sag. Better to use one primer coat and make sure the surface is well wet with epoxy, but not so much that it pools on the surface.
.
The pieces had been dry fitted and clamped, which is a good idea anytime you’re gluing, and the edges and mating surfaces were marked with a magic marker to ensure that the same fit would be had during the gluing.
.
I’ve been using barbecue marinade injection syringes to meter out the epoxy for mixing. They were 88 cents at Walmart and only need the spigot at the end to be enlarged. The spigot and marinade needle are too small to pass epoxy resin except at a very slow rate. I do not use the marinade needle, but it could be useful in a situation where epoxy has to be injected into a narrow crack. The spigot at the end of the syringe is kind of like a double walled tube, the smaller narrow inside tube is drilled out with a drill sized to fit the larger tube. The drill debris will get inside the syringe but it is easy to clean out.
.
Using the syringes ensures precise measure of the epoxy. There is no guessing of where the meniscus is or if surface tension will allow the epoxy to actually be above the mixing line. Many have told me that mixing pumps are the way to go, but there have also been problems with the pumps. The syringe works quickly, accurately, and leaves no mess. It is better to work with smaller batches of epoxy and having an efficient measuring and mixing procedure gets rid of the question of how much to mix and how much time do I have before this large batch sets up on me.
.
I have been mixing from 1 1/2 oz. batches to 4 1/2 oz. batches, and using multiple batches to get the job done. Maybe when I am needing larger batches for sheathing, for instance, I would go to mixing with measuring cups. In larger batches the accuracy of the cups is good.
.
If what I am writing up doesn’t work out too well, you will read about it sometime in the future, if I am able to write it up.
.
My shortcuts with navigation came back to get me, no paper charts, no simple back up GPS unit. Now I have purchased a Garmin unit that runs on AA batteries and provides basic GPS information. It is an old Garmin eMap. I will take the place of the Magellan unit that crapped out when I needed it most. I remember how angry I was when I balled it up with its power cord and threw it into the corner of the pilothouse. It had seemed to work just fine for months in port, but later I found out it was unreliable as to updating its lat and long, also the course and speed were unreliable. It seemed to go haywire when the going got rough, like the crazy motion of the boat in a gale, getting broached so often, made it seem like a new course. I can’t say the Garmin will be any better, but the experienced captains have said, “yes, it is.”.
.
In the galley it has been a nightmare trying to cook with only a small camping lantern. The LED lights and cold cathode fluorescents had quit due to their switches being corroded and some of the connections coming apart during hull repairs.
.
So, I was taking apart 78 cent switches, cleaning the contacts and that little copper plated spring bar that makes them click and actually makes the contact to make them work, then trying to put them together without losing the little coil spring that holds the little plastic nub that needs a dab of lube before it all goes together. I was unable to find where I had got these little switches from and if I used some other type, I would have to redo the switch plates, etc. Fortunately, after chasing after the parts of the first switch, the next three were relatively easy to disassemble, clean, and put back in order. The wiring connections, which are so simple even a child could do it, had to be cut back and reconnected. Forget about color coding or a schematic, apparently I thought when I was putting it together that it would not be that difficult to troubleshoot. Eventually it all was back together again and working.
.
The cook’s bunk got a new reading lamp due to the previous one dying due to corrosion. I should have checked the CCFL bulb, it was also bad, so I stole one from the port hull bunk. LED equivalents are on order from China, should arrive next month.
.
The picture is of the rudder blank ready for shaping and glassing.
