Kaimusailing
s/v Kaimu Wharram Catamaran
| Vessel Name: | Kaimu |
| Vessel Make/Model: | Wharram Custom |
| Hailing Port: | Norwalk, CT |
| Crew: | Andy and the Kaimu Crew |
| About: | Sailors in the Baltimore, Annapolis, DC area. |

23 April 2024 | St Marys, GA
D4 Launchie
The laptop pooped the bed, so I have to scurry around with alternatives. Not as bad as typing on the phone.

17 April 2024 | St Marys, GA
Dinghy Skeg
I was suffering with what seemed like a cold and also had allergy symptoms. I awoke and felt fine. The green pollen that was coating everything was gone. Maybe it will return.

07 April 2024 | St. Marys, GA
Clammy Hands
Items came in from TEMU, the Chinese cut rate retailer. One was a nice little drone that cost about twelve and a half dollars. It looked like an easy thing to play with while I coughed and sneezed. I was fighting a summer cold, even though it is not summer elsewhere, it seems like it here. A nice [...]

02 April 2024 | St. Marys, GA
Sun Doggie
After laminating the cedar strips onto the gunwales of the dinghy I found the screws I used wouldn’t come out. The epoxy had seized them. The screw heads were stripped so I cut a straight slot in the heads with the cut off wheel. The cedar smoked when the screw heads got red hot. I could remove [...]

21 March 2024 | St. Marys, GA
Just Add Water
The rainy weekend started off with overcast and fog but no rain. It looked like I might be able to get something done on the D4 dinghy. I wanted to change the bow seat which is really the bow deck. The sailing option uses the deck to hold the freestanding mast. I didn’t like how the deck looked, [...]

01 March 2024 | St. Marys, GA
D4 Dinghy Alternative Seats
The rain event was more wind than rain, strong winds with gusts up to 44 mph. We drove into town to see what the harbor was like. There was a small sailboat that had dragged anchor and was sitting close to shore. The tide was out. We left and played with Bleu at Notter’s Pond.
Using the Scarf Jig
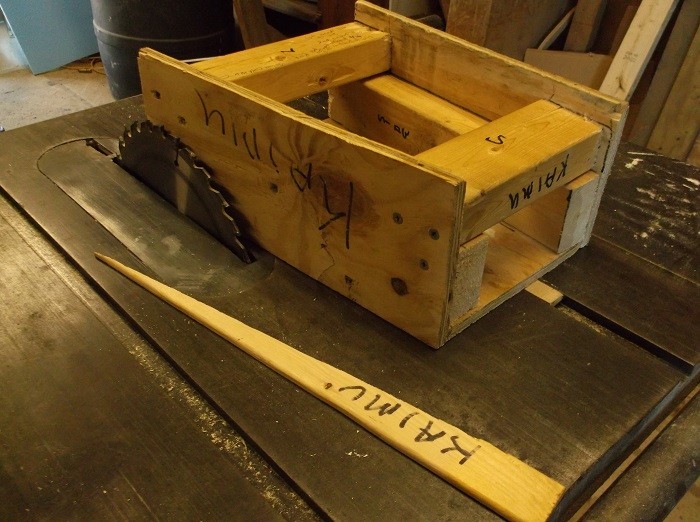
.
After making the first cut, the plank is flipped over and a thin slat is inserted into the saw cut to that the plank can be clamped to the jig without the saw cut squeezing shut. I call the thin slat a kerf spacer. The second cut only has to be deep enough to cut the remaining wood left by the first cut. It takes some skill to get the second cut to be flush with the first cut. It can come out at a slightly different angle or be offset to the side slightly. The end product can be cleaned up with a power plane and belt sander. It is a very efficient way to make a scarf bevel.
.
I was trying to get more consistent with the scarf bevel cuts and I finally got it figured out. I have cut about 20 scarf bevels so far, so it is about time. The first step in getting control of this technique was to always start the scarf cuts on the same face of the jig. I labeled this face of the jig “1st” as I would always be making the first cut using that side of the jig. I chose that side because I had a feeling that most of the better bevel cuts were made by starting on that side. Next I decided to use the marks that I made on the plank to line up the plank and jig. I always take a 10:1 triangle, which you can see in the picture, and mark the 10:1 angle on the end of the plank on both the top and bottom edges. Then I draw the line marking where the saw blade should begin the cut on the face of the plank. To gain consistency, I lined up the cut line with the leading edge of the jig. After I cut the first cut this way, I could see it was in a good place, just a bit offset, so I began cutting the first cut on all the bevels by lining up that mark with the leading edge of the jig.
.
Next I made the second cut using the other face of the jig and now the plank was flipped over on its other edge. The mark for the cut line was placed again at the leading edge of the jig, but now the cut came out offset a bit from the first cut. This was caused by the leading edge of the jig being a slightly different distance from the blade. This scarf bevel was not too bad and could be cleaned up with a plane. Now I used the same procedure for a second scarf bevel, and on the second cut moved the cut line ahead of the leading edge of the jig by about 3/16”. This scarf bevel turned out better, but there was a discrepancy between the 10:1 angles of the two jig faces, so the two cuts were not exactly flush. Still easily cleaned up with power planer or belt sander.
.
Because the 10:1 angle cut with the jig also depends on how the plank is pulled through the saw, the discrepancy can be compensated by just holding the plank a little bit outward on its way through the saw. The distance between the cut line and the leading edge of the jig also had to be increased to about 1/4”. Now the scarf bevel was nearly perfect. There is still some variability in the cuts, but by using marks and writing down notes on adjustments, the bevels are much more consistent. There are many more planks to get out and thus many more scarf bevels to cut, so getting a handle on this procedure will pay off.
.
This jig was made for a specific table saw and if I end up cutting scarf bevels on another saw, I could make an equivalent jig, probably even more accurate.
