Kaimusailing
s/v Kaimu Wharram Catamaran
| Vessel Name: | Kaimu |
| Vessel Make/Model: | Wharram Custom |
| Hailing Port: | Norwalk, CT |
| Crew: | Andy and the Kaimu Crew |
| About: | Sailors in the Baltimore, Annapolis, DC area. |

17 April 2024 | St Marys, GA
Dinghy Skeg
I was suffering with what seemed like a cold and also had allergy symptoms. I awoke and felt fine. The green pollen that was coating everything was gone. Maybe it will return.

07 April 2024 | St. Marys, GA
Clammy Hands
Items came in from TEMU, the Chinese cut rate retailer. One was a nice little drone that cost about twelve and a half dollars. It looked like an easy thing to play with while I coughed and sneezed. I was fighting a summer cold, even though it is not summer elsewhere, it seems like it here. A nice [...]

02 April 2024 | St. Marys, GA
Sun Doggie
After laminating the cedar strips onto the gunwales of the dinghy I found the screws I used wouldn’t come out. The epoxy had seized them. The screw heads were stripped so I cut a straight slot in the heads with the cut off wheel. The cedar smoked when the screw heads got red hot. I could remove [...]

21 March 2024 | St. Marys, GA
Just Add Water
The rainy weekend started off with overcast and fog but no rain. It looked like I might be able to get something done on the D4 dinghy. I wanted to change the bow seat which is really the bow deck. The sailing option uses the deck to hold the freestanding mast. I didn’t like how the deck looked, [...]

01 March 2024 | St. Marys, GA
D4 Dinghy Alternative Seats
The rain event was more wind than rain, strong winds with gusts up to 44 mph. We drove into town to see what the harbor was like. There was a small sailboat that had dragged anchor and was sitting close to shore. The tide was out. We left and played with Bleu at Notter’s Pond.

23 February 2024 | St. Marys, GA
D4 Inside Seams
Day two of the dinghy build started out with me finishing wiring the hull bottoms together on the centerline of the bottom panels. This was much easier than the wiring of the chine edges of the bottom panels and the side panels.
Bracketology
.
In the mean time I continued details on the rudders, refinishing where I had to relieve fairing on the front of the rudder blades and on the sternpost. The port lower pintle was cut off so that it couldn’t catch crabpot lines, I used the portable bandsaw which cut through the 1“ solid stainless rod like butter.
.
The Brits next door were ordering epoxy from the same vendor I use, so we put together a large order.
.
I planned on using the Mustang automatic inflating PFD on the delivery trip, so I ordered the rearming kit. First I looked at Defender Marine and West Marine. I could pick up the kit at West for about $38, and from Defender it would be less, about $25, but with hazardous shipping it came out about the same as West. Feeling smart I ordered a couple of out of date recharge kits on eBay for only $10, then found out they were for a different PFD model. The CO2 cartridges were a little smaller. I found the correct sized cartridges on eBay for 5 for about $25. I would need more of the bobbins to go with the cartridges, so found them at the manufacturer, a 3 pack for $24, free shipping. The bottom line is I would have 5 recharge kits for a total cost of about $60, about a third of the retail cost at the marine store.
.
The mechanism that inflates the PFD has peculiar interlocking parts that try to prevent use of readily available parts to rearm. The CO2 cartridge in the proprietary kit comes with a plastic screw on tip that also has a ring that gets displaced when the PFD automatically inflates. The only function of the ring is to keep open a little plastic door that allows sea water to enter a chamber where the bobbin sits, keeping a spring loaded plunger from activating the inflation lever. If the lever is pulled manually the PFD inflates. If the PFD is immersed, the bobbin has a proprietary “pill” that dissolves and allows the plunger to push the manual lever. The lever punctures the CO2 cartridge and the PFD inflates. The mechanism is made by Halkey-Roberts. There are several different model inflators, both manual and manual/automatic. The company also makes valves and spigots for inflatable boats.
.
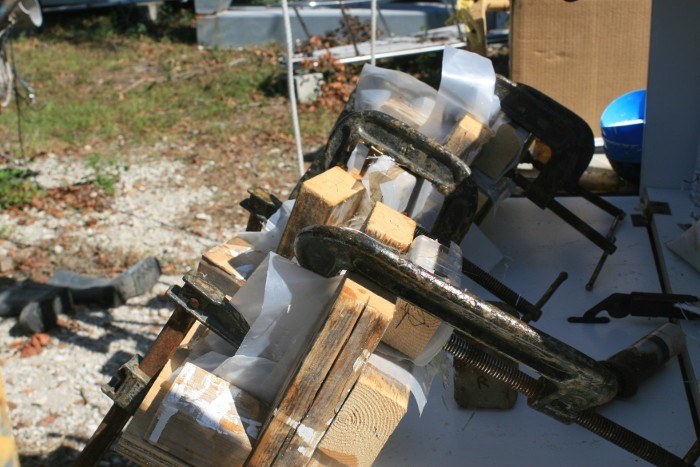
Making rudder gudgeons out of fiberglass roving and epoxy proved to be very strong and easy to fabricate. I was looking for mounting posts for the new solar panels and realized I could make the 16 mounts out of epoxy/glass to my own design. The panels on Kaimu have to be raised higher than the standard mounts so that the hatches underneath can slide with clearance.
.
I designed a mold that would cast epoxy/glass into a Z shape with a lip on the upper edge. Each panel will sit on four of these mounting posts. The mold was constructed out of pieces of 2X3 lumber and a small plywood pad. I decided to make 4 molds so that the 16 mounting posts could be made in a reasonable amount of time. I could make 4 at a time twice a day.
.
Each mold takes 3 pieces of glass to make one layer of the bracket. I added up the 16 brackets and the area of the 3 pieces of glass and divided the result into the total area of the fiberglass roving available. This roving is biaxial 17 oz +45/-45. It has a very flat surface and conforms to the molds angles very well, so I will use it as cloth, not as fiberglass rovings. The calculation came out to 4 layers of glass for each piece of glass, thus 12 pieces of glass in each bracket, 16 brackets, so 192 pieces of glass to cut out of the 3 yards of roving. This is tedious work, but only took a few hours. The pieces of glass were piled in 3 groups, all 2 1/2 “ wide, one 2“ long, one 9, and one 8.
.
I was apprehensive about casting the brackets and began in spite of my fears of epoxy going off before a single bracket was cast, or some other problem preventing putting all those layers of glass in the mold, or inability to clamp the mold, who knows, it ended up going together OK, hope the molds can be separated and not glued up solid.
.
The photo is of the molds and clamps waiting for the epoxy to set up. You can see the plastic sheet used to create mold release.
