Kaimusailing
s/v Kaimu Wharram Catamaran
| Vessel Name: | Kaimu |
| Vessel Make/Model: | Wharram Custom |
| Hailing Port: | Norwalk, CT |
| Crew: | Andy and the Kaimu Crew |
| About: | Sailors in the Baltimore, Annapolis, DC area. |
17 April 2024 | St Marys, GA
Dinghy Skeg
I was suffering with what seemed like a cold and also had allergy symptoms. I awoke and felt fine. The green pollen that was coating everything was gone. Maybe it will return.
07 April 2024 | St. Marys, GA
Clammy Hands
Items came in from TEMU, the Chinese cut rate retailer. One was a nice little drone that cost about twelve and a half dollars. It looked like an easy thing to play with while I coughed and sneezed. I was fighting a summer cold, even though it is not summer elsewhere, it seems like it here. A nice [...]
02 April 2024 | St. Marys, GA
Sun Doggie
After laminating the cedar strips onto the gunwales of the dinghy I found the screws I used wouldn’t come out. The epoxy had seized them. The screw heads were stripped so I cut a straight slot in the heads with the cut off wheel. The cedar smoked when the screw heads got red hot. I could remove [...]
21 March 2024 | St. Marys, GA
Just Add Water
The rainy weekend started off with overcast and fog but no rain. It looked like I might be able to get something done on the D4 dinghy. I wanted to change the bow seat which is really the bow deck. The sailing option uses the deck to hold the freestanding mast. I didn’t like how the deck looked, [...]
01 March 2024 | St. Marys, GA
D4 Dinghy Alternative Seats
The rain event was more wind than rain, strong winds with gusts up to 44 mph. We drove into town to see what the harbor was like. There was a small sailboat that had dragged anchor and was sitting close to shore. The tide was out. We left and played with Bleu at Notter’s Pond.
23 February 2024 | St. Marys, GA
D4 Inside Seams
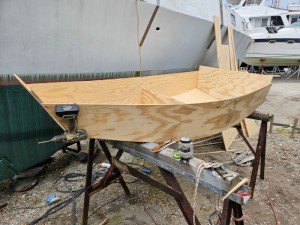
Day two of the dinghy build started out with me finishing wiring the hull bottoms together on the centerline of the bottom panels. This was much easier than the wiring of the chine edges of the bottom panels and the side panels.
More BFB Work

.
Both sides of the main hull are identical mirror images, but they do not bend quite the same, so the clamped up dry fitted hull looked fair, but careful measurements showed some slight twist and off center due to one hull side being a little stiffer than the other. This was adjusted by screwing sheet rock screws into the chine and gunwale stringers and attaching a loop of line that was wound up, a spanish windlass again, to bring the hull sides into proper shape. You can think of the distortion as the effect of the stiffer hull side pushing the bulkheads against the other hull side, bowing it out slightly more. This causes the bulkheads to not sit square on the chine stringers or line up even with the gunwales.
.
With the main hull clamped into position, the butt straps and bulkheads were glued into the hull with “glue strong”. The hull side at one bulkhead edge was not touching it, so I leaned a 2X4 against it and it made contact. The stringers at the bows had a sheet rock screw through them to keep the bow in alignment. After the glue set up, the bows were released from the screws, but still held together with clamps. They were allowed about 2 inches apart and the seam between the bow edges and stringers was buttered with a thick mixture of “glue strong”. Then the bows were screwed back together again along with some clamps to join the entire edge of the bow.
.
The inside corners of the bulkhead/hullside junction was filleted with a mixture of 50/50 microballons/glue strong and shaped with a tongue depressor that had a 3/4“ diameter round end.
Leftover epoxy mixture was used to fill the 250 odd screw holes along the chine stringers.
.
The ama received another coat of epoxy on one inside hull side and one outside hull side, keeping the hull canted so the surfaces were almost level. The ama deck ply pieces were given another coat of epoxy on what will be the underside of the deck. The ama now has 2 coats of epoxy on it and the underside of the deck has 3.
.
The bottom pieces were cut out of scrap 5mm ply. The outer edges of the ply used for the hull sides were wide enough to provide almost all of the bottom. The bottom is only 15 inches wide amidships. The bottom pieces were glued down on the upside down hull with various heavy objects forcing the pieces into the curvature of the bottom.
.
A rainy day ensued and everything was covered up with tarps. A trip to the local home improvement store got us a 4X8 sheet of 2“ thick styrofoam, 2 ten foot pine 1X4‘s, and 4 eight foot poplar 1X4‘s. The rain meant putting all that into a Miata with the top up. The foam was cut into pieces. It will be used for making the side decks and a hiking seat. The decks are 10 feet long, so 5 feet was cut off the foam 4X8 sheet leaving a 3 foot wide piece that was cut in half to make two 18 inch by 4 foot pieces. These will be joined end to end to make an eight foot long bench seat that is 18 inches wide. The remaining 5 foot piece of foam was split down the middle to make two 2 feet by 5 feet pieces. These provide the necessary stock for 10 foot long side decks. Because one deck is inboard and only about 6 inches wide, the curved edge that fits the gunwale leaves the remaining pieces with the same curve that will fit outboard of the opposite gunwale. It still made a very cramped driving position in the little two seater. I left the convertible top’s rear window open so that the longer pieces of wood had room to stick out. I couldn’t see any rear view mirrors except the one outside the driver’s window.
.
The next dry day brought out the multitool with halfmoon blade and the bottom pieces of the main hull were trimmed off. The resultant edge was sanded fair and then rounded off with the trim router and a rounding off bit. The bows were rounded using an orbital sander. 7 oz. fiberglass was laid over the hull at a 45 degree angle which enables it to conform to a tighter radius at the chines. The glass was trimmed to match the waterline which had been scribed on the hull with a sharpie. Then the fiberglass pieces were rolled up. They had been marked with identifying marks as well as the hull, so that they could be rolled out into position exactly where they had been marked and cut.
.
The wood and foam from the home improvement store was taken to the woodshop where I decided to rip the foam into 2“ wide strips. The foam was 2“ thick, so the strips were square in cross section. I was working on the hiking seat and did some reading on the internet about building surfboards, adding stringers to foam to add stiffness. I ripped 2“ wide strips from the 1/8“ doorskin ply I had on hand. I would lay up the hiking seat with alternate layers of foam and ply. The outer edges would be 2“ wide poplar ripped from the 1X4‘s and the leftover wood, which was 1 1/4“ wide, would be used for hardwood blocks to strengthen the crossbeam mounting points at the gunwales of both hulls. The way the hiking seat laid up, it had no wood crossing it at the ends, it was just long pieces of wood and foam. The ends would be rounded and when we fiberglassed the seat, the fiberglass would wrap around the ends. The side pieces of poplar hardwood would provide strength for any mounting bolts and also help stiffen the seat.
.
The remaining two 1X4‘s of poplar were split down the middle, edgewise, on the woodshop table saw. This resulted in 4 thin planks, eight feet long, 3 1/2 inches wide, but only about 5/16 “ thick. A cedar 2X4 was also ripped down the middle, edgewise, producing two, well, two 1X4‘s, which are normally 3/4“ thick. I could have bought 1X4‘s and saved the ripping on the saw, but I goofed. These pieces of wood would be laminated into two blanks for the outriggers crossbeams. They would have a sandwich of light colored poplar around a core of cedar. The poplar provides strong hardwood where the stresses of the beam are concentrated, and the cedar, which glues well, provides a lightweight web in the beam. Maybe it will look nice when it is sanded and varnished.
.
I meant to glue the crossbeam laminations on a table with plastic to keep them from gluing to the table, and blocks of wood screwed to the table, to align the curvature of the beams to match the positions of the main hull gunwales and the ama’s gunwales. The design is to have the ama’s keel just touch the water at rest. I measured the distance of the ama’s keel to the gunwales and also the main hulls waterline to its gunwales, subtracted, and the difference was about 11 inches. I ended up gluing the laminations with no blocks on the table. I clamped what will be the ama ends of the crossbeams together with no clearance, then put a 21“ piece of wood that I found laying around, between the two crossbeams about 3 feet from the main hull ends of the crossbeams, and then put the spanish windlass to use bringing those ends to 22 inches apart. I was afraid to release this contraption until the glue had completely hardened, which took 2 days.
.
Meanwhile, all those foam and wood pieces for the hiking seat were glued up. It took 900 ml of epoxy. That’s a lot. Each surface had to get primed with raw epoxy, then each glue line had to get a layer of thickened epoxy. In the end I just used two bar clamps to hold it together. I wasn’t concerned about strength with respect to styrofoam. No matter how well I glued the wood to it, the styrofoam itself was the weak link. It was just there to keep the wood pieces in line. After the seat is glassed in two layers of fiberglass, the fiberglass surface and the wood layers between the foam pieces would be the only things providing strength. In engineering terms, the fiberglass outer layer provides the top and bottom tension strength of the beam and the vertical wood, even though it is only 1/8“ thick, provides compression strength, aided by the foam which will help keep the 1/8“ thick wood in column. Otherwise the sailor who is hiking out will find his seat giving way and that would be bad.
.
The image is of the crossbeam blanks clamped on a laminating table. You can see the little stick in the middle holding the laminations apart and the spanish windlass at the bottom wound up, holding the butt ends at 22 inches apart.
.
