Kaimusailing
s/v Kaimu Wharram Catamaran
| Vessel Name: | Kaimu |
| Vessel Make/Model: | Wharram Custom |
| Hailing Port: | Norwalk, CT |
| Crew: | Andy and the Kaimu Crew |
| About: | Sailors in the Baltimore, Annapolis, DC area. |

23 April 2024 | St Marys, GA
D4 Launchie
The laptop pooped the bed, so I have to scurry around with alternatives. Not as bad as typing on the phone.

17 April 2024 | St Marys, GA
Dinghy Skeg
I was suffering with what seemed like a cold and also had allergy symptoms. I awoke and felt fine. The green pollen that was coating everything was gone. Maybe it will return.

07 April 2024 | St. Marys, GA
Clammy Hands
Items came in from TEMU, the Chinese cut rate retailer. One was a nice little drone that cost about twelve and a half dollars. It looked like an easy thing to play with while I coughed and sneezed. I was fighting a summer cold, even though it is not summer elsewhere, it seems like it here. A nice [...]

02 April 2024 | St. Marys, GA
Sun Doggie
After laminating the cedar strips onto the gunwales of the dinghy I found the screws I used wouldn’t come out. The epoxy had seized them. The screw heads were stripped so I cut a straight slot in the heads with the cut off wheel. The cedar smoked when the screw heads got red hot. I could remove [...]

21 March 2024 | St. Marys, GA
Just Add Water
The rainy weekend started off with overcast and fog but no rain. It looked like I might be able to get something done on the D4 dinghy. I wanted to change the bow seat which is really the bow deck. The sailing option uses the deck to hold the freestanding mast. I didn’t like how the deck looked, [...]

01 March 2024 | St. Marys, GA
D4 Dinghy Alternative Seats
The rain event was more wind than rain, strong winds with gusts up to 44 mph. We drove into town to see what the harbor was like. There was a small sailboat that had dragged anchor and was sitting close to shore. The tide was out. We left and played with Bleu at Notter’s Pond.
Side Deck Trouble
.
I continued with the styrofoam and 1/8“ plywood stringer method to construct the side decks. One deck is inboard of the lee gunwale and is about 6“ wide at midships. The other side deck is about 1 1/2 feet wide and is outboard of the windward gunwale. Both side decks help stiffen the hull sides. The lee side deck has a coaming along its inboard edge to help keep any water from running right over the deck into the hull. The windward outboard side deck has a similar piece of wood at its outboard edge, but instead of protruding up like a coaming, it is flush with the upper surface of the side deck. On this side of the boat you will be sitting on the side deck and maybe climbing further out to sit on the hiking seat. A coaming would be uncomfortably in the way. Supporting the outer edge of the seat is important, so the wooden edge is there, it just doesn’t protrude above the seat. It will be clamped to the crossbeams at its ends.
.
The curved edges of the side decks were trimmed and shaped to closely fit against the gunwales. I made a mistake in the design by not taking into account the sheer rocker. I laminated the side decks on a flat table and they didn’t match the vertical curve of the gunwales, even though it is only about 2 inches or so. I found that the outboard side deck could be jammed into position by putting a horizontal post across the gunwales and all the way out amidships past the outboard edge of the side deck. This would keep the middle of the side deck even with the gunwale amidships. Then the ends of the side deck were forced up to meet the gunwales fore and aft at the bulkheads. The styrofoam inner part of the side deck would bend up to meet the gunwales, plus the whole inside edge of the side deck matched up with the gunwale all along its length. This actually made a nice shape, the side deck has a gradual twist from amidships going out to its ends. It looks like the twist will give a downward slope to the ends of the side deck and it might even match the downward curve of the crossbeams.
.
I found the styrofoam would end up with a very rough surface unless some care was taken with how it was cut. The best tool turned out to be the multifunction tool which made perfectly smooth cuts. A smooth surface is better because it requires less epoxy to prime it and bond it. If it develops a rough surface, such as when you listen to the store clerk who says “Just score it with a sheet rock knife and it will break in a straight line at the edge”, then you have to smooth it out and the tool for that is the belt sander. I used the belt sander to smooth the laminated blanks for both the hiking seat and the side decks. There were still divots in the surface, but when I epoxied, I primed with a thin coating of unthickened epoxy, then followed with a 50/50 mix of microballoons and “glue hard” or “glue strong”, a mixture of colloidal silica and milled glass fibers. This thickened mix was like mayonnaise and was brushed on in a thick layer, then squeegeed with a painters trowel, about 10 inches wide. This left a smooth surface with no divots. Then the fiberglass which had previously been measured, marked, and cut, was laid out on the surface and unthickened epoxy was brushed on. The painter’s trowel helped spread the epoxy and wet out the fiberglass, plus the smooth surface was retained. One surface of the hiking seat and two wide strips of the upper surface of the outboard side deck were glassed this way with two layers of 7oz cloth. I was now down to about 3 cups of epoxy.
.
While waiting for my epoxy order to come in, I continued with the other side deck. I didn’t have enough epoxy to glass it, but I could work on fitting it. The problem with the inboard side deck was even worse than the outboard one. The outboard side deck was wide enough to take quite a bit of twisting to make it match the gunwale curve, the sheer rocker. The inboard deck was only 6 inches wide at its widest, so how was I going to twist it into position? As I trimmed it and clamped it, I found I could make the central 3 feet or so of the deck match the gunwale there, but the ends would then be sunk down below the level of the bulkheads and the gunwale there. It looked like I would have to first bond the middle 3 feet of the side deck, and after it cured, warp the rest of it into position. This would add a lot of twist, but I was able to simulate it with clamps and slats of wood to hold it into position. This side deck has no 1/8“ plywood stringers to stiffen it, so it can bend more than the outboard side deck that needs the stiffness for crew to sit on it.
.
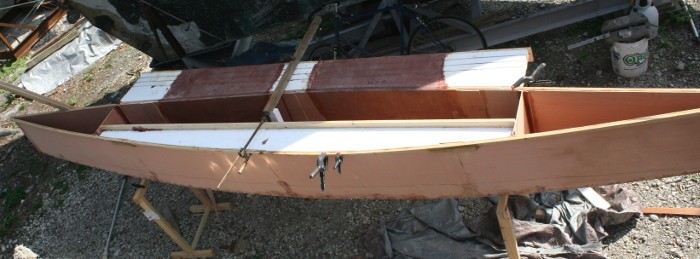
The photo is of the BFB hull on saw horses with the outboard side deck partially glassed to the gunwale, that’s the top side deck. The other side deck is the long white strip with the wooden edge. You can see the top edge of the wooden edge (coaming) is down almost even with the tops of the bulkheads. When finished it should be above the bulkheads and the white styrofoam should be even with the top edge of the bulkheads. In this picture the edge at the gunwale is even with the gunwale for about 3 feet amidships. This edge will be glassed and after it sets up, the coaming will be raised into position . Then afterwards I plan to add a coaming piece from the end of the side deck coaming all the way across the boat to the outer edge of the outboard side deck.
