Kaimusailing
s/v Kaimu Wharram Catamaran
| Vessel Name: | Kaimu |
| Vessel Make/Model: | Wharram Custom |
| Hailing Port: | Norwalk, CT |
| Crew: | Andy and the Kaimu Crew |
| About: | Sailors in the Baltimore, Annapolis, DC area. |

23 April 2024 | St Marys, GA
D4 Launchie
The laptop pooped the bed, so I have to scurry around with alternatives. Not as bad as typing on the phone.

17 April 2024 | St Marys, GA
Dinghy Skeg
I was suffering with what seemed like a cold and also had allergy symptoms. I awoke and felt fine. The green pollen that was coating everything was gone. Maybe it will return.

07 April 2024 | St. Marys, GA
Clammy Hands
Items came in from TEMU, the Chinese cut rate retailer. One was a nice little drone that cost about twelve and a half dollars. It looked like an easy thing to play with while I coughed and sneezed. I was fighting a summer cold, even though it is not summer elsewhere, it seems like it here. A nice [...]

02 April 2024 | St. Marys, GA
Sun Doggie
After laminating the cedar strips onto the gunwales of the dinghy I found the screws I used wouldn’t come out. The epoxy had seized them. The screw heads were stripped so I cut a straight slot in the heads with the cut off wheel. The cedar smoked when the screw heads got red hot. I could remove [...]

21 March 2024 | St. Marys, GA
Just Add Water
The rainy weekend started off with overcast and fog but no rain. It looked like I might be able to get something done on the D4 dinghy. I wanted to change the bow seat which is really the bow deck. The sailing option uses the deck to hold the freestanding mast. I didn’t like how the deck looked, [...]

01 March 2024 | St. Marys, GA
D4 Dinghy Alternative Seats
The rain event was more wind than rain, strong winds with gusts up to 44 mph. We drove into town to see what the harbor was like. There was a small sailboat that had dragged anchor and was sitting close to shore. The tide was out. We left and played with Bleu at Notter’s Pond.
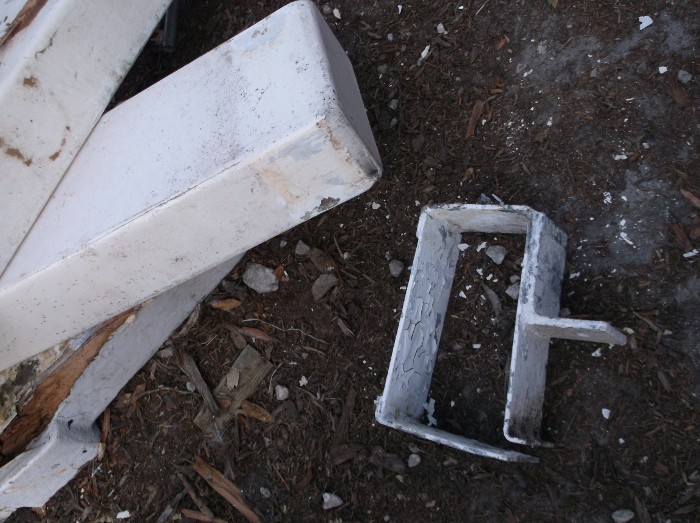
Beam B Gone
.
Another check of Capn Webb’s progress shows him making a steady 5-6 knots toward Brisbane from New Zealand. He is now just past halfway.
.
I wanted to use garlic and Parmesan in my Super Egg Toastie breakfast concoction, but there didn’t seem to be any way of adding garlic to the pan without burning it. It’s easy to add it in the beginning, but it will be burned before the thing is finished. Not so easy to add it to the pan later when the pieces of bread are frying in the pan. The solution is to slice the garlic and quickly fry it for about 30 seconds or so, then slide them out of the pan onto a small dish. Next the first piece of bread goes into the pan and the first egg into the bread. The usual way is to cut a hole in the bread, but I’ve been cutting the slice of bread into 4 pieces and dropping the egg into the middle of the pieces. After flipping the first piece and frying a bit, slide it out of the pan onto the plate of fried garlic. Then start the second bread and egg thing, after flipping, sprinkle with shredded Parmesan and slide the first bread and egg thing, and all the garlic, on top of the Parmesan and cover the pan until the bottom finishes cooking. The Parmesan will be melty, the garlic will be unburned. I wanted to take a picture of it, but had to taste it, and then it was gone quickly.
.
The next day I was starting to attack #3 beam. It had gone rotten in a few places which was a continuation of deterioration from a few years ago when the beam was repaired in place by grinding out punky wood and filling the beam with an epoxy/glass mill ends mixture. This repair was successful, but any piece of wood that gets rot in it has little fungus fibers even in the parts of it that seem solid. Any time a piece of wood has rot, the entire piece should be replaced. Borate solutions will stop fungus, but the solutions can’t get everywhere. A piece of wood can have fungus in it, but if it is kept dry, the fungus can’t grow. In Beam #3 bolt holes or cracks must have had places that didn’t get sealed with epoxy. Also, any trapped water can break down the epoxy surface by freezing and thawing. There is a thread now on the Wharram Builders and Friends site about beam rot. It happens a lot. If beams are carefully made with no unsealed surfaces anywhere and kept from things like dropped tools or other damage to the epoxy skin, then they will last for a long time.
.
The #3 beam was repaired in place because it can not be removed without taking the two hulls completely apart. This is not Wharram’s design fault, it is a modification to the hull layout by the first builder and we who followed, followed suit. Beam #3 sits in a beam trough that crosses into the starboard hull at the junction of the pilothouse and the dinette. In the port hull it sits in a trough that is between the chartroom and the central main bunk. Even if an aperture were cut in the side of the pilothouse to allow the beam to be slid across both hulls, the beam brackets are also modified and can’t be wrapped around the beam after the beam is in place and can’t be attached to the beam and slid in with the beam because the brackets have to be placed over large vertical bolts and the tabs on the brackets sit near the bottom of the bolts. So, if the beam were dropped into place from above, as Wharram designs it, it could be replaced easily, but these design modifications make that impossible without ripping off parts of the cabin top and pilothouse windows.
.
Our current replacement of beam #3 will be done by laminating planks in place with scarf joints and layering the beam up to its 5X10 inch dimension. This beam is much larger than the original Narai MK IV from which this boat was modified. That boat uses 4X8 dimension of the beam.
.
I began by looking at the ends of the beam inside the hulls, opening the beam troughs in the pilothouse and the main bunk. Then I began to cut the beam in two places, where it leaves each hull. I would end up with three sections of beam, one section in each hull and the remaining section that spans between the hulls. The whole beam is about 20 feet long. The end at the pilothouse was the worst section of the beam and it crumbled apart with a pry bar. The end at the main bunk was in good shape and it was difficult to cut it because of its location with decking adjacent to it right up to the hull and cabin sides. I asked to borrow a chainsaw from the boatyard but they said no, they would cut the beam for me. While I was waiting for them to respond I chopped away at it and decided to see if the Japanese pull saw from Harbor Freight could cut it. It would just fit in the space between the decking and the hull/cabin side. I cut twice, side by side, and chiseled out the in between, then cut again. Soon it was cut through, faster than I expected. I bicycled out and told the yard manager I wouldn’t need the chainsaw cut.
.
I broke apart any punky wood and tried to get as much of the beam out of there as I could. I also had to remove bolts that held the cross deck framing in place. The front of the engine sled also attaches to this beam, so those bolts had to come out.
.
The bolts had been in there 15 years and did not come out willingly. I worked like a dog and one bolt refused to come out. The problem is that the bolts would unthread from the aluminum channeling that made up the cross deck framing, but in the rotten beam the threads couldn’t grab on anything, so the bolts just turned and turned and didn’t move out. I had to pry on the boltheads from below while ratcheting away at them to get them to come out. This was extremely tiring. The one bolt that refused even that technique left me so exhausted that I took a lunch break and maybe I would put the project off for another day. I felt like someone had nailed my arms to my shoulders.
.
While on the lunch break I spoke with the woodworker who said maybe the beam was jammed by the various props I was using to hold things up while removing the beam, which is what normally holds things up. That gave me the idea to cut off the bolt, as far as it had been withdrawn, and hammer it back into the beam. The remainder of the bolt would then be all in the wood of the beam and I could remove the beam with the remainder in it. My plan was to use individual bolts to attach the crossdeck framing to the new beam, not through bolt it, so I could waste the existing bolt.
.
It worked very well and in 5 minutes the bolt was out of the way. I was very happy now and resumed beam removal. I wasn’t so sore now, having gotten past this logjam. The rest of the job, for the day, was prying at the beam, breaking off pieces, chiseling it away from the cross deck framing where it was solidly glued on with a mixture of epoxy and fiberglass mill ends. Very strong stuff and very heavy too. I worked like a hockey team works, go like mad for a while, then sit on the bench for a while. After the beam was removed, I proudly showed anyone who came around the empty space. Of course there still remained the two ends of the beam in the hulls.
.
The ends in the hulls were the parts of the beam that were bolted to the actual hulls. Each end has two brackets that encircle the beam. The brackets are clamped by three bolts like a giant “C”. A welded on tab has a giant bolt from the hull passing through it with some large rubber pads that cushion the beam and allow some movement of the hull. The arrangement on Kaimu is not standard Wharram beam attachment. His brackets are usually, in the classic designs, lag bolted into the beam, where Kaimu’s are clamped around the beam. The clamping bolts in this modified scheme were originally soft galvanized 5/16 bolts which were not very strong. I replaced them with 5/16 aircraft bolts that were the strongest I could get. Now I was trying to unbolt them and having a big problem. They are “corrosion resistant”, ha ha. Nothing would remove these bolts. Plus, they would probably not break if hit with a chisel, etc.
.
It ended up that I only had to remove the two huge nuts on the vertical bolts in each beam trough, the bolts that held the tabs on the beam brackets. Then I could raise the beam end along with its brackets above the tops of the bolts, move it a bit so that the tabs could be lowered and the beam slid out into the space between the hulls. It is not as simple as it sounds, but in the end, the beams were finally totally out of the hulls.
.
Then the job was to sweep out the debris, scrape the beam trough paint, which was peeling, sand the surfaces and paint with some leftover porch paint.
.
The picture is of one of the beam brackets and some of the pieces of the beam. You can see how the bracket is a rectangle that fits around the beam with some clamping bolts to draw it closed, and the tab that juts off to one side, that anchors the beam to the hull.
