Kaimusailing
s/v Kaimu Wharram Catamaran
| Vessel Name: | Kaimu |
| Vessel Make/Model: | Wharram Custom |
| Hailing Port: | Norwalk, CT |
| Crew: | Andy and the Kaimu Crew |
| About: | Sailors in the Baltimore, Annapolis, DC area. |

17 April 2024 | St Marys, GA
Dinghy Skeg
I was suffering with what seemed like a cold and also had allergy symptoms. I awoke and felt fine. The green pollen that was coating everything was gone. Maybe it will return.

07 April 2024 | St. Marys, GA
Clammy Hands
Items came in from TEMU, the Chinese cut rate retailer. One was a nice little drone that cost about twelve and a half dollars. It looked like an easy thing to play with while I coughed and sneezed. I was fighting a summer cold, even though it is not summer elsewhere, it seems like it here. A nice [...]

02 April 2024 | St. Marys, GA
Sun Doggie
After laminating the cedar strips onto the gunwales of the dinghy I found the screws I used wouldn’t come out. The epoxy had seized them. The screw heads were stripped so I cut a straight slot in the heads with the cut off wheel. The cedar smoked when the screw heads got red hot. I could remove [...]

21 March 2024 | St. Marys, GA
Just Add Water
The rainy weekend started off with overcast and fog but no rain. It looked like I might be able to get something done on the D4 dinghy. I wanted to change the bow seat which is really the bow deck. The sailing option uses the deck to hold the freestanding mast. I didn’t like how the deck looked, [...]

01 March 2024 | St. Marys, GA
D4 Dinghy Alternative Seats
The rain event was more wind than rain, strong winds with gusts up to 44 mph. We drove into town to see what the harbor was like. There was a small sailboat that had dragged anchor and was sitting close to shore. The tide was out. We left and played with Bleu at Notter’s Pond.

23 February 2024 | St. Marys, GA
D4 Inside Seams
Day two of the dinghy build started out with me finishing wiring the hull bottoms together on the centerline of the bottom panels. This was much easier than the wiring of the chine edges of the bottom panels and the side panels.
Pounding the Pin
.
The tiller arms were dry fitted on top of the rudders and bolt holes were drilled 5/16“ through and through. The positions were marked and arms removed. The holes were redrilled to 3/8“. Now the arms were refitted and clamped in place matching the marks. The 5/16 bolts were inserted part way through the arms and rudder heads and a batch of “glue strong” was mixed up, put in a Walmart marinade syringe and injected into the bolt holes, filling the gap between the bolts and the oversized holes. The marinade syringe cost 88 cents and needed to have its spigot drilled a bit larger to allow the mixture to flow easily. A short piece of PVC tubing was used on the spigot.
.
After jamming the bolts all the way through, they were tightened up and excess epoxy mix was wiped away with paper towels.
.
Another odd job was to fill the ends of the tiller cross tube. Originally it was a completely closed tube with ends welded shut and compression tubes welded through the ends where the bolts that attached it to the tiller arms were located. After the collision with the jetty it ended up with one end open and both compression tubes missing. The repair could be rewelding with aluminum tubes and plate to close it back up, or simply fill the ends with high strength epoxy mix and redrill the bolt holes.
.
A tip from Russ Brown about applying finish to bare aluminum is to wet sand the aluminum with epoxy. The epoxy prevents oxidation of the surface and acts as an excellent primer for paint.
.
The tiller crossbar was positioned with clamps while the rudders were also clamped into rudder amidships position, then the bolt holes in the ends of the crossbar were drilled. To finish the job, the hydraulic ram’s forked end needed to be bent back into shape on the 55 ton press, then the ram could be connected to the starboard tiller arm. The ram didn’t respond to the wheel, it took about a half quart of dextron III power steering fluid to top it up. We now have steering.
.
The beam tops or pyramids, or what Wharram calls wedges, were prefinished with 50/50 phenolic microballoons/colloidal silica epoxy mixture. This thickened epoxy has the consistency of chocolate cake frosting and I put it on with a cheap chip brush, thick enough that it was opaque and the lighter color of the wood didn’t show through.
.
Where the beam brackets encircled the beam, on top, was a gap of less than 1/4 inch. It varied on each of the eight beam brackets. The gap was filled by injecting epoxy mixture from a zip-lock bag with one corner cut off, like a cake decorator. The same mix was used to fill any exposed screw holes.
.
Arctic white was painted over any exposed epoxy. This is automotive cyanoacrylic urethane enamel that is a two part paint. The mix is 8:1, base color to activator. Reducer is added, at about 1:4 ratio with the base color. The way I do it is measure the base color and reducer with two measuring cups that are 8:1. My cups are about 1/3 cup for the larger and the smaller one is one eighth of that. I mix the base color and activator a bit, then add reducer to the smaller cup, swill it around a bit, then pour it into the larger cup and swill it around there, then pour it into the mix. I do it again with another dollop of reducer and add it to the mix. The reducer acts like a solvent or thinner and washes out the measuring cups. The mix is mixed for a couple minutes, just like epoxy, then I brush it on. It is not normally a brushing paint, it is meant for spraying on cars, but it comes out like gloss enamel. Using a paint pad made from 1/4“ phenolic paint rollers comes out very smooth with no brush strokes. I may use rollers to paint the hull sides later.
.
Webb Chiles has started uploading videos of his voyage with Gannet, a Moore 24, which is evidently even smaller than Trillium, a C&C 24. These are short unedited clips of his solo voyage and very enjoyable to watch. I had wondered about how he accomplished his sheet to tiller steering and in video #3 it is all there, a picture worth a thousand words. Sailing off the wind he blankets the jib a bit, which is hauled in almost tight, and sheets it to the windward side of the tiller, with bungies off the tiller to the lee side. When the boat bears off, the jib gets less wind and the bungies pull the tiller so the boat heads up, and vice versa.
.
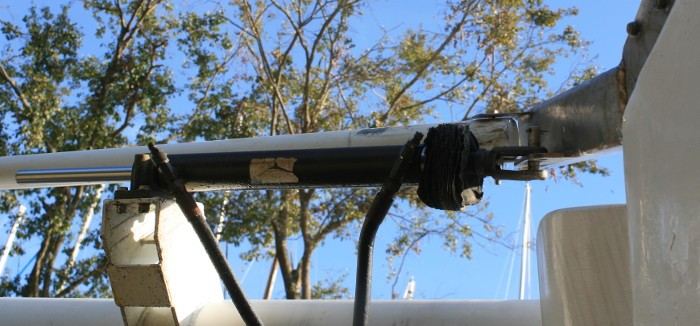
The picture is of the hydraulic steering ram and its pin about to be pounded through its jaws into the tiller arm. The tiller crosstube is the white thing that runs across the picture, it is above and forward of the ram.
