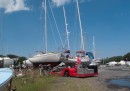
Life aboard in the NE And the work continues!
Now living aboard full time while I make repairs, refits, getting her ready for the long cruise.
09 December 2013 | Piers Marina Philadelphia
09 December 2013 | Piers Marina
25 November 2013 | Piers marina
22 November 2013 | Piers Marina Philadelphia
26 August 2013 | PIERS MARINA - PHILADELPHIA
05 August 2013 | PIERS MARINA - PHILADELPHIA
19 June 2013 | always Riverside, NJ
16 June 2013 | Riverside, NJ
15 June 2013 | Still in Riverside, Nj
29 May 2013
18 May 2013 | Corsica River
22 February 2013
18 February 2013
11 February 2013 | Same!
05 February 2013 | Riverside, NJ
14 November 2012 | Still at Riverside NJ
16 October 2012 | Horta - Azores
04 October 2012 | Riverside NJ
02 October 2012 | Riverside NJ
24 September 2012 | Riverside, NJ
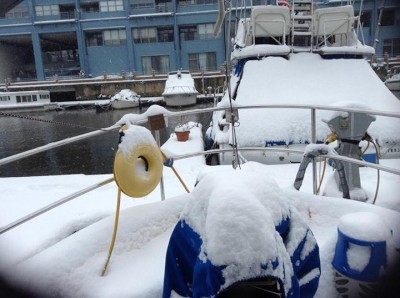
Winter is Here
09 December 2013 | Piers Marina Philadelphia
Roland
Well looks like a cold wet winter, glad I have 2 heaters, new 110 wire inside and new 30amo connectors.
They predicted an inch and we 8, shovel the dock down to where our last liveaboard lives, about 150 feet, then they found the snow blower!
They predicted an inch and we 8, shovel the dock down to where our last liveaboard lives, about 150 feet, then they found the snow blower!
Winters coming - have enough power??
09 December 2013 | Piers Marina
Roland
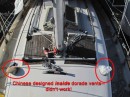
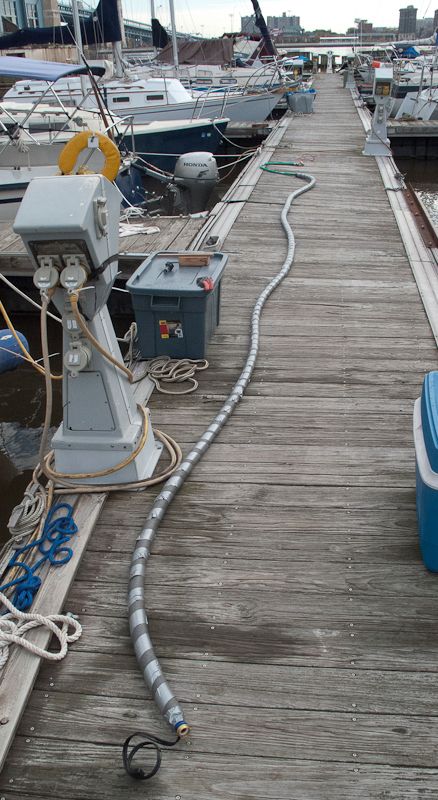
To all my fellow live boards in the cold Northeast and PNW area, PLEASE CHECK ALL your power cord connections this winter. There was a fire last winter at out marine due to the poorly maintained power cord connections.
BoatUS says that 1 cause of boat fires is AC and DC wiring/appliance - 55%
I noticed one day that my cord felt warm where it was plugged in to the boat, "thought that shouldn't be" checked the connector and this is what I found!
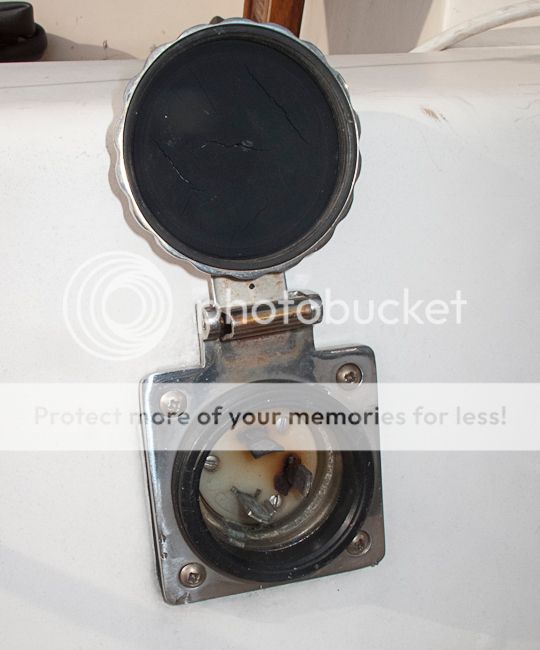
A lot of corrosion and some of the plastic plug was melted.
Here's how all my connectors looked ....
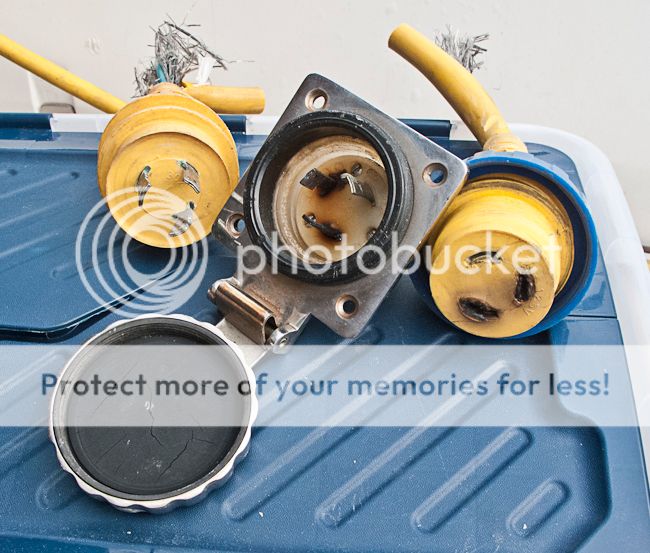
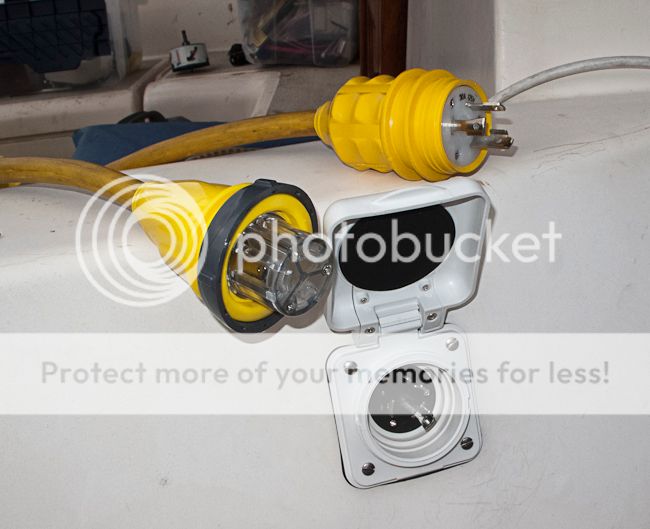
Time to replace them - nice new connectors, I really liked the new Furrion plugs - really well made.
Here's an article I copied from the Marinco site..
"What to look for...
Examine the ends of the shore power cords. Look for discoloration or melting around the blades of the plug (male end) and around the slots on the connector (female end). Examine the face of the inlet on the boat and look for discoloration or melting around the blades and the inlet. Examine the receptacle on the dock and look for discoloration or deterioration around the slots.
What causes overheating...
If a device shows signs of overheating, it is generally caused by one or two conditions: corrosion on the metal blades or contacts, or bad connections between the wiring device and the wires connected to it. Severely corroded blades or contacts are a result of exposure to a corrosive environment, most commonly salt water. If the ends of the cord set are dropped into salt water and not properly cleaned and dried, the contacts will eventually corrode. Corroded contacts do not make a good electrical connection and overheating results. Bad connections between a wiring device and the electrical wires can be a result of loose termination, corrosion on the wires or terminals, or the wires not being stripped properly so the wire insulation is under the terminals. A bad connection will result in overheating of the terminal, and this will be visible on the face of the wiring device.
What to do...
If a wiring device shows signs of overheating, it should be replaced immediately. Do not wait for the problem to get worse. When replacing wiring devices, examine the electrical wire and make sure the wire strands are clean, and are not corroded. Even a new device cannot make a good connection to corroded wire.
Many boat owners think overheating is a result of over loading the circuit, but this is rarely the case. A bad connection in an inlet will also cause the mating connector to overheat. All too frequently a boat owner will merely continue to replace his connector, not realizing the inlet is causing the problem. Both devices should be replaced in order to prevent the problem from happening again.
The same is true for the plug and the receptacle on the dock."
http://www.marinco.com/files/media/guides/AC%20Boater'sGuide.pdf
So please everyone who keeps their boat plugged in with electric heaters over the winter take a moment and check your connectors..
BoatUS says that 1 cause of boat fires is AC and DC wiring/appliance - 55%
I noticed one day that my cord felt warm where it was plugged in to the boat, "thought that shouldn't be" checked the connector and this is what I found!

A lot of corrosion and some of the plastic plug was melted.
Here's how all my connectors looked ....

Time to replace them - nice new connectors, I really liked the new Furrion plugs - really well made.

Here's an article I copied from the Marinco site..
"What to look for...
Examine the ends of the shore power cords. Look for discoloration or melting around the blades of the plug (male end) and around the slots on the connector (female end). Examine the face of the inlet on the boat and look for discoloration or melting around the blades and the inlet. Examine the receptacle on the dock and look for discoloration or deterioration around the slots.
What causes overheating...
If a device shows signs of overheating, it is generally caused by one or two conditions: corrosion on the metal blades or contacts, or bad connections between the wiring device and the wires connected to it. Severely corroded blades or contacts are a result of exposure to a corrosive environment, most commonly salt water. If the ends of the cord set are dropped into salt water and not properly cleaned and dried, the contacts will eventually corrode. Corroded contacts do not make a good electrical connection and overheating results. Bad connections between a wiring device and the electrical wires can be a result of loose termination, corrosion on the wires or terminals, or the wires not being stripped properly so the wire insulation is under the terminals. A bad connection will result in overheating of the terminal, and this will be visible on the face of the wiring device.
What to do...
If a wiring device shows signs of overheating, it should be replaced immediately. Do not wait for the problem to get worse. When replacing wiring devices, examine the electrical wire and make sure the wire strands are clean, and are not corroded. Even a new device cannot make a good connection to corroded wire.
Many boat owners think overheating is a result of over loading the circuit, but this is rarely the case. A bad connection in an inlet will also cause the mating connector to overheat. All too frequently a boat owner will merely continue to replace his connector, not realizing the inlet is causing the problem. Both devices should be replaced in order to prevent the problem from happening again.
The same is true for the plug and the receptacle on the dock."
http://www.marinco.com/files/media/guides/AC%20Boater'sGuide.pdf
So please everyone who keeps their boat plugged in with electric heaters over the winter take a moment and check your connectors..
Getting ready for Winter
25 November 2013 | Piers marina
Roland
Winter came this weekend - with a chilly blast in the teens! Got 2 heaters going, one electric oil filled radiator, working great and a large upright electric blower by the door. Both working wonderfully and the boat a nice 74.
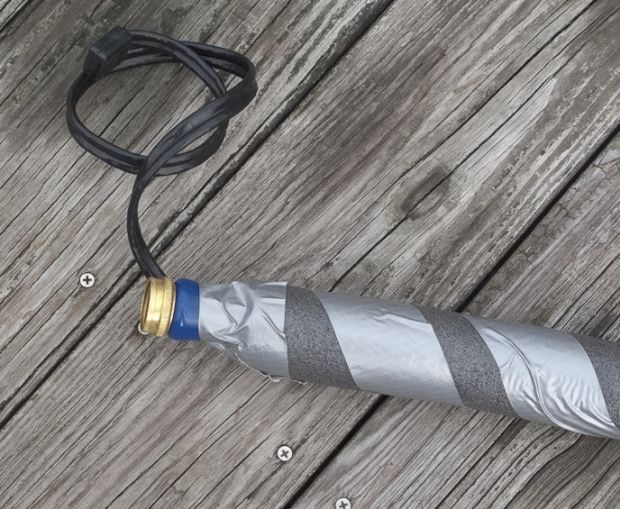
A couple of weeks ago I had to get the water supply ready for the winter which meant I had to run a heat tape along the length of the water hose and then cover it with insulation. This will allow me to have running water all winter long, especially now that I'm shower aboard my boat. Next posting- the various stages of the head rebuild.
I also brought a new Tasco propane stove/oven. The boat came with an Origo alcohol stove/oven of which I am not a fan! Slow cooking with no temp control in the oven, since I bake and cook full time.. no brainer also had the same stove on my last boat and worked great. Stove $1200.00, 2 propane tanks $240.00 miscellaneous sundries to connect the system up- $400.00, it's marine!!!
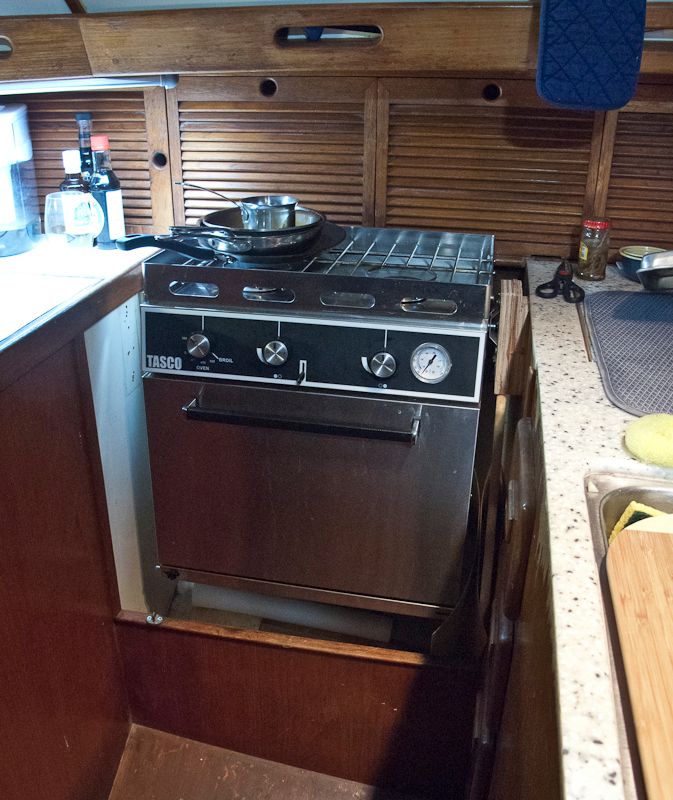
It's up temporary as I still have to formica the walls surround it. Spring project.
A couple of weeks ago I had to get the water supply ready for the winter which meant I had to run a heat tape along the length of the water hose and then cover it with insulation. This will allow me to have running water all winter long, especially now that I'm shower aboard my boat. Next posting- the various stages of the head rebuild.


I also brought a new Tasco propane stove/oven. The boat came with an Origo alcohol stove/oven of which I am not a fan! Slow cooking with no temp control in the oven, since I bake and cook full time.. no brainer also had the same stove on my last boat and worked great. Stove $1200.00, 2 propane tanks $240.00 miscellaneous sundries to connect the system up- $400.00, it's marine!!!

It's up temporary as I still have to formica the walls surround it. Spring project.
Work toils on on the head..
22 November 2013 | Piers Marina Philadelphia
Roland
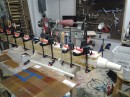
Decided to go with a composting/ drying head for when I brought my boat it had the holding tank in the aft port locker- long hose connected to the toilet that always clogged and filled up quickly.
Made mock ups of the C-head and Natures Head- both turned out to be too big for the space I had available in the head. So I decided to build my own, made the molds, but got side tracked doing other projects and getting the boat ready for the winter- as I am a full time liveaboard now.
Designed my own divertor, made a mold and finished laying it up last weekend in fiberglass. Totally have no idea if it will work smoothly, but the way I've designed my system I can always change it and make another one. It was my second attempt at mold/laying up fiberglass, not that hard!
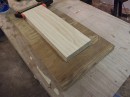
Here's the mold..
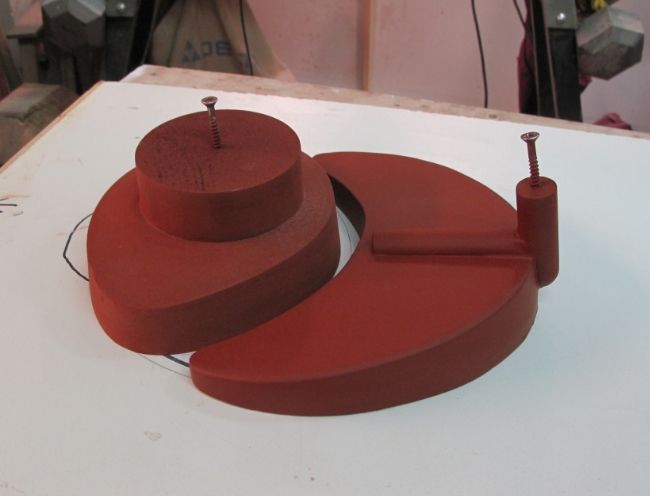
made up from different pieces of wood, glued together then multiple layers of primer, sanded and waxed.
Here's the finished divertor.
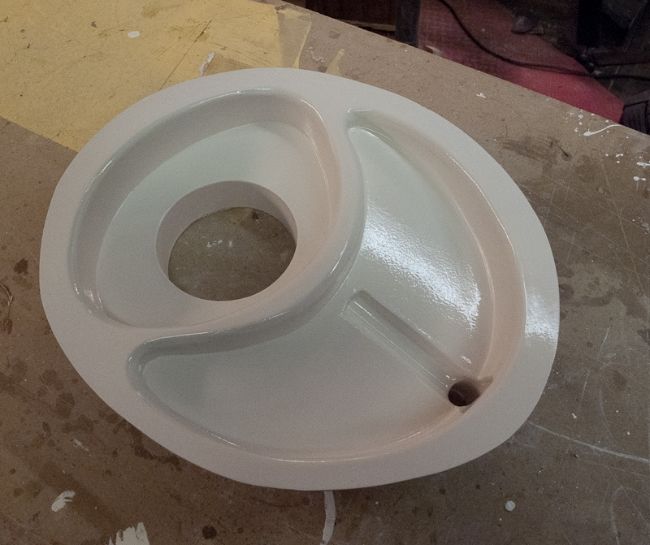
gel coated and ready for the next step.
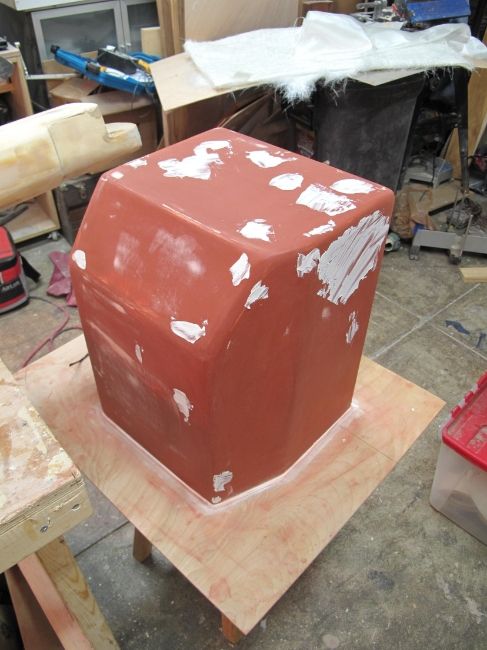
Almost done making the body of the composting head, fiing a couple of dents - hopefully will lay it up over the holidays
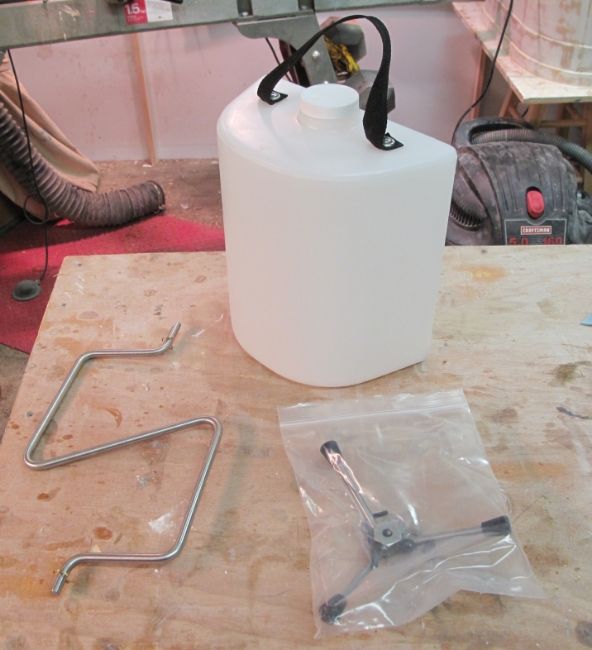
Brought the pee tank and agitator from Natures head.
Hope that by Christmas it will all be done and installed. Be happy to help anyone who's interested in doing the same projected.
thanks
Made mock ups of the C-head and Natures Head- both turned out to be too big for the space I had available in the head. So I decided to build my own, made the molds, but got side tracked doing other projects and getting the boat ready for the winter- as I am a full time liveaboard now.
Designed my own divertor, made a mold and finished laying it up last weekend in fiberglass. Totally have no idea if it will work smoothly, but the way I've designed my system I can always change it and make another one. It was my second attempt at mold/laying up fiberglass, not that hard!
Here's the mold..

made up from different pieces of wood, glued together then multiple layers of primer, sanded and waxed.
Here's the finished divertor.

gel coated and ready for the next step.
Almost done making the body of the composting head, fiing a couple of dents - hopefully will lay it up over the holidays

Brought the pee tank and agitator from Natures head.

Hope that by Christmas it will all be done and installed. Be happy to help anyone who's interested in doing the same projected.
thanks
| Vessel Name: | Kodachrome |
| Vessel Make/Model: | Nassau 34 |
| Crew: | Roland |
Kodachrome's Photos - Bowsprit


Who: Roland
Gallery