
Moonshadow
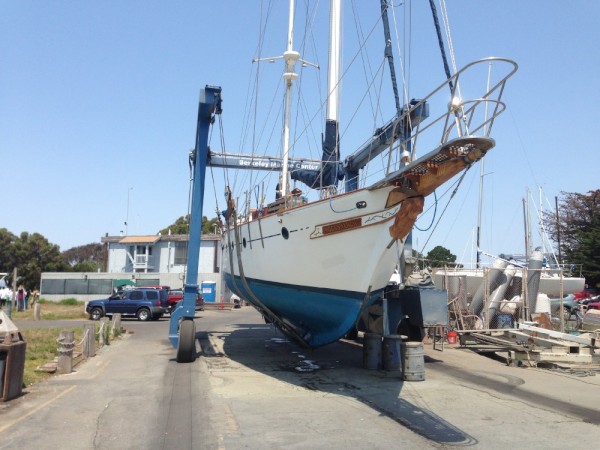
1983 Hudson Force 50 Ketch
30 December 2015
12 March 2015 | SF Bay
07 December 2014 | SF Bay
24 November 2014 | San Francisco Bay
Teak Deck
24 November 2014 | San Francisco Bay
Dale Bagnell
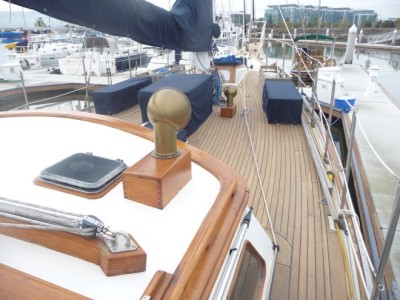
Teak Deck- The 80% Solution
If you want to start a heated discussion among sailors just bring up the subject of teak decks. Some of you may know that Wendy and I bought a Hudson 50 about 18 months ago and we are busy fixing her up to do some Blue Water sailing in a few years' time. One of the reasons that I bought MoonShadow is that she has teak decks and I personally think that there is nothing better than the feel of teak on bare feet when you're out sailing on a warm afternoon.
The trouble is that MoonShadow' s decks have seen better days. There are about 100 screw plugs missing, some of the caulking is pulling loose and a few of the deck planks are broken or cracked and truthfully there are a few soft spots in the deck that bear further investigation. On top of that the decks are gray and the planking is cupped and bears the scars of too much scrubbing and bleaching over the years. I spoke with the previous owner and he said that he sanded the deck once during the 18 years that he owned her but it quickly turned gray again so he didn't bother with it after that. I've got lots of teak to refinish in other parts of the boat so I didn't bother with it either until I was doing some work rebuilding the helm station and I decided to sand the deck under the helm as I had it all torn apart .
It looked so good that I kept going and I sanded all of the aft deck. There were a few plugs missing and a couple of bad planks but it really looked good compared to the other decks and it got me thinking about tackling the rest of the decks.
Unfortunately, after a few weeks the deck began to turn gray again and didn't have that freshly sanded look any more and that's when I started asking all my boating friends for their advice on caring for teak decks. The feedback I got was all over the place as you might expect. Some said that teak decks should never be sanded just scrubbed across the grain and kept clean, some argued that they should be scrubbed with salt water only and brined to stay a light gray color. Others said it should be bleached once a year with a commercial 2 part product and teak oil applied. One said that I should just get a shovel and tear the deck off and patch the fiberglass underneath and be done with it. The advice went on and on but I wasn't hearing a solution that I liked. I watched all of the teak care videos I could find on YouTube and it was just more of the same.
A marine carpenter that I trust told me that if I did sand the decks I could preserve them for a little while with a sealer from the hardware store similar to what you might use on a deck at the back of your house. That got me thinking so I went to my neighborhood West Marine to ask them if they had a sealer product that was suitable for the marine environment.They recommended a product called Semco. It is a sealer so it preserves that just sanded look I wanted but it does make the caulking sticky for a few days. My caulking was on its last legs anyway so I didn't have much to lose. I did a careful survey of the deck and found that I had about a half inch of thickness left in the teak so with some trepidation I started in. The first place I tried sanding was around the deck fitting for a little cabin heater that I had installed a few weeks before.
The results were so good that I was encouraged to keep going. I had an orbital sander so I bought some 80 grit sandpaper and started sanding. It was slow going at first. The caulking was about an eighth of an inch above deck and the planks had deep crevices as well. It was taking me about 1 hour to finish 1 square foot.
I was tempted to get a heavier sander from an equipment rental yard but I have sanded hardwood floors in houses before and I was worried about gouging the deck. After a couple of days of sanding I had finished the deck in front of the companion way hatch and re-sanded the aft deck. I found that I needed to sand it 5 times to get the finish I wanted- Once with the 60 grit sandpaper, once with the 80 grit and 3 times by hand with 80 grit sandpaper sanding with the grain. It was starting to look pretty good and it was time to try out the Semco. I chose the hatch cover as a starting place. The sealer went on like water and had to be worked into the wood and the excess wiped off.
The result was pretty good and after a few days of drying it really started to have that raw sanded look I wanted but things were going too slowly. I needed some help. There was a long weekend coming up so I went to my local Home Depot and bought two more orbital sanders and a large supply of sandpaper and I hired a couple of "day workers" who spoke some English. I figured I could practice my Spanish at the same time as we worked. The men had never worked on a boat before but after an hour or so they got the hang of it. It took the 3 of us a couple of days to sand the port side of the deck on the bow. At that point the oldest sander burned out it's bearings and had to be replaced. A couple of days later the sanding pad base on the other sanders began to wear out and wouldn't hold the sandpaper so I needed to use some contact spray adhesive to hold the sandpaper in place.
It was looking good and time to move on. This was dirty work. We had to change sanding disks every 10 minutes and vacuum up our mess to keep the sawdust down so my neighbors didn't complain too much. The Marina owner came by each day to ensure that we were keeping a clean workplace and nothing was going in the water. My neighbors were pretty good about all the noise and dust although one fellow who came in for the weekend was not happy about the whine of the sanders and all of the dust. We quit early for the day and didn't start up again until 10:00am the next day to give him a little peace but he soon asked the Marina owner to move him to another slip. I can't say that I blame him. I probably should have waited until I was in a boatyard somewhere to tackle a project of this scope. The rest of my neighbors were away for the Thanksgiving weekend so we pressed on. A few days later we were almost finished and we sanded out the last few square feet of deck.
We then sanded the deck 3 times by hand to get the planks as nice as possible. I did find a few boards that needed to be repaired as I went along. I didn't want to get side tracked too much but these boards couldn't be ignored so t I mixed up some epoxy and thickened it with west system 403 and some teak sawdust to patch a few of the worst cracks. Once everything was ready I put on two coats of Semco and let it dry. I finished about 6 hours before the rain started. We'd had beautiful weather for about 10 days for the project and I just managed to get everything done before a series of 4 winter storms blew through. When the rain had departed and the decks dried out I went over the deck to inspect our work. The first thing I noticed was how fast the decks dried after the rain. The second thing I noticed is that the sealer had worked its way into the wood and it now had a nice raw look to it like it was freshly sanded.
I probably should have tackled this project in a boat yard but we worked carefully and kept the work space a clean as we could. We emptied the vacuum I gallon canister at least 20 times so we captured a lot of the dust. Most of my neighbors are speaking to me again and I'm trying to keep a low profile for the next few weekends.
-It did cost more than I had planned
• Labor- $1,600
• Sanders- $100
• Sandpaper and other supplies- $200
• Semco- 4 Quarts at $50 each- $200
In total it added up to more than $2000 for a project that really wasn't on my critical path right now. But it did give me a tremendous psychological lift. I get happy every time I look at the deck now. It's a great back drop for the other work I need to do.
-But that's not the end of the story .Semco needs to be reapplied every 6-12 months. So there will be more light sanding and sealing in my future but hopefully nothing like this again for a few years.
Summary
The deck looks pretty good. Is it perfect? No, but it looks good enough that I am encouraged to tackle the other problems I have with the deck. I've already started putting in new bungs. After that I'll re-caulk it on a section by section . In some places I will need to use a router to clean out the seam so it will be slow going. Ultimately I will have to replace some wood and check out some soft spots in the deck but for now an 80% solution looks pretty good to me. In fact it is giving me the energy to keep working on it. I really like the contrast between the deck and the varnished trim. As Voltaire once said "don't let the perfect be the enemy of the good" and right now an 80% solution is good enough to keep me focused. A complete deck replacement would have cost me $30K plus and taken my entire repair budget. For 10% of that amount I can keep my project moving forward. Even my grumpy neighbor , who originally said I should scrap the deck admitted that there might be some life left in the old decks after all. So if you stop by my boat please say something nice about my deck even if you don't mean it. It makes me happy and keeps me working!
Comments
| Vessel Name: | Moonshadow |
| Vessel Make/Model: | Hudson Force 50 |
| Hailing Port: | Marina del Rey, CA |
| Crew: | Dale and Wendy |
| About: | Dale- IT Industry Veteran Wendy- Yoga Instructor |
| Extra: | Getting Moonshadow ready for an extended blue water cruise |
Moonshadow's Photos - Main
 |
Pictures from the rebuild of MoonShadow's Bowsprit
15 Photos
Created 12 March 2015
|
 |
Pictures from the 2013 Americas Cup in San Francisco
16 Photos
Created 7 December 2014
|
 |
 |
 |
Various shots of Moonshadow sailing the California coast
6 Photos
Created 7 December 2014
|
S/V Moonshadow

Who: Dale and Wendy
Port: Marina del Rey, CA
Gallery


Favorites
No Links Added Yet
SailBlogs Friends
