
Swingin' on a Star
Ship's log for the circumnavigating Saint Francis 50 catamaran, "Swingin on a Star".
01 April 2010 | Palau
13 July 2009 | Palau
05 July 2009 | Yacht Harbor
03 July 2009 | Peleliu
02 July 2009 | Palau
01 July 2009 | Two Dog Beach
30 June 2009 | Mecharchar
29 June 2009 | Mecharchar
28 June 2009 | Ulong
27 June 2009 | Ngeruktabel
17 June 2009 | Ngeruktabel
16 June 2009 | Ngeruktabel
15 June 2009 | Ngeruktabel
14 June 2009 | Ngeruktabel
13 June 2009 | Ngerutable
25 May 2009 | Yacht Harbor
30 April 2009 | Malakal
29 April 2009 | Koror
28 April 2009 | Malakal
27 April 2009 | Malakal
Rigging Finale
25 January 2008 | Port Louis
Randy
It is Friday and we have three more work days to go before we have to take off on Tuesday. While I hate to admit it, we have gotten more work done on the boat than I expected at this point, even so we were a bit behind on several fronts. The fiberglass work had taken longer than expected do to the difficulty of the work space, the extra grinding required to remove the glass laid up over the hulls gel coat and the large amount of clean up.
Johnny Sails was supposed to start on our project Wednesday but has only stopped by once to re-measure some things. This worried me because it is easy to imagine how a sail maker during regatta week could be distracted. I was still hoping he would come through though because he is a wonderful guy who uses the best materials (Sunbrella, UV safe thread, etceteras) and really understood what we wanted made.
On the bright side I met Nick of TechNick, who runs the steel fabrication shop in the Spice Island Marine complex. I asked him if he could make me a water-sports board rack on short order. I couldn't believe he said yes. Since our great experience wind surfing, Hideko and I have been trying to find a place to stash a windsurfing board. While at it I figured I'd make room for my old 8'6" surf board that Thomas is looking after for me.
We considered several locations and finally decided on making a rack to bolt underneath the hard bimini. The Saint Francis hard top is so far off the deck that I can't touch it reaching over my head. This gives us plenty of room to install a rack and still have ample head room for 6 foot plus folks. My only hesitation was that the boat is so clean as is and I don't want it to start getting it cluttered. The Saint Francis 50 has so much storage space that nothing intrudes on decks. No jerry jugs or solar panels on the rails, no lines or hardware on the side decks to obstruct the walk way, just a clean layout. Unfortunately the board lockers, which although awesome, are only 7 feet long, just a bit too small for a windsurfer.
I wanted to wrap up the rigging tasks today to ensure that we will be ready to sail on Tuesday. Some of the jobs left to do involved putting holes in the mast but I didn't have a tap set. I had searched most of the island and found some taps but no drivers. Richard accidentally snapped off a tap when installing a pad eye earlier in the week and that was using a good tap set. It was a bear getting the broken tap out without damaging the threads. I wanted to make sure that any holes I made in the mast were done carefully and correctly, which meant a proper tap driver. The only way I could think of to finish the project would be to borrow the tools from Turbulence rigging and I wasn't sure they would do such a thing.
Later I wound up in Island Water World across the lagoon to pick up some more things for Brent. IWW had already told me that they had no tap sets but I decided to scrounge around in their locked case anyway while I waited in line. Lo and behold, there on the bottom of the case, under a couple of packaged drill bits I found a little yellow box. I opened it and inside were the exact taps and drill bits I needed with a nice T handle driver. I guarded it with my life on the way to the check out counter.
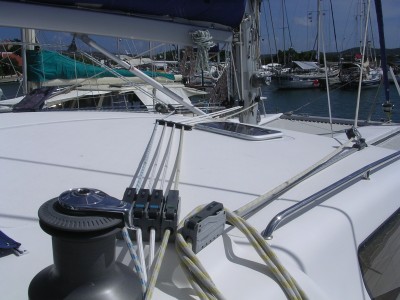
Back at the boat I carefully installed the pad eye for the topping lift block and the foot block for the main halyard. The Main halyard is a special case. It must bear a lot of load the entire time the boat is underway, and thus anything in its path must be strong and secure.
When making the rigging mods I wanted, in so far as possible, to leave the operations at the mast intact. In other words I wanted to make things accessible from the cockpit but also allow the old mast operations to function as well for double coverage. Thus the line jammers for the reef leach lines are still in place as are the clips and tack rings. To do the same thing with the halyard I needed to leave it running through the mast jammer. To make this run fair I had to lead the halyard under the winch mounting bracket to a block on the side of the mast. A footblock worked best here and only required the removal of a single cleat to make the run back to the deck organizer. Once installed it made a perfect run.
The topping lift goes on when the main is down and off when the main is up. It is rarely used otherwise. This and the fact that the topping lift comes down on the port side of the mast where the winch feeds on the aft side made a pad eye with a Dyneema loop and block a good solution. The topping lift no longer runs through the mast jammer but this is fine because the topping lift is not really a critical system as long as the compression post is functioning.
During all of this the compression post was a big consideration. I wanted to make sure that all of the lines were unobstructed on any point of sail. Using the Dyneema attached blocks allowed us to get the block outboard and as far up under the boom sheaves as possible. That combined with the most outboard installation of the deck organizer as possible keep the line paths clear of the post under almost any trim of the boom. If you let the traveler all the way down and let the sheet out until the main's battens are bending on the shrouds you can touch the compression post to the lines, but I doubt most folks would be willing to treat their main sail so.
Next I ran all of the new Dyneema lines for the topping lift and reef two. I watched Richard do this and picked up the trick, which was butting the two lines together and then putting three loops of whipping twine through them with a sail-makers needle to connect them together like a train. Then you pull the existing line out as the new line feeds in. The main halyard was already long enough to reach back to the cockpit. Saint Francis put a very long halyard on the boat to give you flexibility and it saved me a lot of money here. In fact when we finally had things situated I cut some of the halyards tail off we had so much extra. The extra length would be good if you used the main halyard to haul things up over the rail but we either use the davit block and tackle or the Spin Halyard for that type of thing.
As the sun sets on the lagoon we usually get a calm patch. When it came I quickly raised the main to see if I had flubbed up any of the line lengths. They all needed a little trim but the reef lines I installed had so much extra that you could only call the installer (me) paranoid. The old tails are now nice spare Dyneema lines in our line locker. It was a joy to see the primary project we have wanted done on the boat since we bought her flapping in the calm breeze. Hideko and I dropped the main and couldn't wait to go for a sail on Tuesday.
Johnny Sails was supposed to start on our project Wednesday but has only stopped by once to re-measure some things. This worried me because it is easy to imagine how a sail maker during regatta week could be distracted. I was still hoping he would come through though because he is a wonderful guy who uses the best materials (Sunbrella, UV safe thread, etceteras) and really understood what we wanted made.
On the bright side I met Nick of TechNick, who runs the steel fabrication shop in the Spice Island Marine complex. I asked him if he could make me a water-sports board rack on short order. I couldn't believe he said yes. Since our great experience wind surfing, Hideko and I have been trying to find a place to stash a windsurfing board. While at it I figured I'd make room for my old 8'6" surf board that Thomas is looking after for me.
We considered several locations and finally decided on making a rack to bolt underneath the hard bimini. The Saint Francis hard top is so far off the deck that I can't touch it reaching over my head. This gives us plenty of room to install a rack and still have ample head room for 6 foot plus folks. My only hesitation was that the boat is so clean as is and I don't want it to start getting it cluttered. The Saint Francis 50 has so much storage space that nothing intrudes on decks. No jerry jugs or solar panels on the rails, no lines or hardware on the side decks to obstruct the walk way, just a clean layout. Unfortunately the board lockers, which although awesome, are only 7 feet long, just a bit too small for a windsurfer.
I wanted to wrap up the rigging tasks today to ensure that we will be ready to sail on Tuesday. Some of the jobs left to do involved putting holes in the mast but I didn't have a tap set. I had searched most of the island and found some taps but no drivers. Richard accidentally snapped off a tap when installing a pad eye earlier in the week and that was using a good tap set. It was a bear getting the broken tap out without damaging the threads. I wanted to make sure that any holes I made in the mast were done carefully and correctly, which meant a proper tap driver. The only way I could think of to finish the project would be to borrow the tools from Turbulence rigging and I wasn't sure they would do such a thing.
Later I wound up in Island Water World across the lagoon to pick up some more things for Brent. IWW had already told me that they had no tap sets but I decided to scrounge around in their locked case anyway while I waited in line. Lo and behold, there on the bottom of the case, under a couple of packaged drill bits I found a little yellow box. I opened it and inside were the exact taps and drill bits I needed with a nice T handle driver. I guarded it with my life on the way to the check out counter.
Back at the boat I carefully installed the pad eye for the topping lift block and the foot block for the main halyard. The Main halyard is a special case. It must bear a lot of load the entire time the boat is underway, and thus anything in its path must be strong and secure.
When making the rigging mods I wanted, in so far as possible, to leave the operations at the mast intact. In other words I wanted to make things accessible from the cockpit but also allow the old mast operations to function as well for double coverage. Thus the line jammers for the reef leach lines are still in place as are the clips and tack rings. To do the same thing with the halyard I needed to leave it running through the mast jammer. To make this run fair I had to lead the halyard under the winch mounting bracket to a block on the side of the mast. A footblock worked best here and only required the removal of a single cleat to make the run back to the deck organizer. Once installed it made a perfect run.
The topping lift goes on when the main is down and off when the main is up. It is rarely used otherwise. This and the fact that the topping lift comes down on the port side of the mast where the winch feeds on the aft side made a pad eye with a Dyneema loop and block a good solution. The topping lift no longer runs through the mast jammer but this is fine because the topping lift is not really a critical system as long as the compression post is functioning.
During all of this the compression post was a big consideration. I wanted to make sure that all of the lines were unobstructed on any point of sail. Using the Dyneema attached blocks allowed us to get the block outboard and as far up under the boom sheaves as possible. That combined with the most outboard installation of the deck organizer as possible keep the line paths clear of the post under almost any trim of the boom. If you let the traveler all the way down and let the sheet out until the main's battens are bending on the shrouds you can touch the compression post to the lines, but I doubt most folks would be willing to treat their main sail so.
Next I ran all of the new Dyneema lines for the topping lift and reef two. I watched Richard do this and picked up the trick, which was butting the two lines together and then putting three loops of whipping twine through them with a sail-makers needle to connect them together like a train. Then you pull the existing line out as the new line feeds in. The main halyard was already long enough to reach back to the cockpit. Saint Francis put a very long halyard on the boat to give you flexibility and it saved me a lot of money here. In fact when we finally had things situated I cut some of the halyards tail off we had so much extra. The extra length would be good if you used the main halyard to haul things up over the rail but we either use the davit block and tackle or the Spin Halyard for that type of thing.
As the sun sets on the lagoon we usually get a calm patch. When it came I quickly raised the main to see if I had flubbed up any of the line lengths. They all needed a little trim but the reef lines I installed had so much extra that you could only call the installer (me) paranoid. The old tails are now nice spare Dyneema lines in our line locker. It was a joy to see the primary project we have wanted done on the boat since we bought her flapping in the calm breeze. Hideko and I dropped the main and couldn't wait to go for a sail on Tuesday.
Comments
| Vessel Name: | Swingin' on a Star |
| Vessel Make/Model: | Saint Francis 50 |
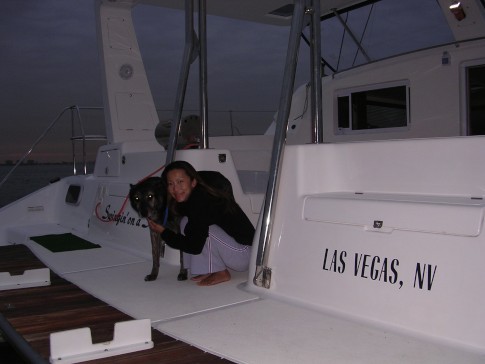
| Hailing Port: | Las Vegas, NV |
| Crew: | Randy Abernethy |
| Home Page: | http://swinginonastar.com |
Swingin' on a Star's Photos - Swingin on a Star (Main)
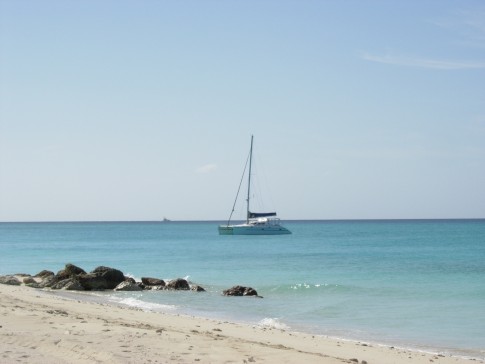 |
Selected photos of Swingin' on a Star at anchor.
7 Photos
Created 18 September 2007
|
 |
Swingin on a Star

Who: Randy Abernethy
Port: Las Vegas, NV
Gallery


History
Links
SailBlogs Friends

