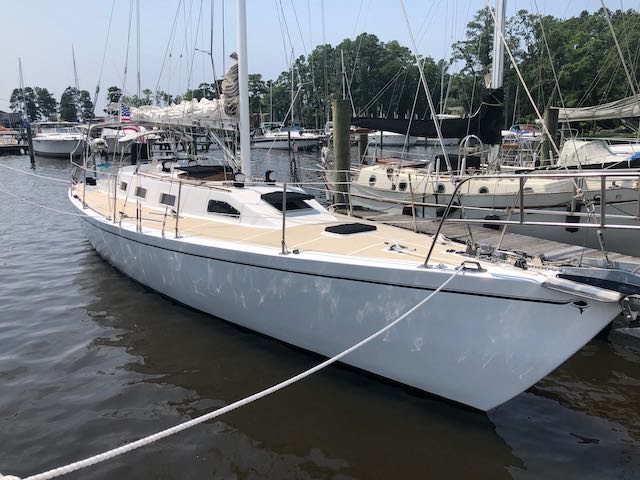
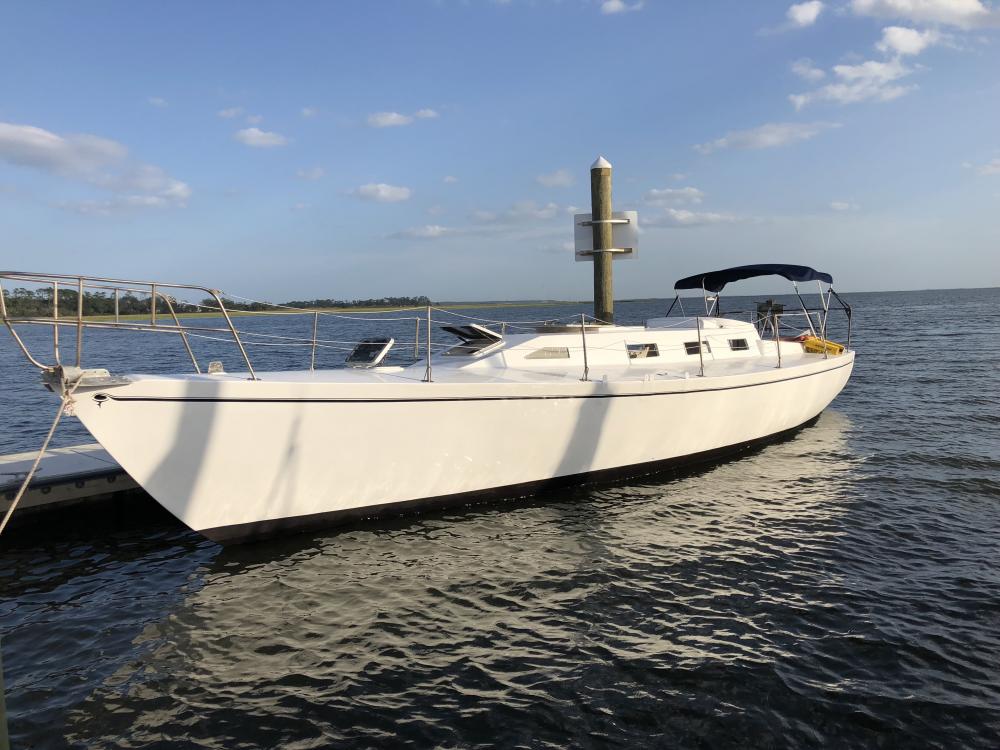
S/V Pearl
Pearl is a custom built 42 foot steel hull cutter. She is a racer cruiser designed by Davis and built in 1985 at McCandless Shipyard in Urbanna Virginia
24 October 2022
22 July 2022
01 May 2021
10 October 2019
30 March 2019
26 January 2019
25 December 2018
03 September 2018 | Pt Pleasant NJ
06 July 2018
23 June 2018
22 June 2018
31 May 2018 | St Mary's Georgia
13 March 2016 | St Mary's Boat Services
13 March 2016 | Dallas Bluff Marina
04 March 2016
01 October 2012 | Dallas Bluff Marina
04 September 2012 | Dallas Bluff Marina
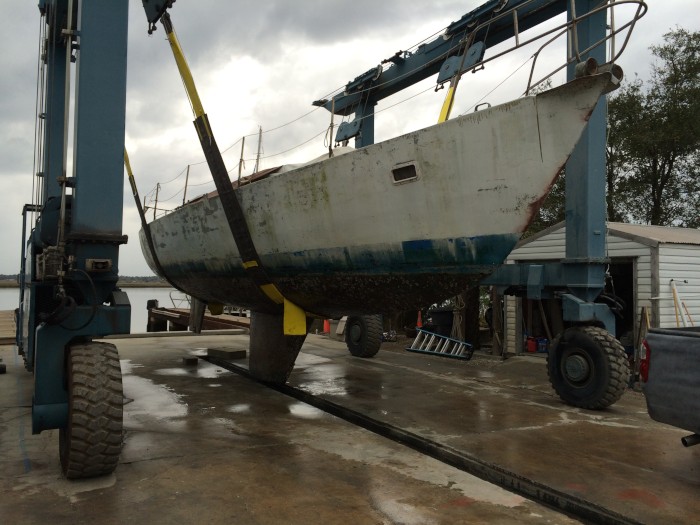
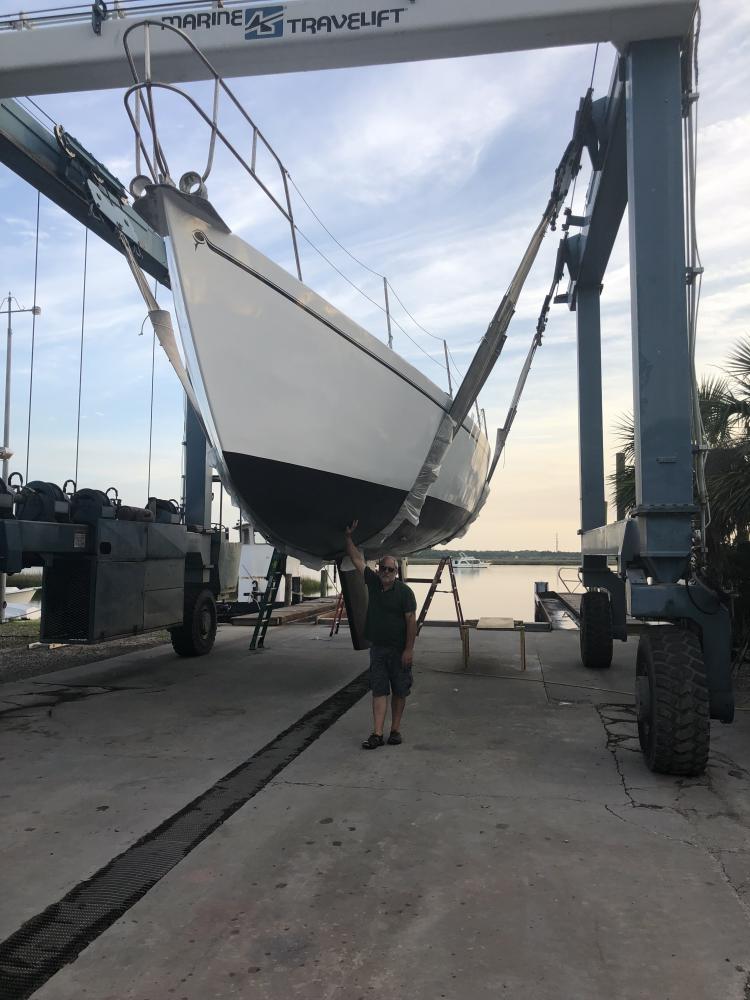
Maintenace Haulout
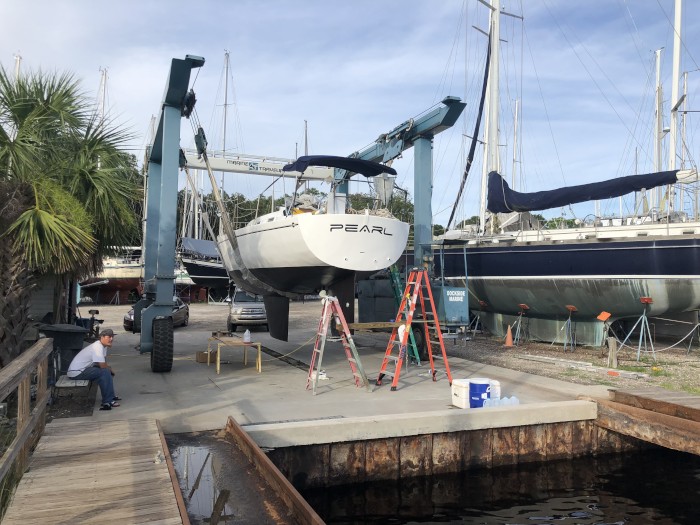
24 October 2022
Paul Cottrell
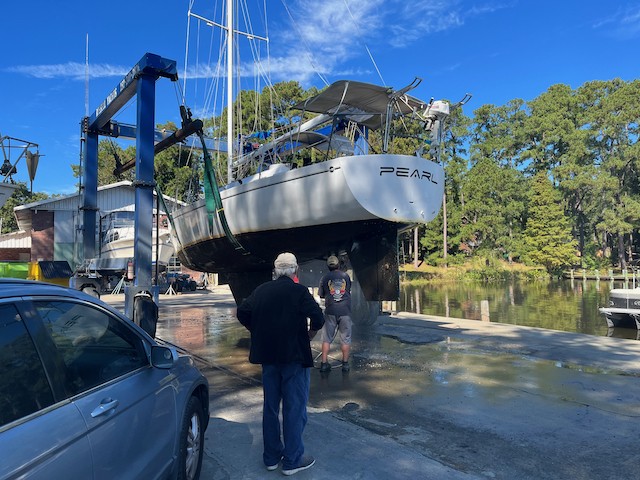
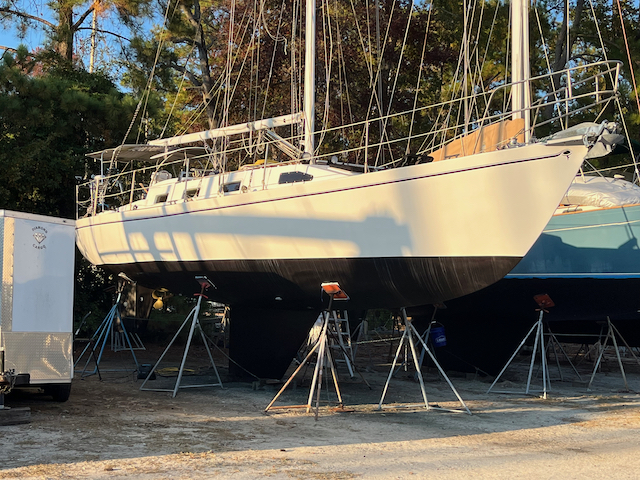
The time has come for the first haul out since launching after the major yard work. It's been 4 years in the water on the brand new bottom overhaul and I was anxious to see how everything held up. It was obvious a bottom job was going to be necessary since I've done several bottom cleanings by diving the boat while on the dock at Dallas Bluff. The growth is highly accelerated in that area and bottoms need scraping often if you wish to make any headway or have steerage for that matter.
I have to say, other than a couple small areas where there were adhesion failures on the rudder and skeg I was duly impressed with how my paint scheme held up.
This will be my opportunity to finally finish the fabrication and installation of the swim platform frame. I started the fab on the stainless tubing frame way back when on the hard at St Mary's but time ran out to finish it so here I am.

I hung the main frame off the transom so I could start to design and fab up the support brackets. Luckily I had all the materials on hand to bend and tack up 2 lower supports which I brought to a local metal shop for the final weld up. I'm not proficient at tig welding just yet and don't have the proper equipment anyway so had to pass that task off to a professional.
I also started working on finishing the platform deck. I already had made the deck which is what I used to create the tubing frame but it was still unfinished. I had to map out the drainage slots, cut them out and start working on the sanding and finishing. The plan is to do the bodywork and paint it with the same paint scheme as the hull, and then add some kiwi grip non skid.
Pretty time consuming to get all the grooves sanded out and ready for paint so I won't get that part dome before launch but the platform is at least secure on the transom and I can mount the deck on later at the dock. I need to get back in the water before the boat yard starts charging me :)
All in all a successful haulout with a fresh bottom job and clean zincs. I even managed to get a polish and couple coats of wax on the hull with the help of my good friend Dennis.
I have to say, other than a couple small areas where there were adhesion failures on the rudder and skeg I was duly impressed with how my paint scheme held up.
This will be my opportunity to finally finish the fabrication and installation of the swim platform frame. I started the fab on the stainless tubing frame way back when on the hard at St Mary's but time ran out to finish it so here I am.
I hung the main frame off the transom so I could start to design and fab up the support brackets. Luckily I had all the materials on hand to bend and tack up 2 lower supports which I brought to a local metal shop for the final weld up. I'm not proficient at tig welding just yet and don't have the proper equipment anyway so had to pass that task off to a professional.
I also started working on finishing the platform deck. I already had made the deck which is what I used to create the tubing frame but it was still unfinished. I had to map out the drainage slots, cut them out and start working on the sanding and finishing. The plan is to do the bodywork and paint it with the same paint scheme as the hull, and then add some kiwi grip non skid.
Pretty time consuming to get all the grooves sanded out and ready for paint so I won't get that part dome before launch but the platform is at least secure on the transom and I can mount the deck on later at the dock. I need to get back in the water before the boat yard starts charging me :)
All in all a successful haulout with a fresh bottom job and clean zincs. I even managed to get a polish and couple coats of wax on the hull with the help of my good friend Dennis.
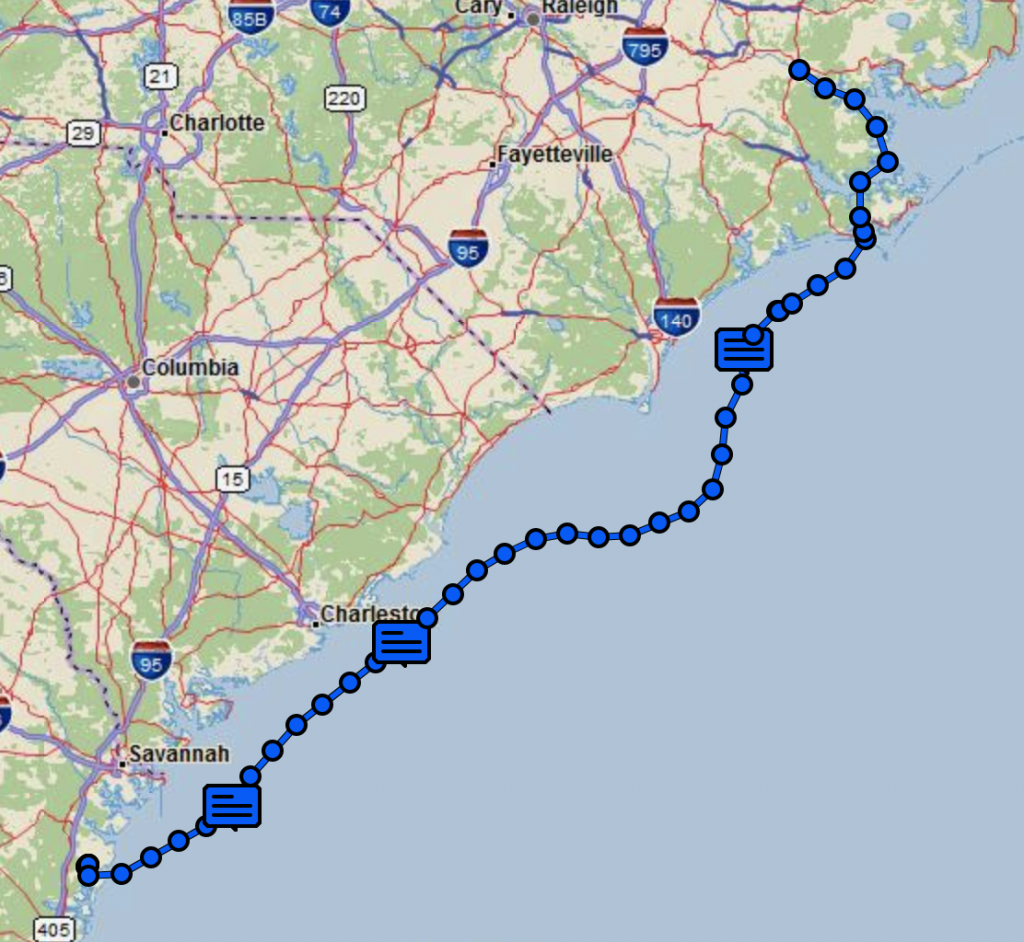
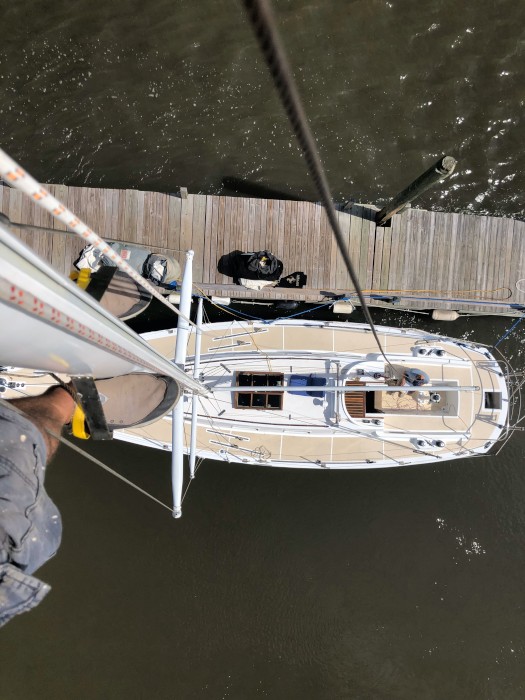
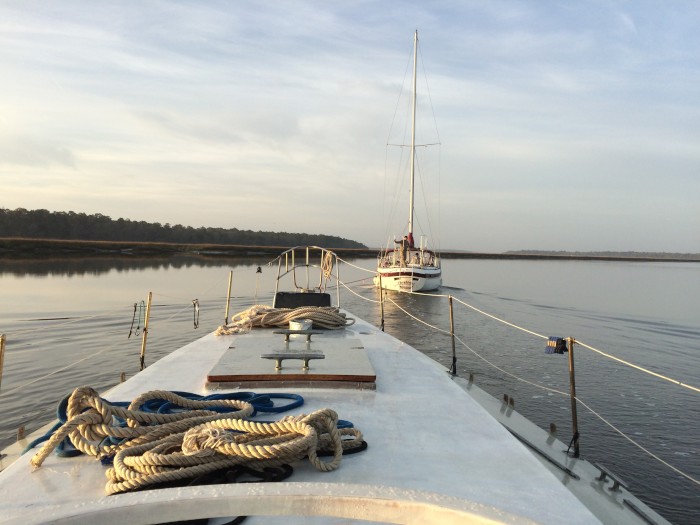
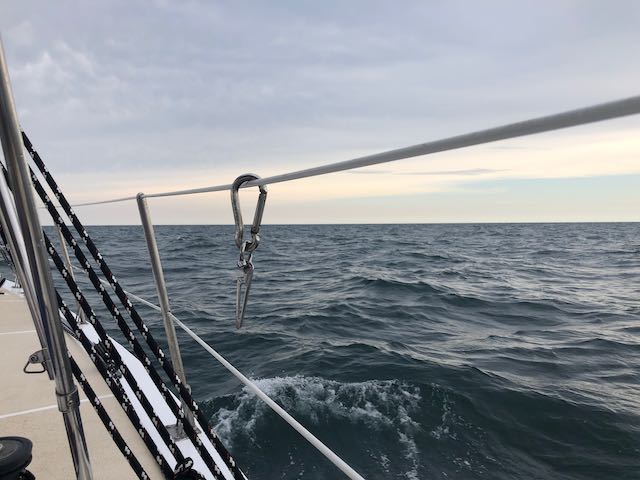
Passage to Carolina
22 July 2022
Paul Cottrell
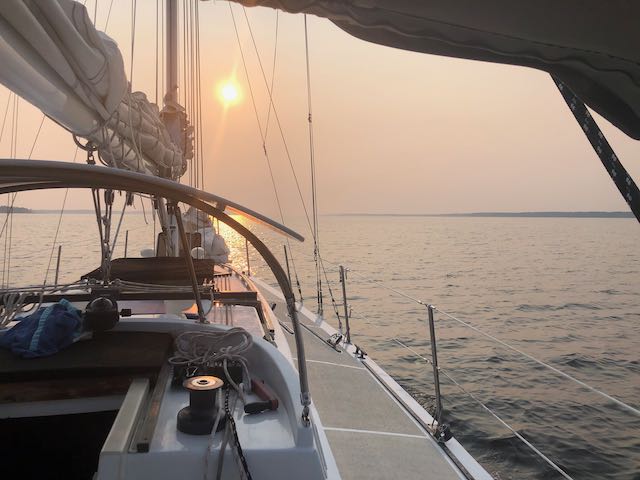
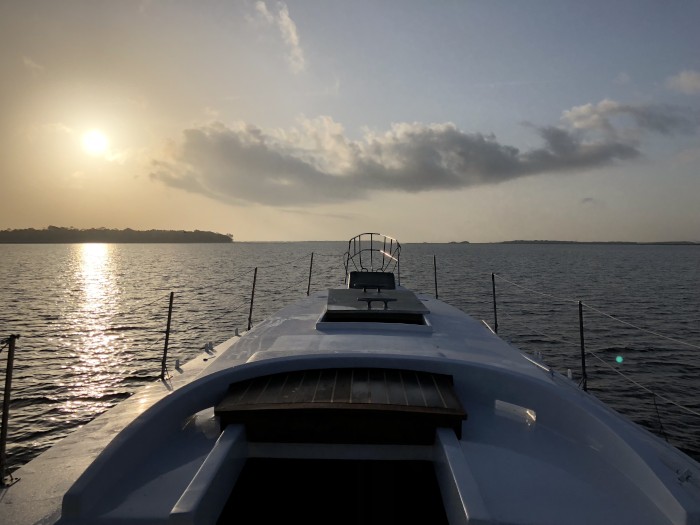
The day finally arrived where Pearl would make the passage from Dallas Bluff Georgia to Washington North Carolina. I spent the previous month finishing up some final preparations and taking her through several sea trials out on the Sapelo Sound to test the rigging and dial in the brand new B&G autopilot.
Sapelo Sound is a challenging place to sail. The steep tides make for a pretty shoally bottom. It's mostly sandy muddy so running aground isn't too big of an issue unless you get stuck enough to require the next high tide to float off, in which case you could be stuck for a while.
I found a good weather window starting on July 18 so that was our target departure. It was a Sunday and weather was great. I wanted to leave on the last part of the incoming high tide because the Sapelo approach is not the easiest to navigate with a big draft. That was going to mean leaving the dock around 2:30pm which would put us heading north out to sea around 5:00 pm, so here we go, sails up headed north.
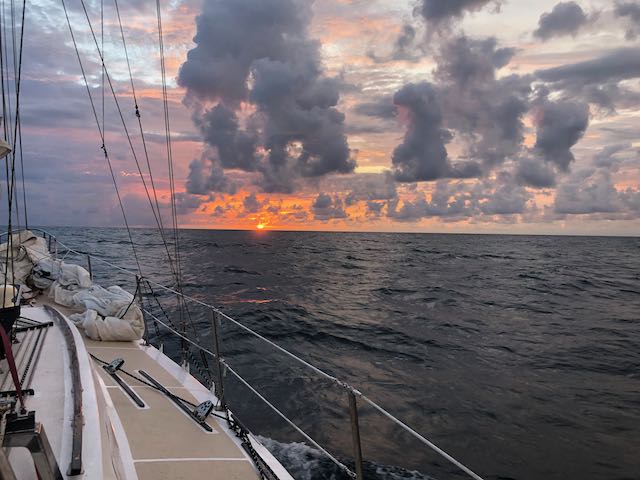
Craig, my volunteer first mate for the trip prepared some dinner as we headed towards Savannah watching the sun go down along with the sails. With the sails packed up and the dark moving in we settled into the beanbags for intermittent naps. It was a very pleasant overnight run under auto pilot with the Westerbeke humming along at a very steady 6kts. We cut through the city of ships waiting to enter Port of Savannah, played with a pod of dolphins for a good hour or more (wish I had gotten video of that) and broke light to a pretty spectacular sunrise.
Day two started out with no wind to speak of and so we just kept motoring along watching all the rain bursts off in the distance.

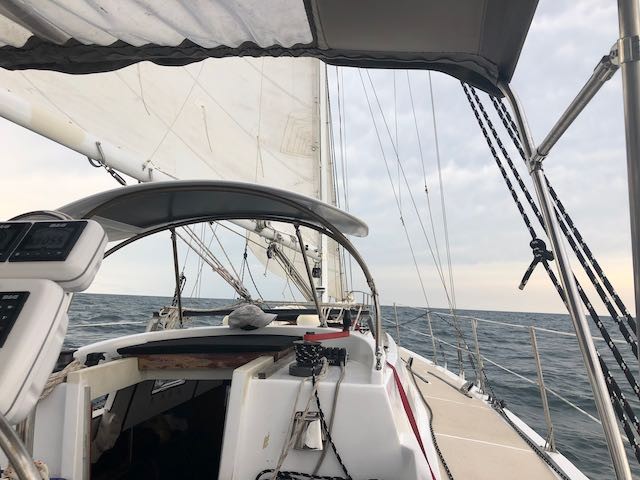
The weather cleared and the wind picked up around noon so it was sails up, engine off and happy times with a following sea and fair winds. It was like that all afternoon and picked up a bit more later on. It was a really great opportunity to push Pearl a bit and really see how she handled. I had a blast and the boat performed so well I was just grinning ear to ear.
Overnight was quite a bit different night two. We dropped sails around 5:00 pm as the wind and waves were building and the first mate was getting anxious about it. As we headed north with a 5-6 ft following sea there was a ominous darkness building from onshore to the west. It was pretty clear we were in for some weather as I headed farther offshore to make sure we cleared the frying pan shoals with no issue. I probably could have cut it a fair amount closer but with nasty conditions and it being night and all I erred on the safe side.
No worse for wear we entered day three after trudging through multiple rather wet and windy squalls and the ill prepared cabin becoming a war zone of stuff flying around from one side to the other. Took lots of notes on that :)
Having hand steered all night without a watch relief I was exhausted. I set the autopilot and turned the helm over to Craig so I could go below and crash out as we made our approach to Beaufort inlet.

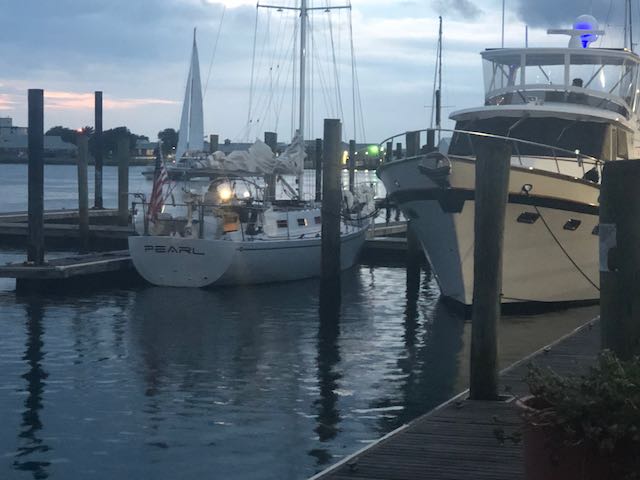
It was a good feeling to reach the dock in Beaufort. A great sense of accomplishment for the first real offshore shakedown. The crew celebrated with some great food and lots of grog. Needless to say no issues getting to sleep that night :)
Day four has us relaxing in the beanbags heading up the ICW under autopilot just watching the world go by. We landed at the city dock in Washington after dark and headed to the house.
Day five all we had to do was move Pearl into her new home about an hour and half back down the river to McCotters Marina.
What a great 5 days!!
More Pics
Sapelo Sound is a challenging place to sail. The steep tides make for a pretty shoally bottom. It's mostly sandy muddy so running aground isn't too big of an issue unless you get stuck enough to require the next high tide to float off, in which case you could be stuck for a while.
I found a good weather window starting on July 18 so that was our target departure. It was a Sunday and weather was great. I wanted to leave on the last part of the incoming high tide because the Sapelo approach is not the easiest to navigate with a big draft. That was going to mean leaving the dock around 2:30pm which would put us heading north out to sea around 5:00 pm, so here we go, sails up headed north.
Craig, my volunteer first mate for the trip prepared some dinner as we headed towards Savannah watching the sun go down along with the sails. With the sails packed up and the dark moving in we settled into the beanbags for intermittent naps. It was a very pleasant overnight run under auto pilot with the Westerbeke humming along at a very steady 6kts. We cut through the city of ships waiting to enter Port of Savannah, played with a pod of dolphins for a good hour or more (wish I had gotten video of that) and broke light to a pretty spectacular sunrise.
Day two started out with no wind to speak of and so we just kept motoring along watching all the rain bursts off in the distance.
The weather cleared and the wind picked up around noon so it was sails up, engine off and happy times with a following sea and fair winds. It was like that all afternoon and picked up a bit more later on. It was a really great opportunity to push Pearl a bit and really see how she handled. I had a blast and the boat performed so well I was just grinning ear to ear.
Overnight was quite a bit different night two. We dropped sails around 5:00 pm as the wind and waves were building and the first mate was getting anxious about it. As we headed north with a 5-6 ft following sea there was a ominous darkness building from onshore to the west. It was pretty clear we were in for some weather as I headed farther offshore to make sure we cleared the frying pan shoals with no issue. I probably could have cut it a fair amount closer but with nasty conditions and it being night and all I erred on the safe side.
No worse for wear we entered day three after trudging through multiple rather wet and windy squalls and the ill prepared cabin becoming a war zone of stuff flying around from one side to the other. Took lots of notes on that :)
Having hand steered all night without a watch relief I was exhausted. I set the autopilot and turned the helm over to Craig so I could go below and crash out as we made our approach to Beaufort inlet.
It was a good feeling to reach the dock in Beaufort. A great sense of accomplishment for the first real offshore shakedown. The crew celebrated with some great food and lots of grog. Needless to say no issues getting to sleep that night :)
Day four has us relaxing in the beanbags heading up the ICW under autopilot just watching the world go by. We landed at the city dock in Washington after dark and headed to the house.
Day five all we had to do was move Pearl into her new home about an hour and half back down the river to McCotters Marina.
What a great 5 days!!
More Pics
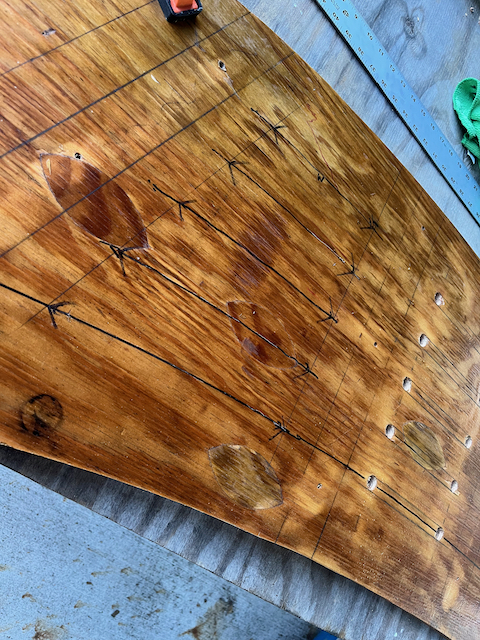
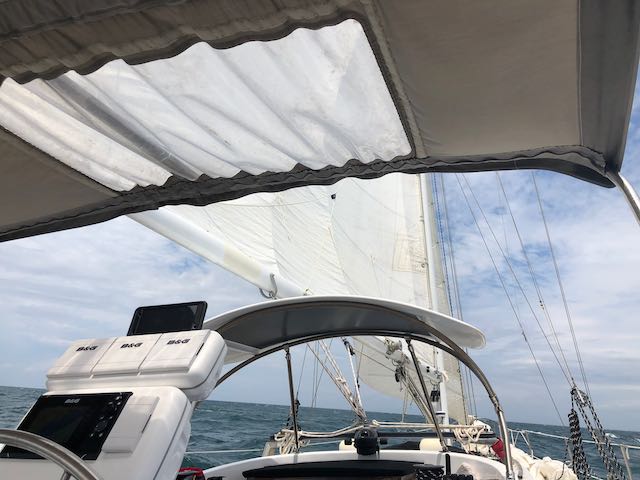
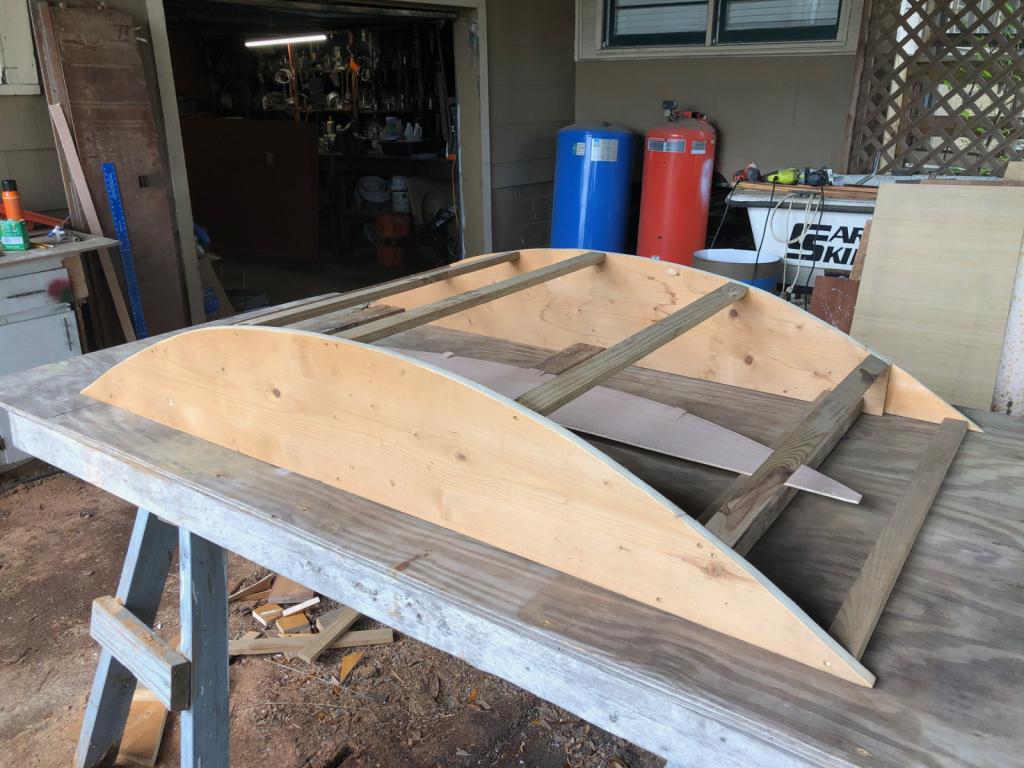
Carbon Fiber Hardtop for the Dodger
01 May 2021
Paul Cottrell

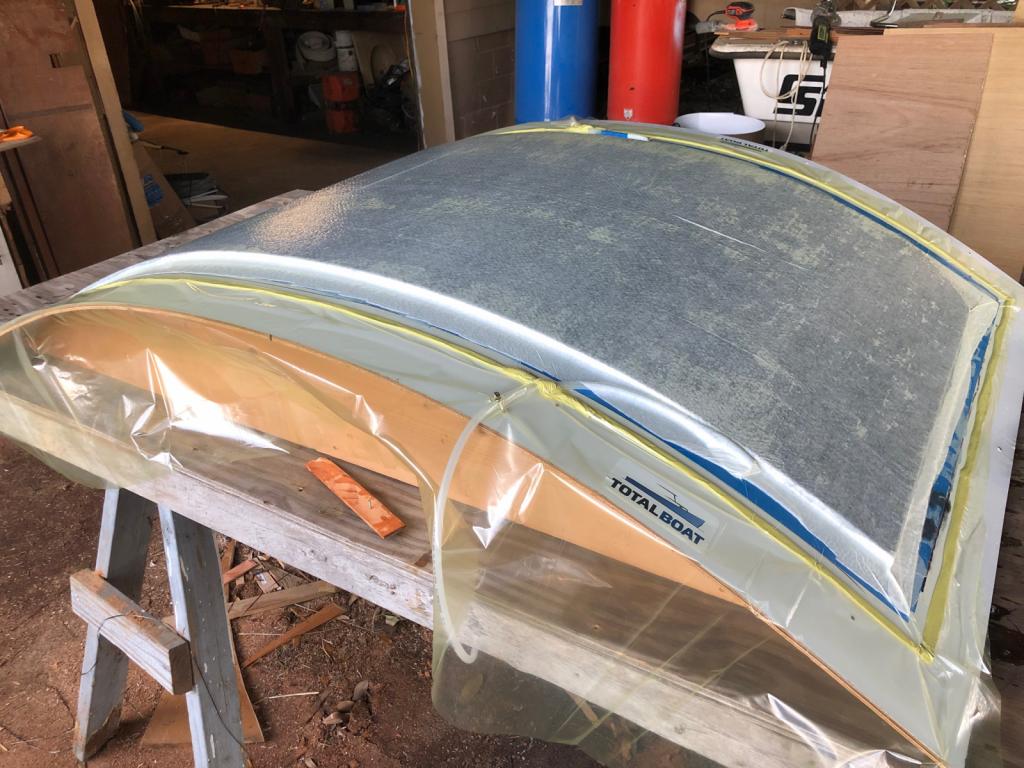
As I finished up business of configuring an existing Dodger frame to fit the new setup I was taking notice how curvy the top was. As I pondered the making of the covers, which I had fully intended to be sewn canvas, my imagination was showing me a hard top. So... off I go.
Before fully committing to a hard top I had to see what it would look like with a mock-up. I used Luan plywood for the template. It's a great template material that I sometimes cut into strips that get hot glued together to make patterns.

I think this looks really good. I'm super happy with it and look forward to the build. This is gonna be fun. Next step is to figure out what materials to build it from. There are some options here but I chose to build a carbon fiber panel. Why? cause it's cool, why else?
I could have just done a regular woven but I've been interested in experimenting with carbon for a while now and it is a stronger material than just the woven. So the idea is to paint it white as the rest of the boat leave carbon showing on the underside.
The form was rather easy since there weren't any compound curves
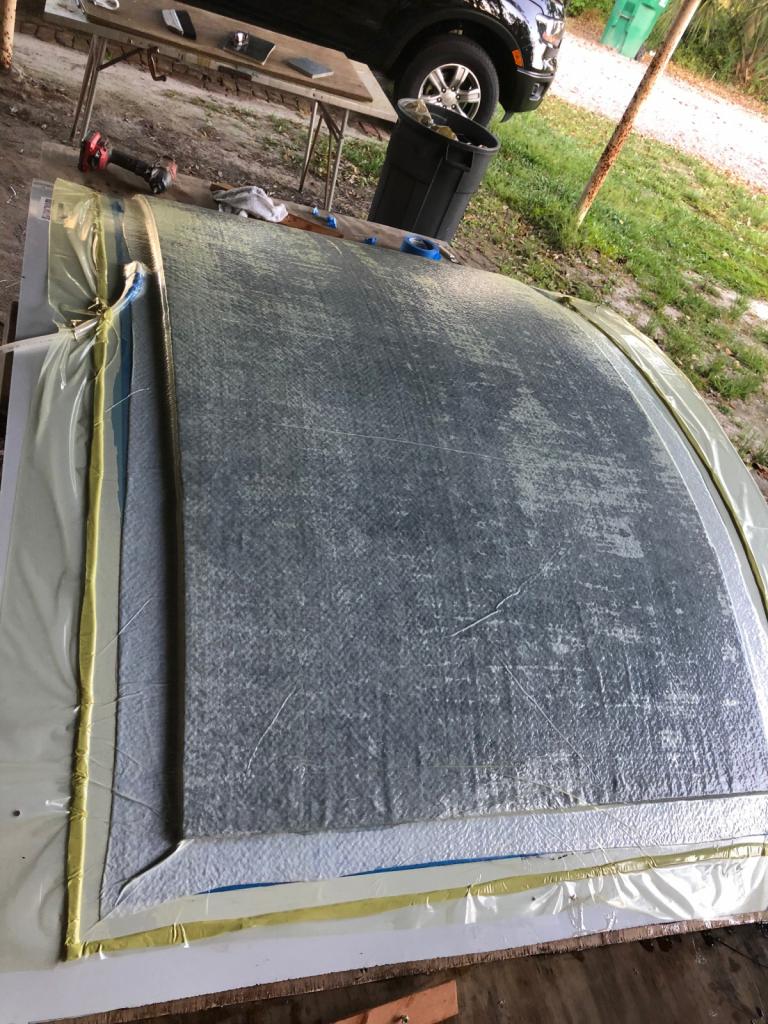
After installing the form on the frame I cleaned and waxed the mold area and started the layup. The idea is to build a composite bent sheet of 1/2" foam core sandwiched between bi-axial cloth and a shell of carbon. You wet out each layer as it goes on the stack, adding a bit of thickener between the foam core and bi-axial layers.
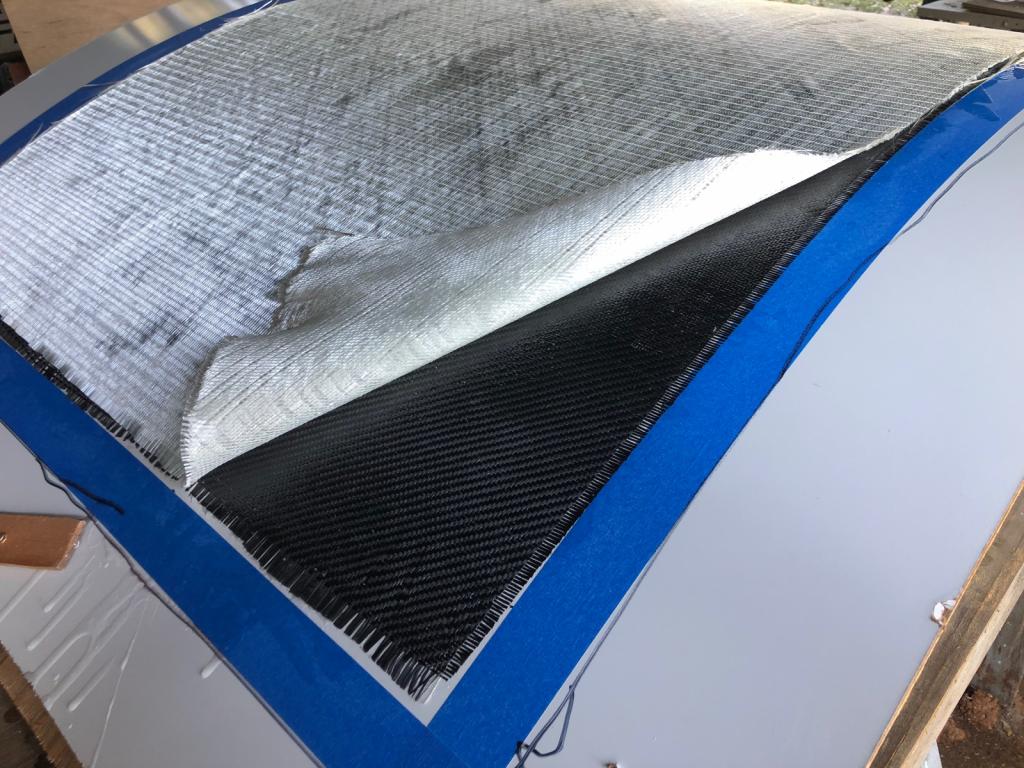
Then you add your vacuum layers, tack down the outer plastic sheet to the mold surface, crank up the vacuum and leave it overnight. There are plenty of sites to get all the detailed info of exactly what to use and how to do this process.
Next I used the original luan template to cut out the shape, routed the foam about 1/2" away from the edges, filled the edge with 2 part epoxy fairing filler, routed the edge with a round over bit and finished out the body work.
Lot's of test fitting and getting the installation details worked out before painting. I painted the top and underside edges with the same Quantum 2 Part Polyurethane paint system to match the rest of the boat.
Came out great! I used stainless 1/4-20 "hurricane" machine screws to attach it to the tubing by drilling and tapping holes. Made for a cleaner install on the underside. I love these hurricane screws. Found them a Home Depot years ago and started using for various installations requiring a large surface area on the screw head. Negating the need for a separate flat washer.
Underside is unpainted and clear coated carbon. Kind of a cool look.
More Pics of the build
Before fully committing to a hard top I had to see what it would look like with a mock-up. I used Luan plywood for the template. It's a great template material that I sometimes cut into strips that get hot glued together to make patterns.
I think this looks really good. I'm super happy with it and look forward to the build. This is gonna be fun. Next step is to figure out what materials to build it from. There are some options here but I chose to build a carbon fiber panel. Why? cause it's cool, why else?
I could have just done a regular woven but I've been interested in experimenting with carbon for a while now and it is a stronger material than just the woven. So the idea is to paint it white as the rest of the boat leave carbon showing on the underside.
The form was rather easy since there weren't any compound curves
After installing the form on the frame I cleaned and waxed the mold area and started the layup. The idea is to build a composite bent sheet of 1/2" foam core sandwiched between bi-axial cloth and a shell of carbon. You wet out each layer as it goes on the stack, adding a bit of thickener between the foam core and bi-axial layers.
Then you add your vacuum layers, tack down the outer plastic sheet to the mold surface, crank up the vacuum and leave it overnight. There are plenty of sites to get all the detailed info of exactly what to use and how to do this process.
Next I used the original luan template to cut out the shape, routed the foam about 1/2" away from the edges, filled the edge with 2 part epoxy fairing filler, routed the edge with a round over bit and finished out the body work.
Lot's of test fitting and getting the installation details worked out before painting. I painted the top and underside edges with the same Quantum 2 Part Polyurethane paint system to match the rest of the boat.
Came out great! I used stainless 1/4-20 "hurricane" machine screws to attach it to the tubing by drilling and tapping holes. Made for a cleaner install on the underside. I love these hurricane screws. Found them a Home Depot years ago and started using for various installations requiring a large surface area on the screw head. Negating the need for a separate flat washer.
Underside is unpainted and clear coated carbon. Kind of a cool look.
More Pics of the build
Non Skid
10 October 2019
Paul Cottrell
Kiwi Grip for the win!
There are many options available for non skid applications from adhesive panel type products to sprinkling sand like substances on wet coatings. There is one product that I fell in love with many years ago when redoing the decks on a small 17 ft center console I was refurbishing. The product was really easy to install and I was so impressed with the longevity and durability that it was a no brainer for this project. That product is called Kiwi Grip, a rubberized water based coating that is applied using a notched trowel and a special texture roller.
The prep is the same as for most all the non skid applications. The surface needs to be thoroughly cleaned, sanded and cleaned again. I always clean before I start sanding for any coatings project. What this does is prevent sanding any dirt and oil deeper into the surface.
The tricky part is taping off the panels so that the edges will be clean. For this I use 1/4" 3M striping tape. It's a thicker vinyl like tape that is very durable. It holds up great when sanding directly along the edges - a must for any paint but especially necessary for kiwi grip. I then add wider painting tape to contain the mess.

Kiwi Grip comes in 3 standard colors, none of which really suit my taste but the good news is that it can be tinted with ordinary house paint tint. My local Ace hardware helped out by putting 2 gals worth of tint in a mayo jar I provided. The tan color is the custom tint and I went with plain white on the coachroof.

I could have taken the easy way and just made the whole deck one big patch of non-skid but I was not going to be happy with that look. The extra effort was well worth it. The panels look great.
There are many options available for non skid applications from adhesive panel type products to sprinkling sand like substances on wet coatings. There is one product that I fell in love with many years ago when redoing the decks on a small 17 ft center console I was refurbishing. The product was really easy to install and I was so impressed with the longevity and durability that it was a no brainer for this project. That product is called Kiwi Grip, a rubberized water based coating that is applied using a notched trowel and a special texture roller.
The prep is the same as for most all the non skid applications. The surface needs to be thoroughly cleaned, sanded and cleaned again. I always clean before I start sanding for any coatings project. What this does is prevent sanding any dirt and oil deeper into the surface.
The tricky part is taping off the panels so that the edges will be clean. For this I use 1/4" 3M striping tape. It's a thicker vinyl like tape that is very durable. It holds up great when sanding directly along the edges - a must for any paint but especially necessary for kiwi grip. I then add wider painting tape to contain the mess.
Kiwi Grip comes in 3 standard colors, none of which really suit my taste but the good news is that it can be tinted with ordinary house paint tint. My local Ace hardware helped out by putting 2 gals worth of tint in a mayo jar I provided. The tan color is the custom tint and I went with plain white on the coachroof.
I could have taken the easy way and just made the whole deck one big patch of non-skid but I was not going to be happy with that look. The extra effort was well worth it. The panels look great.
The Ground Tackle Epic
30 March 2019
Paul Cottrell
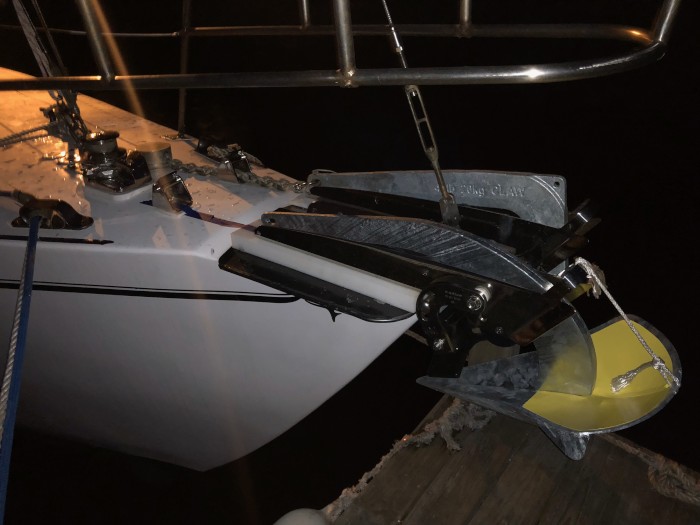
With hurricane season approaching and the Hunter 30 flip project behind me it was time to get going on my ground tackle project in anticipation of the possible need for storm anchoring.
Pearl had come with a really old plow anchor which I gave away some time ago with the full understanding I would be starting from scratch with new anchor technology.
A good bit of research went into the anchor selection along with some previous experience with my "Baby Claw" (#20). I finally decided on a Mantus #55 along with a Lewmar Claw #44.
The Mantus would be run on 250' of chain with an additional 50' of rode through the Swedish Anchorlift windlass. The Claw would be run as a backup with 200' all rode to be run on the Anchorlift auxiliary gypsy through a hawse next to the windlass.
The original anchor chutes were simple welded pieces of pipe on the bow plate and weren't really going to work for what I wanted so I went to work cutting them off. I mounted 2 Anchorlift bow rollers with AnchorMate's on custom angled blocks. A couple of chain stoppers some paint and nonskid would finish off the exterior workings of the project and my attention would be turned to the chain locker and windlass setup.
I installed the bulkhead partitions so the lighter rode would settle in a space more forward and the chain would run through a PVC conduit a little farther aft and lower. The windlass is 24 volt so I decided to install 2 smaller 12v batteries in the bow which I will charge from the engine with a 12->24 volt conversion. After installing the deck switches and hooking up the solenoids I could begin testing the setup.
After some tests and looking at that huge Mantus #55 on the bow and the way it looked and nested I decided it was pretty much overkill for what I considered a "daily dropper". I retired it to storm duty and since you can disassemble it for storage this made a lot of sense. So instead I picked up a 44lb Spade Anchor. It was a great choice, self launches much easier than the Mantus and fits on the bow very nicely tucked in alongside the backup Claw. I've read great reviews on these and have the utmost confidence I'll have no issues with this anchor.
All in all I'm very pleased with the setup. It's a tad overkill I suppose but I'd rather have anchors and not need them than need and not have right?
So my final setup is
Daily Dropper = #44 Spade on 250' chain / 50' rode
Backup on Bow = #44 Claw on 200' rode
Storm = #55 Mantus swapped out on the chain when needed
Lunch/Aux/Kedge = #20 Claw (the baby claw)
Here's the photos
Padding and Furring the Portlight installation
26 January 2019
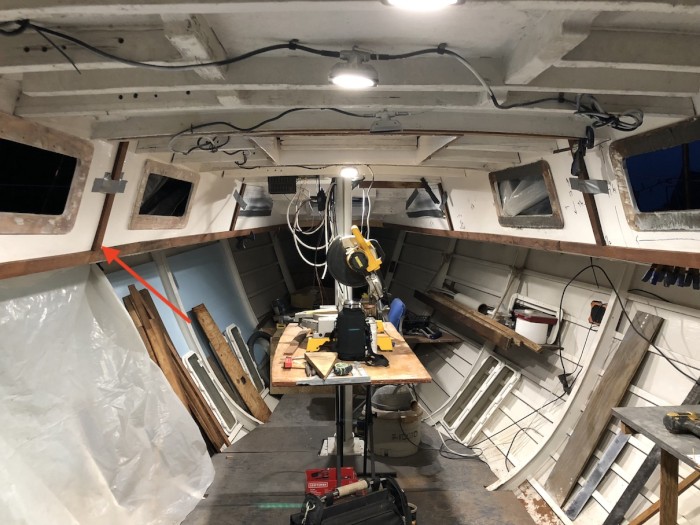
Currently working on padding/insulating the Coach-roof sides. I wanted to have more than just a 3/16" metal skin for the coach-roof sides for the insulation factor as well as the interior aesthetics. It seems a tricky endeavor. I want to be as careful as possible not to introduce a possible corrosion situation and here is what I have come up with.
I fabricated my opening port-light furring using marine plywood planed to size and coated 360 deg in west systems epoxy. They are then bonded to the prepped coach sides using west systems epoxy with some adhesive filler added. The prep involves simply abrading with 80 grit and cleaning with acetone. These are being faired on the interior side with gorilla hair to make the frame surface flat so the ports will install properly.
So now furring strips need to be installed. I had some strips of cherry available that were already milled and ready to go so I'm using those with the idea that they should be very resistant to rot. I have cut the cherry strips to make all the furring strips necessary to lay on a nice interior skin. These will be bonded to the prepped surface with either 5200 or loctite heavy duty construction adhesive, clamped in place until thoroughly set. The lower strips can also be mechanically fastened with recessed #10 ss machine screws and nylocks.
Now I need to fill in the spaces with some sort of padding/insulation. I have landed on a Polyiso product - EnergyGuard Polyiso Insulated Sheathing. This product is laminated both sides and has a great fire rating. It bonds to the prepped surface very well with Weldwood spray contact cement. The plan is to make sure there are no voids and fill any rouge spaces with some spray foam and apply with liberal amounts of spray glue. (spray both sides and let set for 5 mins or so before pressing together)
For the final surface I plan to cut white formica and glue to the finished inside surface using 3M Scoth-Weld or Weldwood contact cement. (I've had really good results with weldwood)
Most of the surface will be "clamped" together with the portlight installation as well as the lower trim and the headliner panels when finally installed.
Here's the finished Look
Merry Christmas
25 December 2018

Just taking a moment to reflect on the years events and all the great things that have been accomplished on Pearl
Messy Desk?
03 September 2018 | Pt Pleasant NJ
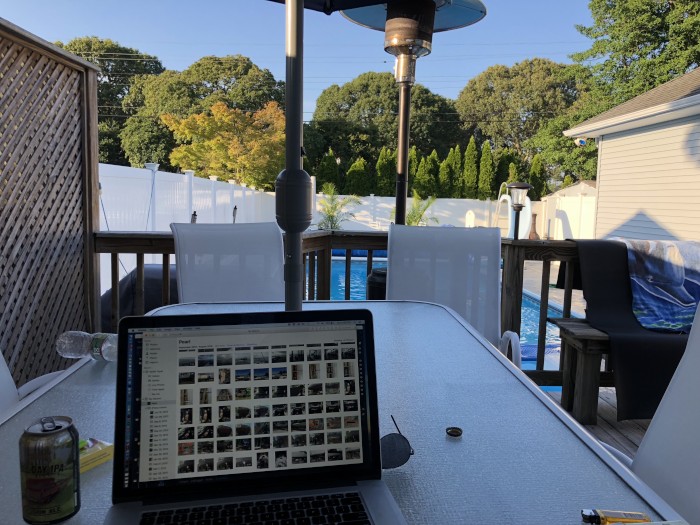
So I caught a bug after showing off some pics of the project and I've started adding to the story whilst I sat by the pool today. Courtesy of some very gracious friends in NJ that I have managed to keep in touch with for 20 some odd years and visit often. I make a pilgrimage to NJ and Upstate NY every summer to see friends and family. Next year my plan is to sail a round trip North up into Lake Champlain with stops along the way. Wish me luck in getting Pearl ready in time. Lots to do still.
Anyway, it was fun to finally start documenting this story and I'm anxious to keep filling in the blanks. I still have epics about hull repairs, paint jobs and myriad other pieces of the project to post. Meanwhile enjoying my last days of summer at the Jersey Shore. Cheers!
Anyway, it was fun to finally start documenting this story and I'm anxious to keep filling in the blanks. I still have epics about hull repairs, paint jobs and myriad other pieces of the project to post. Meanwhile enjoying my last days of summer at the Jersey Shore. Cheers!
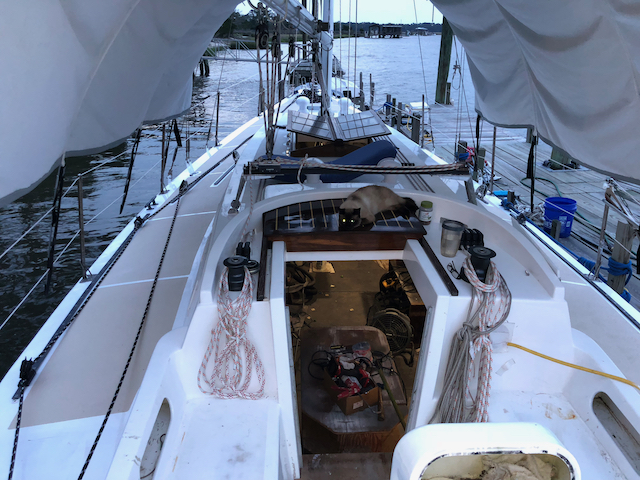
Turning Pearl back into a Sailboat
06 July 2018

Now that Pearl is floating again (Boats Wanna Float!) we can start the business of turning her back into a sailboat. The rig has been sitting in the yard for about 4 years on stands. I capitalized on the opportunity to unstep when a crane barge happened to be in the area and it was relatively free so why not. It actually helped get shrouds and stays out of my way as I worked across the deck and coach roof to refactor and install new hatch coamings.
I started by building a DIY mast mover out of a tiny old flatbed trailer and a couple old plastic barrels that were laying around from our new dock build. They were used as floating dock floats. Worked like a charm and allowed me to move the mast anywhere in the yard by myself.
So I moved the mast over near the workshop and built a shade cloth tent over it using the materials that served as a shade cloth tent over the boat while in the boatyard. Such a lifesaver when working in the hot July sun on the southern Georgia coast. MOst days in July were in the mid to upper 90's with humidity to match. ugghhh.
I gave the mast and boom a thorough scrubbing and stripped all the hardware that would come off easy. I left anything that had rivets as I don't own a large enough rivet gun to re-install and I had bigger fish to fry. All the slotted screws came out without a hitch with the help of a little heat. My good friend Norman helped me sand it down to bare aluminum and I proceeded to apply a Quantum paint system starting with the chromated primer. THe paint rep told me I could direclty overcoat with the 2-part polyurethane so purchased a cheap hvlp spray gun from amazon and the paint went on great.
I've been very happy with Quantum products. Shout out to my friend Richard for pushing me in that direction. I had been considering it but it was kinda new on teh market so I was a tad leary. If you are considering a DIY paint job on your boat or mast you really should check them out. I find their products very easy to work with in both spray and roll applications and the support is second to none.
Quantum Link
Once the paint was done I started the business of creating the new wiring harness and building out the mast head. There is a sail track groove on the inside of the mast which acts as a harness track. Really awesome. I wired the masthead for the Hella nav/anchor light, the B&G wind transducers and 2 antenna, a vhf whip and a Digital Antenna wide band omni-directional.. Hoping it works as advertised :)
I had to fabricate a host of parts from starboard for this project. Love working with this stuff. You can see detailed pics in the gallery link below.
So with the help of friend John I finally got the harness in the mast (after 4-5 attempts). After fussing with grommets and connections I hooked up a battery and tested out the lights - good to go :)
Next order of business was making new stays and shrouds. I got a really good deal on a spool of 1/4" wire rope on ebay which allowed me to replace the forestay, backstay, upper shrouds and the fore sail stay with brand new wire. The old wire was in really great shape and most of the wire ends coming out of the Sta-lok fittings as I took them apart was relatively clean. Still I'm glad I went ahead with the standing rigging replacement. The old wire was in such great shape that I cut the old longer pieces into shorter lengths with clean ends to use for the four lower shrouds. Sta-loks went on fast and clean. I found it pretty easy once I had my workstation set up. I started with cutting the new lengths by hacksaw but halfway through switched to a cutoff disc. Much faster and the burrs left behind were easier to clean up than I thought.
Found another cheap deal on 300' of 3/8 line for halyards so I went for it. Enough for all my halyards with a little left over. Crappy color but "cheap as chips" as my friend Richard says. Shout out to Gill for nailing the Pearl logo. So happy with it that I used the spare cove stripe vinyl on the mast. Love it!
After prepping and installing the collar and step all we had to do was get it stepped. We have a couple options here at the marina one of which is a small boom crane on a flatbed truck. However it just so happened that we had a crane barge in the neighborhood scheduled to install a piling so I went that route instead. It's quite a bit trickier to use a pile driving crane because they don't the kind of control when letting down as one would like. We got lucky and stuck the landing without a hitch.
So the mast building epic lasted 2 full sprints in the month of July and now that the boom is installed as well, Pearl is back to looking like a proper sailboat again.
photo storage is limited here and I do like my pics so I'm trying out google photos.
Click here for the mast build gallery
St Marys to Dallas Bluff
23 June 2018
I only took a few images on the two day trip home. I need to find a way to post videos. Suppose I'll need to get a YT account and link to them there. I'll work on that.
My ear was pinned to rhythms and sounds playing from the freshly rebuilt Westerbeke 42b. It powered Pearl confidently into the hot rising sun. This is roughly a 12-14 hour journey depending on tide and weather of course. A friend offered the use of a slip in a marina close to the halfway point so I broke the trip in half.
Pearl performed brilliantly except that my prop decision was a tad hasty and a bit mislead. My fault I'm over propped, which means to say I cannot run the engine to it's optimal rpm at cruising speed. Best I could do was 1800 when the max is 3500 and the cruising rpm should be around 2000-2500. I should be getting that at 1/2-3/4 throttle.
Even so I was elated to be at the helm again. I made the hum of the engine background music to the sights and smells of the South Georgia barrier islands. It was a hot trip but since we left at 6am each day it meant we could be off the water by 2pm. I asked friend Henry if he would be interested in floating up the coast for a couple days and he jumped at the chance for a tour of the barrier islands. He was a great help manning lines and getting the boat ready, taking the helm occasionally for a watch.
I reflected on the accomplishment quite a bit. But as much as I enjoyed basking in the pride and joy of this accomplishment my thoughts always turned back to the path ahead. The projects like ghosts were staring right at me from the shiny new shell of a boat that still needs to be assembled. That list is way too long to go into here but maybe I'll post my whiteboard of it later.
At this point Pearl is an exceptional, seaworthy, racer/cruiser with a freshly rebuilt 42hp engine, brand new dripless drivetrain, new rudder, blasted and epoxy coated interior skin, Quantum Top Coat System, Sherwin Williams Seaguard 5000 barrier coat, 3 coats of hard bottom 67% cuprous, 3 coats of ablative 67% cuprous. Motorable she is with a sound 100 gallons fuel storage and 100 gallons water storage. Lets build a mast and get this thing turned into a sailboat - shall we?
Boats Wanna Float
22 June 2018
It's launch time for Pearl. It's been quite the challenge doing all the major projects needing done during the haul out. Two years of relatively steady work on weekends and holidays. I did take a month off from working last August because it just got too hot to be productive in any way - so I took off to visit northern Maine and drop in on my second cousin and his family if Belfast. Dale Cottrell is founder of Cottrell Boatbuilding and builds gorgeous small boats, rowing dinghy's, wherry's - that kind of thing. But I digress.
It's a happy day when you're hanging in the slings waiting to get launched. It's a mix of excitement and joy tied up with anxiety about all the things that still need doing, all the what if's for the trip home and the constant "did I do everything I needed to do" thoughts racing in my head.
I was reminded of this phrase I kinda coined in the boatyard among friends whom had boats on the hard for various reasons and various planned durations.
"Boats wanna float" I kept saying. "Why not do anything that can be done floating at the dock . . . at the dock"
"Boats wanna float!" I would shout out like a yard parrot.
I suppose I have a delightful situation where I happen to tie up at very friendly marina and can do most any project while floating.
Painting the Hull
31 May 2018 | St Mary's Georgia
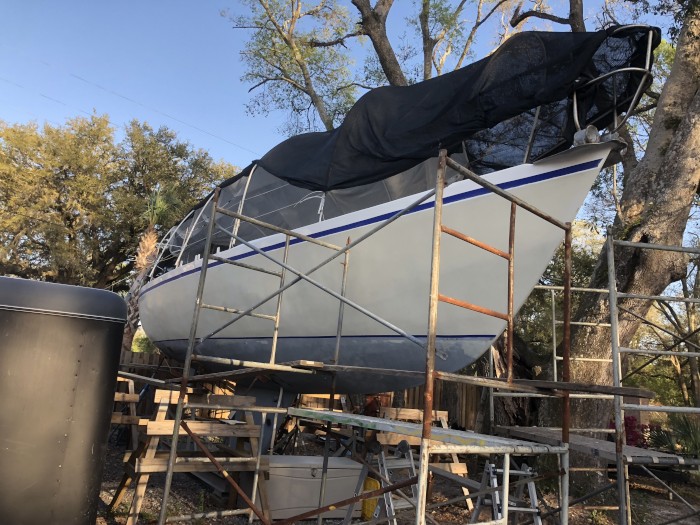
What a long story this paint job has been. I think I'll leave that to another post but suffice to say this was a long and arduous process - roughly 300 hours of sanding and painting. This image shows the 2 part Quantum Epoxy Primer.
I'm pretty happy with the results overall and I would totally recommend EMC's Quantum, a very easy to work with 2 part Polyurethane that flattens out as it cures, is color sand-able and buff-able so you can make repairs and polish it out on future haul outs.
The waterline got a little lost so I'm going to have the boatyard do a "dunk and haul" so I can see get an idea of where the lines would be to do the business of striking an actual waterline.
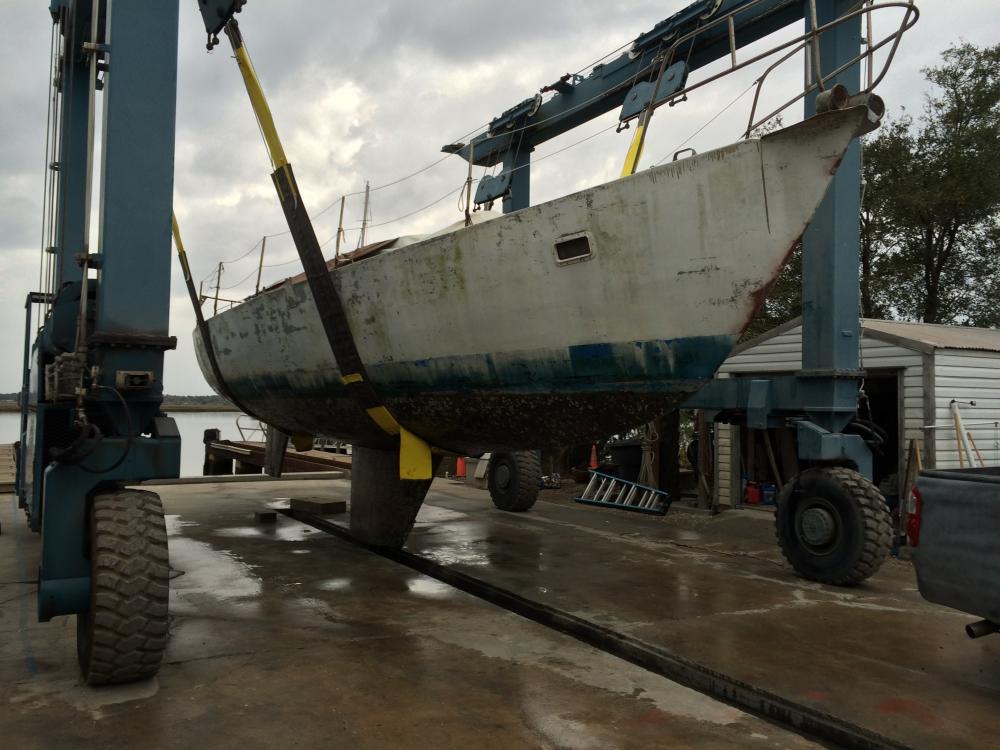
Hauling Out
13 March 2016 | St Mary's Boat Services
This will be the first time I have seen the hull like this and I couldn't be happier. I've seen her many times when careened on the sandbar for a "DIY" haulout but that's not quite the same thing.
More Pics
More Pics
It was time to go - getting towed to St Marys for the haulout
13 March 2016 | Dallas Bluff Marina
The time had come to head to St Marys Boat Services in Southern Georgia to begin the hull repairs and paint. It was a long time coming and I truly I wasn't really ready but the offer came for a "free" tow in that direction so I made it happen. At this point Pearl is just a bare shell of a boat with no engine installed so I was at the mercy of the timeline.
Funny story about the departure mishap. We were all set up and ready, I was still tied to the dock facing north east up river and the tide was going out so I was headed into it. The tow boat, a 44ft CSY with a brandy new Cummins 65hp was tied up along side facing the opposite direction. We had the tow line in place and everything was a go. The operation was simple - tow boat pulls away from me headed down river and will "pluck" me off the dock in tow - easy peasy.
So all of that worked like a charm, it was an exciting moment as Pearl pulled away from the dock into open water. It had been a rather long time since Pearl was in that situation, albeit under tow, but it still felt great until I realized that the boat was turning and headed straight for the dock and was about to crash head on into another boat. I was steering Port as hard as I could and it only got worse. The tow boat decided to add power in an attempt to pull my bow off to port but that only made things worse. Now I was going even faster with the same inevitable outcome - a collision course with a very large old project boat that cold not be avoided. All I could do was flag the towboat to stop all propulsion and hang on.
Well, it wasn't near as bad as I thought it would be. I managed to make contact directly at one of the very strong chainplates and only bent a turnbuckle on the other boat. Pearl sustained a minor ding on the anchor chute plate. Whew! IT was a whole lot more embarrassing than it was damaging so alls well that ends well right?
Turns out that I installed the steering cables incorrectly. It had been a few years since I had taken the steering apart for the cockpit rebuild and I didn't realize that with an aft facing quadrant you have to crisscross the steering cables in the pedestal tube - so the steering was actually backwards. After I quickly figured this out we were off and running. I spent the day having to mentally correct my steering brain to do everything opposite. I did have to reconcile with the owner of the bent shackle but we had known each other for a few years and he was very forgiving. I made it up to him with a stash of boat gear that I wasn't going to use anyway and so it became a win win after all.
Here's some pics of the trip
Getting Pearl ready for the Tow to St Mary's
04 March 2016
doing the last "DIY" haulout to get the 4 years worth of barnacles and crud off the bottom and rudder to make the tow a little easier
Demo the old cockpit
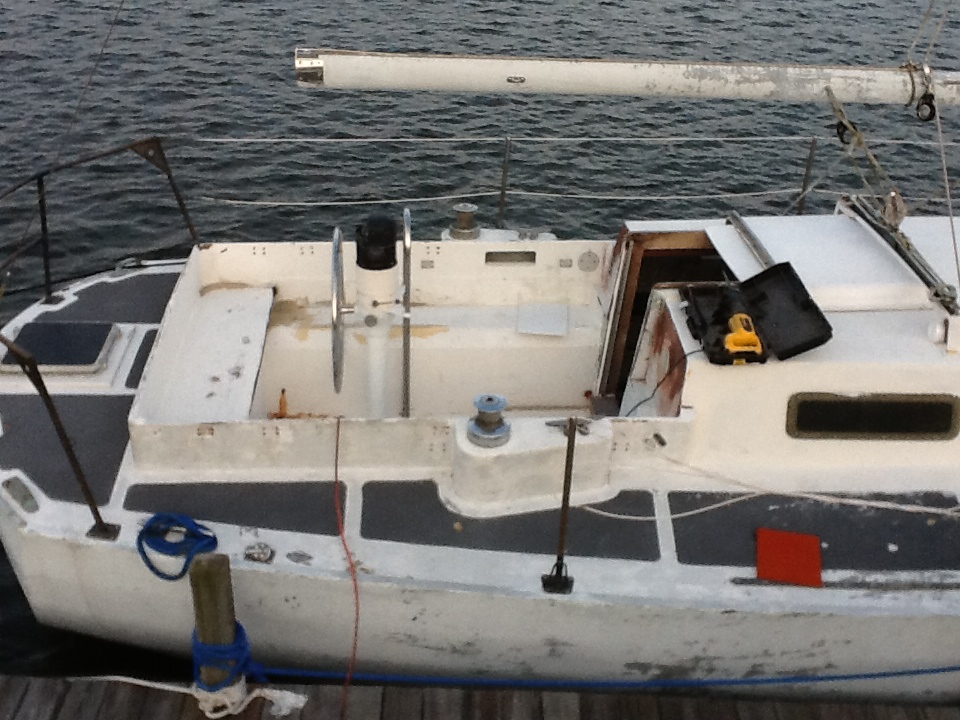
01 October 2012 | Dallas Bluff Marina
Paul

Overall I've had no issues with the laminated plywood decks on Pearl. The execution is solid and I've had no concern for rot or leaks with one exception, the cockpit.
Photo gallery here
Photo gallery here
The cockpit before demo
04 September 2012 | Dallas Bluff Marina
Paul
Getting ready to do the cockpit rebuild and decided to take a few pics of the old one. Pearl is a steel hull with wood decks. The construction overall is really solid with 3/4" marine ply through bolted to the frames and bonded with what looks to be 3M 5200, laminated with 10oz woven and West Systems. Pretty solid and I love it because I get the benefits of a steel hull and superstructure without the mess and feel of a steel deck. I love the wood decks. They are cooler, softer on the foot and it's easy to make changes and repairs as you will see.
This is the old cockpit which has already been modified to remove the traveller that used to cut right across the middle. I changed it to a mid boom traveller system.
Click here for the full gallery
This is the old cockpit which has already been modified to remove the traveller that used to cut right across the middle. I changed it to a mid boom traveller system.
Click here for the full gallery
| Vessel Name: | Pearl |
| Vessel Make/Model: | Custom Built Steel Cutter Racer Cruiser |
| Hailing Port: | Washington NC |
Pearl's Photos - Main
 |
|
 |
 |
 |
 |
|
 |
 |
 |
Just a few pics from our 14 hour journey down the ICW from Sapelo Sound to St Mary's Boat Services near the Kings Bay Naval Station in St Marys Georgia.
15 Photos
Created 3 September 2018
|
 |
 |
Tore out the old rotten cockpit and completely rebuilt it
7 Photos
Created 4 September 2012
|

Port: Washington NC