Cal 40 "Kismet" Restoration
08 September 2016
07 July 2016
08 June 2016
30 March 2015
13 August 2014
10 March 2014
22 December 2013
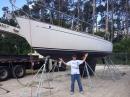
12 August 2013
03 June 2013
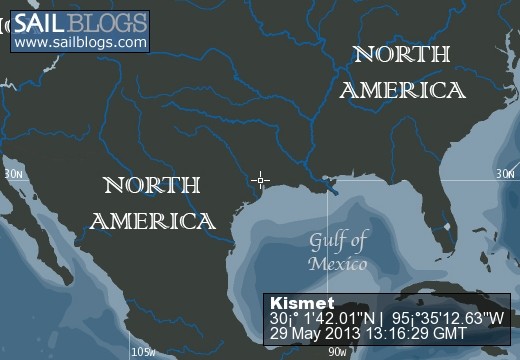
29 May 2013 | Tomball, TX
20 May 2013 | Washington
20 March 2013 | Anacortes, WA
Pin Stripes and Boot Stripes
08 September 2016

Thought I would add a update to explain August 2016...Wow, it was hot!
My major project was to finish all the wet sanding and compounding which I can happy say yes, this has been completed. And when you look at the pictures you can clearly see the difference.
This was also a time to paint the pin-stripes and the boot stripe. This has been completed also, pictures are nice. I am very proud of how she is looking. What do you think? Yea I know she's hot looking :)
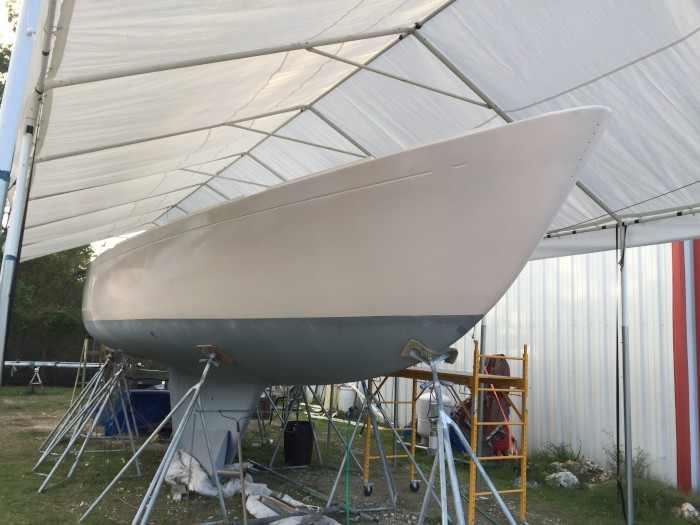
Painting "Matterhorn White"
07 July 2016
You know I learned a whole lot about painting. First I learned I am happy this is not my profession. And if you can hire a professional do-it..I did not hire a professional because, I guess I need to learn something new and this I was successful.
The Paint; I have been toying with what paint to apply, go with the norm and use Awlgrip, Awlcraft2000, or Imron (now Axalta). Then I came across these guys, EMC, "Engineered Marine Coatings" and after much debate I decided on the EMC because of its tough record and easy to repair capability (and I can contest, it's easy to repair and blends perfect)
My first choice was Imron, I even used the primer, it was very easy to apply and sand, 4 coats total, two coats gray with off-sets of cream, sanding with longboard.
Painting with EMC was fairly easy, mixing was easy 1:1 when spraying but I made some amateur mistakes which I am paying for now (extra unneeded steps). They suggest you paint 3 or 4 coats and I did 4 coats. The first coat was perfect I mean professional perfect, no runs, drips or errors perfect. (Wish I could have stopped). The call for wait time between coats, min. 1 hour. That is where I made the mistake, I waited only 45 min, and the 2nd coat was going on good, then I hit some not so dry spots from the 1st coat and it made indention's when the spray hit the paint. FFFFF I was saying. After the 2nd coat I waited and hour but the damage was alread done, 3rd coat after the wait time did not hide and 4th coat after the hour did not hide...
The repair:
To fix my mistake meant sanding. I was already told I would need to wet-sand, then compound and this will leave the surface like glass. But because I made the mistake I needed to sand with a rougher grit paper, then higher then compound. And yes it will fix the issue.
Sand painting errors with 600 grit, then wet sand with 1200 grit, compound with 1500 grit liquid, then 3000. She will look like glass..
To my defense: I understand why it happened; heat! The week I took-off from work to paint was hotter than normal. The temp at 0630 was 78 and was rising from there. When I started it was 84, @ 0730, took me an hour to paint the 1st coat, by 0830 temp was 86. I waited til 0915 and it was 89. I was worried about the heat and rushed. When I finished the job at 1300, it was 97/8..
Check out the pictures you will see it looks great, but it will look better. But it puts me another week or two behind and by the way, like everywhere, it's still hot 98+..Welcome to Texas
The areas in the pictures you see that have no paint is because that will be non-skid area and I will paint those with roller.
But EMC is good paint I will use them again and it's worth checking them out.
http://quantumpaint.com/
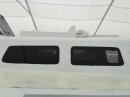
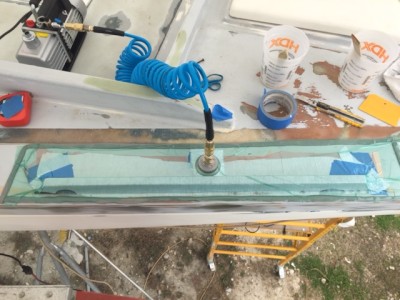
Hatches Pictures:
shinny paint on the hatches:...
The Paint; I have been toying with what paint to apply, go with the norm and use Awlgrip, Awlcraft2000, or Imron (now Axalta). Then I came across these guys, EMC, "Engineered Marine Coatings" and after much debate I decided on the EMC because of its tough record and easy to repair capability (and I can contest, it's easy to repair and blends perfect)
My first choice was Imron, I even used the primer, it was very easy to apply and sand, 4 coats total, two coats gray with off-sets of cream, sanding with longboard.
Painting with EMC was fairly easy, mixing was easy 1:1 when spraying but I made some amateur mistakes which I am paying for now (extra unneeded steps). They suggest you paint 3 or 4 coats and I did 4 coats. The first coat was perfect I mean professional perfect, no runs, drips or errors perfect. (Wish I could have stopped). The call for wait time between coats, min. 1 hour. That is where I made the mistake, I waited only 45 min, and the 2nd coat was going on good, then I hit some not so dry spots from the 1st coat and it made indention's when the spray hit the paint. FFFFF I was saying. After the 2nd coat I waited and hour but the damage was alread done, 3rd coat after the wait time did not hide and 4th coat after the hour did not hide...
The repair:
To fix my mistake meant sanding. I was already told I would need to wet-sand, then compound and this will leave the surface like glass. But because I made the mistake I needed to sand with a rougher grit paper, then higher then compound. And yes it will fix the issue.
Sand painting errors with 600 grit, then wet sand with 1200 grit, compound with 1500 grit liquid, then 3000. She will look like glass..
To my defense: I understand why it happened; heat! The week I took-off from work to paint was hotter than normal. The temp at 0630 was 78 and was rising from there. When I started it was 84, @ 0730, took me an hour to paint the 1st coat, by 0830 temp was 86. I waited til 0915 and it was 89. I was worried about the heat and rushed. When I finished the job at 1300, it was 97/8..
Check out the pictures you will see it looks great, but it will look better. But it puts me another week or two behind and by the way, like everywhere, it's still hot 98+..Welcome to Texas
The areas in the pictures you see that have no paint is because that will be non-skid area and I will paint those with roller.
But EMC is good paint I will use them again and it's worth checking them out.
http://quantumpaint.com/
Hatches Pictures:
shinny paint on the hatches:...
2016 Update (Primed and Ready)
08 June 2016
Hello all!
My intention when I started this blog was to keep everyone informed of the progress of this restoration, I saw some great sites like www.farreachvoyages.com and http://www.triton381.com/projects/restoration/restoration.htm...
These sites are very well documented and I have viewed them many, many times to get ideas and how-to articles.
But as life goes, I have not had the time to document and many times because of work or weather I have been unable to work on the boat, even under the canopy, and I am only one person and time is on my side, I am not at a marine yard, I am at a storage location close to my home. But it's getting time to put Kismet back in the water and start sailing.
Here is what I have done and what I am doing. I have created the launch Kismet list, these are all the projects that must be done before she hits the water. This gives me a sort-of goal list of things that must be accomplished.
The painting has begun in Oct when she got her primer sprayed on.
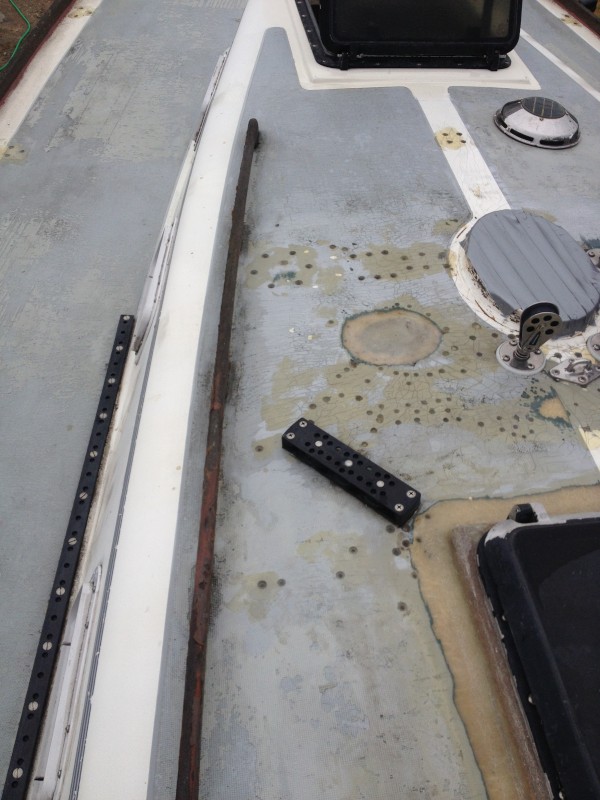
I used Imron high build primer, then sanded it down with a longboard. Then use two more coats of primer (gray and white) and sanded again. The final sanding was with 320. I did the same on the cabin top and cockpit area. At the last moment, I decided after seeing another Cal 40 here in TX that I would create a storage compartment under the port cockpit seating area.
I also finished the hatch covers and the new hatch cover with integrated instrument panel, this was all custom built. (check the pic). It was primed and then painted.
Speaking of paint, after much research I decided that I would use EMC (Engineered Marine Coatings) as the top coat. I first looked at Imron but then changed my mind and when with EMC. It paints very easy, I wasn't too happy with the flattening agent but worked with EMC directly to figure out the problem. I should have used more but that's ok, will wear my sunglasses more :).
Next week I have vacation and will finish the painting of the hull, will be posting picture of that also. Most of the work on the inside of Kismet is completed, besides the head, that needs to be done. I will be changing all the plumbing and I figure I can do that once Kismet is in the water. I have changed all the thru-hulls so that is not an issue.
I also tackled the fixed porthole and created fiberglass inserts for the new windows, it will be frameless and flush to the cabin. Here's a good video from Boatworks today that explains what I am doing and how the windows will look.
https://youtu.be/MQyjxVUskd8
My frames inside are reinforced and are a 1/2 thick, this reinforcement should help with the strength of the cabin along with the new inside stanchions (helps support the deck from flexing).(Somebody in Kismet life-span removed these stanchions, I am putting them back)
All of the opening portholes (6)(Beckson) are being refurbished also, new gaskets, darker lens, and new screens.
So with hope and good weather I will have Kismet completely painted by the end of next week, the I can start putting her back together.
So with that, I will sign off and will update next month
My intention when I started this blog was to keep everyone informed of the progress of this restoration, I saw some great sites like www.farreachvoyages.com and http://www.triton381.com/projects/restoration/restoration.htm...
These sites are very well documented and I have viewed them many, many times to get ideas and how-to articles.
But as life goes, I have not had the time to document and many times because of work or weather I have been unable to work on the boat, even under the canopy, and I am only one person and time is on my side, I am not at a marine yard, I am at a storage location close to my home. But it's getting time to put Kismet back in the water and start sailing.
Here is what I have done and what I am doing. I have created the launch Kismet list, these are all the projects that must be done before she hits the water. This gives me a sort-of goal list of things that must be accomplished.
The painting has begun in Oct when she got her primer sprayed on.
I used Imron high build primer, then sanded it down with a longboard. Then use two more coats of primer (gray and white) and sanded again. The final sanding was with 320. I did the same on the cabin top and cockpit area. At the last moment, I decided after seeing another Cal 40 here in TX that I would create a storage compartment under the port cockpit seating area.
I also finished the hatch covers and the new hatch cover with integrated instrument panel, this was all custom built. (check the pic). It was primed and then painted.
Speaking of paint, after much research I decided that I would use EMC (Engineered Marine Coatings) as the top coat. I first looked at Imron but then changed my mind and when with EMC. It paints very easy, I wasn't too happy with the flattening agent but worked with EMC directly to figure out the problem. I should have used more but that's ok, will wear my sunglasses more :).
Next week I have vacation and will finish the painting of the hull, will be posting picture of that also. Most of the work on the inside of Kismet is completed, besides the head, that needs to be done. I will be changing all the plumbing and I figure I can do that once Kismet is in the water. I have changed all the thru-hulls so that is not an issue.
I also tackled the fixed porthole and created fiberglass inserts for the new windows, it will be frameless and flush to the cabin. Here's a good video from Boatworks today that explains what I am doing and how the windows will look.
https://youtu.be/MQyjxVUskd8
My frames inside are reinforced and are a 1/2 thick, this reinforcement should help with the strength of the cabin along with the new inside stanchions (helps support the deck from flexing).(Somebody in Kismet life-span removed these stanchions, I am putting them back)
All of the opening portholes (6)(Beckson) are being refurbished also, new gaskets, darker lens, and new screens.
So with hope and good weather I will have Kismet completely painted by the end of next week, the I can start putting her back together.
So with that, I will sign off and will update next month
March Madness - 2015
30 March 2015
The title explains everything, it's been Madness to push for projects to be finished, with success coming in all directions.
You know when you read about "Preparation" how important it is before you paint, that prep is 95 percent of the total job, they are not kidding. I can say that I am 96 percent finished with the hull/deck joint and toe rail....Yes the toe rail is almost finished. I think this needs to be explained.
When I started this project I had a vision, inspiration from another Cal 40 that I seen also in Anacortes, WA. When I selected Kismet to be my new boat, knowing that it was going to be a project I needed some idea's. One of the guys took me to see Dancing Bear a Cal 40 that Mark Schrader and company refurbished. In all her beauty at the dock I saw everything that I dreamed about in my head, no teak, simple, modern and crisp looking. When I saw Dancing Bear I found my inspiration, I took photos and did research and when Kismet arrived I started working the plan. I ran across only today two article's from Cruising World mag date Feb & Mar 2006 where they talk about the rebuild of Dancing Bear, and I am so struck with more inspiration to work harder and not worry about how fast it's done, it took them 3 years and I'm at 1 ½ with major projects coming to completion.
Hull Deck joint completed, toe rail installed, new interior completed, redesign fuel system with polisher, fuel tanks, water, sewage refit, all electrical rewired, LED red/white completed, tabbing (was in good shape, did re-enforcements) replaced all thru-hulls, replaced all engine hoses, belts, etc...
All of this work was competed on evenings in the summers and weekends, There is still a lot more to do but things are progressing well, and after reading those article's, I am even more inspired and know that Kismet will float proudly again, soon, very soon....I'm excited..
Toe Rail - Mark Schrader and company (very talented, Quinn Olson) decided to use King Starboard for the toe rail, custom designed and it looks great and I decided that I was going to do the same thing and was able to duplicate the whole process, from router bits to angles. No problem...But after doing some more research, I realized that King Starboard is not such a good product for the southern zones of the US, I'm in TX and the average temp in the summer is 90+. It expands and contracts and this is not good, I think this why they used so man fasteners to bolt the toe rail down (every 4" on center).
All Toe-Rail Pics...
I decided to use Mahogany in-cased in carbon fiber and bonded to the deck. It's more work to do-it this way but will achieve a great look, very functional, last long past my days and will not leak. The process was to measure the lengths of mahogany that I wanted, leaving space for water drainage and stanchion base (see pics). I put a 1" wetted layer of fiberglass down, the put the wood on top, then screwed the wood to the deck (minimal screws used). Came back the next day and put a layer of carbon fiber over the wood, leaving a 2" on each side of the wood so it would bond to the fiberglass deck. I vacuum-bag the rail in-place and came back the next day. It worked great and look even better. I'm in the process of now fairing the seams and doing my final sanding on the hull and will prime when finished.
Deck - The deck has been sanded and faired but still needs attention because of the gelcoat that was originally sprayed was very thick and cause a lot of spider cracks, I will open them up and wet and fair them to smooth finish then I can prime the deck in the next couple months.
That's it for now...
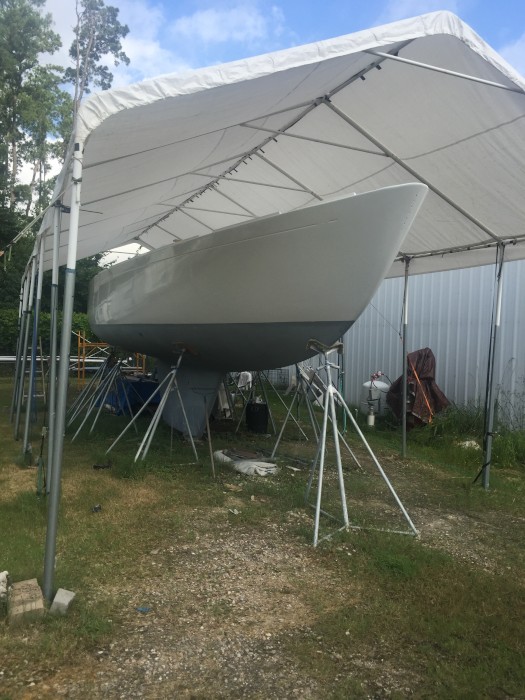
August Update
13 August 2014

Sorry for not so many updates. I am to busy to think about blogs, but today is a slow day and I have time to give some updates since March.
After the March update I been focusing on the interior of Kismet, redoing all the trim, rebuilding all the sinks, (Head/Galley), also reworked the NAV table and ready for installing refrigeration unit. Re-did the forward cabin and started putting back together the holding tank, water tank location and rebuilding all the bunks. This includes a lot of painting. Kismet had a lot of Formica that was used on bulkheads and almost all flat surfaces, I replaced it all because it was all yellowed and scratched, I replaced it with new sheets and updated a lot of the trim and re-stained all the wood to give it a fresh new look.
I still need to finish the hull/deck rebuild, I need to primer and do a final sanding so I can paint. Here in TX it's too hot for painting, the humidity is running 90 to 95%, so I will wait till Fall to paint.
I am preparing to paint, so take a look at the cover I bought from "ShelterLogic", it's a 20 by 40 foot, I added 8 foot legs to give me more height, and I made some walls (not shown) so I can enclose for painting.
This shelter gives me some protection from the heat and the rain, very good product!
Thats about it for now, I have passed the year mark of being on the hard. When your a one-man operation it takes longer.
March Update
10 March 2014

Wow, March already! So what has happened since December? Not much been too cold, well that is not completely true. I did have to hold off on the toe rail because of coldness, I was able to complete it but not able put on 1st coat of primer. I did put a coat of epoxy on it to seal it in for the moment, can't tell in the pic because I lightly sanded it. By the end of March hope to have that competed.
So here is what I have done since Dec.
Fuel System:
New fuel tank installed, if you recall I removed the two old Aluminum tanks and replaced with Polyethylene. I had a custom built water tank made that stretches the whole distance above the bilge below the floor boards, it's 9"W x 24"H x 60"L. I also relocated the fill locations for the fuel and the water to the side decks (Prt - Water/Stbd - Fuel). I built a fuel polishing system and a control panel for managing the fuel. This is located on the Stb side rear of the engine compartment next to the fuel tank, (See Pic). I also mounted the water pump and accumulator on the Stb side hull (special mounting plate created)(This will be in line with the water maker system. Future project)
Electrical:
One of the problems with Kismet and was noted in the survey was the wiring. The 120v wiring was House wire, not marine grade wiring. She also had an over abundant (12) 120v house receptacles and no GFI plugs. So I removed all the 120v wiring replaced with marine grade wire and removed 6 house plugs and installed 3 GFI plugs. She will pass that inspection :). I also upgrade the 12v wiring system to fall in-line with inspection standards. The 12 volt wiring was not as bad but speaker wire used for lighting is not correct wire, it will work, but not for me...
Engine:
The engine was lifted off the mounts so the plumbing could be reworked and some of the electrical wires could be relocated. I also replaced all the hoses on the engine and replace the engine fuel filter, oil filter, drained the oil and replaced, drained the coolant and replaced, thermostat was replaced, impeller was replaced fuel hoses was upgrade from ¼ to 5/8, exhaust hose and water intake hose was replaced. Replace engine controls also.
Bottom:
All the bottom paint has been removed and the hull has been exposed. (See Pic's in Gallery). Talking to previous owners there was a compete blister removal in early 2000'ish time frame and it's visible. Doing a complete inspection I see the hull has not generated any new blister and the repairs are in great condition. The next step is to go ahead and fair some of the hull and put the 1st of 5 barrier coats of Interlux 2000E and then antifouling paint on after that. In hind-site I should have just refreshed the antifouling and moved on, but me being me I needed to see for myself that all was good :).
Deck:
Haven't done anything on the deck beside the deck/hull joint, that will require paint fairing, paint fairing etc. So I see that being finished in April time frame....May 25th will mark the 1 year point of the project I was hoping to be finish but that will not be so.
(See Gallery for Pictures)
Remaining projects are listed, not by priority;
Deck fairing, painting,(Imron Flat Snow White) non-Skid (Tent Gray)
Hull Painting (Imron MS600, Snow White)
Bottom Paint (Pettit Trinidad SR Pro) Black
Hatch replacement
Cabin Interior
Head piping / tank replacement
Well that's it for the moment, if you have any question let me know.
| Vessel Name: | Kismet |
| Vessel Make/Model: | Cal 40 |
| Hailing Port: | Seabrook, TX |
Kismet's Photos - Main
 |
 |
Pictures of the deck and the rebuilding process.
2 Photos
Created 3 June 2013
|
 |
I got this picture from the Yahoo Groups
2 Photos | 1 Sub-Album
Created 20 March 2013
|

Port: Seabrook, TX
Gallery