
Second Wind
07 June 2009 | Stockton, Ca
06 April 2009 | Stockton
06 April 2009 | Stockton
05 April 2009 | Stockton
05 April 2009 | Stockton
05 April 2009 | Stockton
05 April 2009 | Stockton
04 April 2009 | Stockton
04 April 2009 | Stockton
04 April 2009 | Stockton
04 April 2009 | Stockton
04 April 2009
Rigging Complete!
07 June 2009 | Stockton, Ca
Clear, 82 and winds SW at 8
I finally got ahead of the development curve on the two software packages I am supposed to deliver on 17 July, and decided that it was a good day to finally get some rest and finish my little lady.

Since my last post, I had to give her 3 weeks to cure before I could flip her back upright. Once back on the trailer, I got in with some Worst Marine textured deck paint in off white and twice coated all the cockpit surfaces save for the actual footwells, which were never textured to begin with, and I wanted to ba able to clean the floors of any dirt, soda, beer, food, etc. depending on who is with me that day. The end result is even more classy than I had originally envisioned. The off white complements the blue pearl really nicely and ties the deck rails in with the cream waterline stripes and bottom. The deck coating is actually really nice to apply, as it rolls out with a textured wool roller, and appears to be self levelling. The end result is a nice even texture (I was really concerned about applying this coating after my little fiasco with the primers and such before). My fears nullified as soon as the second coat went down and I saw that the pumice evened out very nicely and the paint covered well. Note to self.... Calculate square footage for paint and then double it before calculating paint requirements. I did a very thorough calculation on the interior and decks, and then calculated for two coats based on the manufacturer's instructions and that turned out to only cover once. Apparently the wool roller I was using puts down a heavier coat than the foam rollers I think they were probably considering. Oh well, at least it was off-the-shelf and was a fast trip to pick up another quart. The net result is a very durable, very safe and very nice looking completion to my little restoration job. Even when new, this Sailnetics FJ NEVER looked this good.

The rigging effort was actually spread out over two weekends (albeit over a month apart), but I finally got in and finished it up today. A month ago, I got in and ran all the 1/4 inch poly. This included the jib cunningham, the hiking strap shrouds, the boom vang, the main cunningham, the centerboard control, and the traveller. Interestingly enough, the boat came with a lot of very high end hardware. I know that Sailnetics had a reputation for shipping their boats with all Ronstan or Harken rigging depending on customer choice. Somewhere along the lines, the boat has been completely re-rigged with all original hardware (good stuff) upgraded with all the best Harken ratcheting blocks, Ronstan self-guiding cam-cleats, and a very high end (for a dinghy) reciprocating ball traveller and compund block with tailing cam-cleat. All of this made me start adding up all the replacement const for all these race-rig parts and the final number was up around half of the replacement cost of the boat new from H&H Sailcraft in Ohio (the only certified FJ builder in the US). Needless to say, when I found out that the traveller needed some attention (all the balls in the traveller had eroded and were pitted) it was a no brainer to go ahead and rebuild with new parts. Needless to say, the balance of the rigging hardware is in like-new condition so all I ended up replacing was the poly stock.
I found out that the best way to fly when replacing sheets and halyards is to go to Worst marine and look over their closeout and clearance stock. It is usually pretty impressive when one can find 200 feet of premium 3/8 line at 38 cents per foot, especially when it goes for three times that price when you have it cut off the spool. Regardless, my trip ended up netting me 130 feet of 3/8 and 70 feet of 1/4 New England "Sta-Set" for right at 75 dollars. I scanned the net and couldn't even come close to this anywhere else. Can you believe it? I actually got a good deal at West, for once.
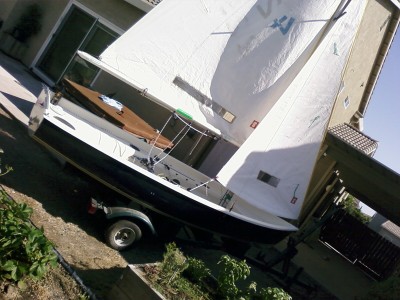
Anyway when I resumed work today, I started with the spyderlines for the mast rig, which is currently not being used, however may be reemployed ata later date for trapeze control or maybe even go back to mast tuning. After I finished dealing with that and getting the thru-hull fixtures back in place, I raised the mast and hoisted the sails. The sails you are seeing in the pics are the original stock that came with the boat. I am going to burn these out until such time as I am forced to bring out the new NorthSails compliment, or I decide to start club racing again... This time with my own boat and not the club owned boats that never get rigged right. With the flying stock raised and ready for action, it was time to build new sheets. First I grabbed a new set of aluminum snap hooks, and then set out to measure a new mainsheet and jibsheets. I love working with triplebraid line, as opposed to dinghy line. Being of much higher quality, it doesn't unravel as bad, and melts nicely to finish off the cut ends so it doesn't fray. I was glad to get rid of the garbage that was there before.

Now that the lines were sized, cut and installed, it was time for the fun part... optimizing the rig. There are about 20 different ways to rig this boat, so I played with several until I figured out that the last person to rig the boat had done so to accommodate multiple scenarios... Single handed with the skipper seated anywhere aft of the traveller, and all lines running conveniently aft for ease of use; Double handed cruising, with the jib sheets running through a set of blocks and easily led across the boat from the car tracks through a set of cam-cletes mounted to the centerboard tunnel; and double-handed race with trapeze (this includes utilization of cars that carry a block on one side and a cam-clete on the opposite side for best access when hanging off the rails from the wires. I figure these first two setups will be employed most often unless something happens and we start getting really competetive.

Anyway, check out what a fully race-rigged Olympic class dinghy entails... Even the Laser Bahias I was racing in Berkeley didn't have so many ways to fine-tune the running rig... Now if I can just remember what all those damn lines do when the situation demands it, and hopefully not get all tangled up in it and end up going overboard... eesh!
Seriously, this is going to be a fun boat to sail... it should be close to the Lasers but heads and shoulders beyond the Lido I sailed as a kid.
Now to find a pace to take it out (that isn't the river running with a 2-5 knot current, depending on the tides) where I can learn how she behaves and what to expect from her under various conditions. Once the familiarization is complete, the Stockton Deep Water Channel and Turning Basin should be good, with easy access and right up the raod from home. No more hour and a half drive just to go get wet.
Anyway, enjoy the pics... This was a fun project and I enjoyed every minute of the restoration... The result is really nice, classy and clean. Now if I could just get another weekend off to go sailing...
Since my last post, I had to give her 3 weeks to cure before I could flip her back upright. Once back on the trailer, I got in with some Worst Marine textured deck paint in off white and twice coated all the cockpit surfaces save for the actual footwells, which were never textured to begin with, and I wanted to ba able to clean the floors of any dirt, soda, beer, food, etc. depending on who is with me that day. The end result is even more classy than I had originally envisioned. The off white complements the blue pearl really nicely and ties the deck rails in with the cream waterline stripes and bottom. The deck coating is actually really nice to apply, as it rolls out with a textured wool roller, and appears to be self levelling. The end result is a nice even texture (I was really concerned about applying this coating after my little fiasco with the primers and such before). My fears nullified as soon as the second coat went down and I saw that the pumice evened out very nicely and the paint covered well. Note to self.... Calculate square footage for paint and then double it before calculating paint requirements. I did a very thorough calculation on the interior and decks, and then calculated for two coats based on the manufacturer's instructions and that turned out to only cover once. Apparently the wool roller I was using puts down a heavier coat than the foam rollers I think they were probably considering. Oh well, at least it was off-the-shelf and was a fast trip to pick up another quart. The net result is a very durable, very safe and very nice looking completion to my little restoration job. Even when new, this Sailnetics FJ NEVER looked this good.
The rigging effort was actually spread out over two weekends (albeit over a month apart), but I finally got in and finished it up today. A month ago, I got in and ran all the 1/4 inch poly. This included the jib cunningham, the hiking strap shrouds, the boom vang, the main cunningham, the centerboard control, and the traveller. Interestingly enough, the boat came with a lot of very high end hardware. I know that Sailnetics had a reputation for shipping their boats with all Ronstan or Harken rigging depending on customer choice. Somewhere along the lines, the boat has been completely re-rigged with all original hardware (good stuff) upgraded with all the best Harken ratcheting blocks, Ronstan self-guiding cam-cleats, and a very high end (for a dinghy) reciprocating ball traveller and compund block with tailing cam-cleat. All of this made me start adding up all the replacement const for all these race-rig parts and the final number was up around half of the replacement cost of the boat new from H&H Sailcraft in Ohio (the only certified FJ builder in the US). Needless to say, when I found out that the traveller needed some attention (all the balls in the traveller had eroded and were pitted) it was a no brainer to go ahead and rebuild with new parts. Needless to say, the balance of the rigging hardware is in like-new condition so all I ended up replacing was the poly stock.
I found out that the best way to fly when replacing sheets and halyards is to go to Worst marine and look over their closeout and clearance stock. It is usually pretty impressive when one can find 200 feet of premium 3/8 line at 38 cents per foot, especially when it goes for three times that price when you have it cut off the spool. Regardless, my trip ended up netting me 130 feet of 3/8 and 70 feet of 1/4 New England "Sta-Set" for right at 75 dollars. I scanned the net and couldn't even come close to this anywhere else. Can you believe it? I actually got a good deal at West, for once.
Anyway when I resumed work today, I started with the spyderlines for the mast rig, which is currently not being used, however may be reemployed ata later date for trapeze control or maybe even go back to mast tuning. After I finished dealing with that and getting the thru-hull fixtures back in place, I raised the mast and hoisted the sails. The sails you are seeing in the pics are the original stock that came with the boat. I am going to burn these out until such time as I am forced to bring out the new NorthSails compliment, or I decide to start club racing again... This time with my own boat and not the club owned boats that never get rigged right. With the flying stock raised and ready for action, it was time to build new sheets. First I grabbed a new set of aluminum snap hooks, and then set out to measure a new mainsheet and jibsheets. I love working with triplebraid line, as opposed to dinghy line. Being of much higher quality, it doesn't unravel as bad, and melts nicely to finish off the cut ends so it doesn't fray. I was glad to get rid of the garbage that was there before.
Now that the lines were sized, cut and installed, it was time for the fun part... optimizing the rig. There are about 20 different ways to rig this boat, so I played with several until I figured out that the last person to rig the boat had done so to accommodate multiple scenarios... Single handed with the skipper seated anywhere aft of the traveller, and all lines running conveniently aft for ease of use; Double handed cruising, with the jib sheets running through a set of blocks and easily led across the boat from the car tracks through a set of cam-cletes mounted to the centerboard tunnel; and double-handed race with trapeze (this includes utilization of cars that carry a block on one side and a cam-clete on the opposite side for best access when hanging off the rails from the wires. I figure these first two setups will be employed most often unless something happens and we start getting really competetive.
Anyway, check out what a fully race-rigged Olympic class dinghy entails... Even the Laser Bahias I was racing in Berkeley didn't have so many ways to fine-tune the running rig... Now if I can just remember what all those damn lines do when the situation demands it, and hopefully not get all tangled up in it and end up going overboard... eesh!
Seriously, this is going to be a fun boat to sail... it should be close to the Lasers but heads and shoulders beyond the Lido I sailed as a kid.
Now to find a pace to take it out (that isn't the river running with a 2-5 knot current, depending on the tides) where I can learn how she behaves and what to expect from her under various conditions. Once the familiarization is complete, the Stockton Deep Water Channel and Turning Basin should be good, with easy access and right up the raod from home. No more hour and a half drive just to go get wet.
Anyway, enjoy the pics... This was a fun project and I enjoyed every minute of the restoration... The result is really nice, classy and clean. Now if I could just get another weekend off to go sailing...
hull refinishing contined...
06 April 2009 | Stockton
beautiful... author exhausted
The final subsection in the chapter of FJ13 hull refinishing comes to a close with the clearcoat. Once all the base was down and inspected, it was time to get ready for the clear. First thing is first, since white shows everything that may have fallen off of the making paper, blown through the open garage door (ventilation), or fallen off my body (don't laugh, you would be surprised at how little body hairs, threads, flecks of paint, or dust can spring off your body from ten feet away and naturally, be magnetically attracted by wet paint); tacking the white to get rid of any dust, and such (after blowing myself and my clothes off really well) is in order. Clean tack rag in hand and an air chuck on the other, I take to the task. Yeah, that looks good... Wow! this is going to be really nice when it is done... Very clean, very pretty... I can tell she is happy to be getting this ultra-makeover... I mean, what lady doesn't like a day at the spa getting a full body massage followed by a cosmetic makeover?
So all tacked up, here comes the catalyzed clear. This stuff is scary without a respirator. The overspray coats your skin, your face, your nose, etc... yup, you guessed it, there was one item missing from my box... Had to do this the old way... Holding my breath....
Since it is a small boat and I was blowing thin coats of clear, each coat was pretty quick, so the holding my breath bit wasn't a big issue. The clear went down without too many challenges, and yes, the outcome was everything I had hoped for.
The beauty of this particular clear is it is diamond clear urethane by PPG. It dries up crystal clear... May clearcoats have a slight yellow cast to them which throws the color a bit... Not the case here... and the other thing I like about it is that the product, when dry has a very high gloss. It is dry to the touch as I write this, and still looks wet.
The end result is quite nice, and I am very happy with the end result. Once the topsides are painted and the boat is re-rigged, she is going to be very photogenic. Even better, while not many people ever notice small sailboats, and most that I have seen lately are kinda old and beat up; our little lady is sure to get an admiring glance here and there.
Here are a few pics of the completed job.


Now I just let it cure up and harden for a couple of weeks before I can turn her back upright on the trailer so I can take care of the anti-skid on the topsides. I think I am going to go with an anti-skid throughout, including the rails, which one sits and stands on when flying on the trapeze. The coating throughout will make for a uniform appearance, but also add to an enjoyable sailing experience by limiting the number of accidental slips in the bottom of the boat during a tack/ gybe, or sail handling maneuver. I thought about using the white base/ clear on the topsides, but after slipping off the last boat whole walking on the deck to handle a bumper, I decided that slipping and breaking my backside in this one was not going to be an option.
Thanks for following this series of posts...
May the winds always cooperate, and you make port safely...
So all tacked up, here comes the catalyzed clear. This stuff is scary without a respirator. The overspray coats your skin, your face, your nose, etc... yup, you guessed it, there was one item missing from my box... Had to do this the old way... Holding my breath....
Since it is a small boat and I was blowing thin coats of clear, each coat was pretty quick, so the holding my breath bit wasn't a big issue. The clear went down without too many challenges, and yes, the outcome was everything I had hoped for.
The beauty of this particular clear is it is diamond clear urethane by PPG. It dries up crystal clear... May clearcoats have a slight yellow cast to them which throws the color a bit... Not the case here... and the other thing I like about it is that the product, when dry has a very high gloss. It is dry to the touch as I write this, and still looks wet.
The end result is quite nice, and I am very happy with the end result. Once the topsides are painted and the boat is re-rigged, she is going to be very photogenic. Even better, while not many people ever notice small sailboats, and most that I have seen lately are kinda old and beat up; our little lady is sure to get an admiring glance here and there.
Here are a few pics of the completed job.
Now I just let it cure up and harden for a couple of weeks before I can turn her back upright on the trailer so I can take care of the anti-skid on the topsides. I think I am going to go with an anti-skid throughout, including the rails, which one sits and stands on when flying on the trapeze. The coating throughout will make for a uniform appearance, but also add to an enjoyable sailing experience by limiting the number of accidental slips in the bottom of the boat during a tack/ gybe, or sail handling maneuver. I thought about using the white base/ clear on the topsides, but after slipping off the last boat whole walking on the deck to handle a bumper, I decided that slipping and breaking my backside in this one was not going to be an option.
Thanks for following this series of posts...
May the winds always cooperate, and you make port safely...
hull refinishing contined...
06 April 2009 | Stockton
beautiful
Okay... So with the bottom all masked off, it was time to start blowing the blue pearl base. BTW this blue is actually a General Motors color. It is regularly seen on 2003 - 2005 Suburbans, Tahoes, Corvettes and Cadillacs. It is a very pretty dark blue with a heavy pearl and some metal flake for light refraction. The White is from a three part Cadiallac Ice White, which has been a staple color for the manufacturer for the last ten years or so. I chose not to go with the pearl to preserve the super-clean aesthetic. My last boat was mostly pearl white with this blue, and a lighter one for graphics. I noticed then that the white pearl, while quite beautiful by itself, tends to look a little dirty when you pair it up with the darker pearls. Don't get me wrong, the last boat came out amazing, but for a sailboat, I wanted to stick with that ultra-clean look that one sees on the really high-end yachts. To me it is just about as beautiful as a sailboat can get, and always makes me look twice.
Anyway... I laid out the first coat of blue... yeah, that's that beautiful color I remember and love so much...

Oh dadgumit! Remember the problems I had on transom with the white base lifting? Guess what? As I was checking the paint to see if it had flashed enough to apply the second coat, guess what I found up on the forward port side? Yup, from the bow line back about a third of the way, the base had bit through, and reacted with that darned primer again... >... Okay, by now I have just accepted that this was going to be the battle of the project... So away we go wet sanding back to get rid of all the cratering caused by the lift... for the most part, back to the gel coat. By now, I have sanded my hand raw (wet sanding paper is very abrasive on skin -- ie the hand holding the paper) and now my ring finger is bleeding and getting all over the surface I am trying to prep... Lovely...
So I get it all fixed and feathered back in. Now I have to go back and re-base it, which doesn't bother me too much since the blend will be hidden when I dp a couple of drop-coats of the paint to make the pearls stand up, which is an old painter's trick for overcoming the mottling that occurs with nearly every spray gun I have ever used. This consists of cranking up the air pressure to super atomize the material, and then standing back about twice the normal distance, holding the gun at a 45 degree angle to the surface and dusting the micas over the surface. The result is a much deeper, uniform appearance, and is also a really cool of camouflaging imperfections that might have been missed. It worked for the most part. It still lifted a bit, but not nearly as bad as before. The two things that occur to me at this point is: 1. no one will notice it from 10 feet away or on the water, so no big deal, and 2. this is all moot the first time I accidentally put her into the dock in a fluky wind and strip the side. This isn't one of those things one wished to happen, but like when talking about going down on a motorcycle, it isn't a matter of "if", as opposed to a matter of "when". Besides, it is my sense of personal performance that makes me upset about this. It sure isn't the first time I have had a paint job turn up problems that require rework, and it sure as heck wasn't the worst (I once did a car - complete paint job - that the paint self destructed on - long story, but as it turned out, it was a bad paint batch from the factory - and my simple splash and deliver turned out with a full body strip, redo all the bodywork on the car, prime block and seal, and try again - 30 hour job turned into a 300 hour nightmare, which incidentally ended up being entirely paid for by the paint company (I am legally not at liberty to mention which one)).
Suffice it to say, I got the base completed, finally, and once dry, unmasked it... The result? Nice...


Even without clear, I was able to tell exactly how it was going to look finished... Okay, now I am starting to feel better about the world in general...
The HAWK (104.1) is playing killer tunes from the 80's and 90's - they call it Sunday Flux Capacitor - My paint is starting to behave, and I am starting to see the finish line... Now it is time to let it all dry up nice and tight. The wonderful thing about base coat is that it is much like lacquer; it dries really fast, and can be worked with or recoated, in a very short time.
Anyway... I laid out the first coat of blue... yeah, that's that beautiful color I remember and love so much...
Oh dadgumit! Remember the problems I had on transom with the white base lifting? Guess what? As I was checking the paint to see if it had flashed enough to apply the second coat, guess what I found up on the forward port side? Yup, from the bow line back about a third of the way, the base had bit through, and reacted with that darned primer again... >... Okay, by now I have just accepted that this was going to be the battle of the project... So away we go wet sanding back to get rid of all the cratering caused by the lift... for the most part, back to the gel coat. By now, I have sanded my hand raw (wet sanding paper is very abrasive on skin -- ie the hand holding the paper) and now my ring finger is bleeding and getting all over the surface I am trying to prep... Lovely...
So I get it all fixed and feathered back in. Now I have to go back and re-base it, which doesn't bother me too much since the blend will be hidden when I dp a couple of drop-coats of the paint to make the pearls stand up, which is an old painter's trick for overcoming the mottling that occurs with nearly every spray gun I have ever used. This consists of cranking up the air pressure to super atomize the material, and then standing back about twice the normal distance, holding the gun at a 45 degree angle to the surface and dusting the micas over the surface. The result is a much deeper, uniform appearance, and is also a really cool of camouflaging imperfections that might have been missed. It worked for the most part. It still lifted a bit, but not nearly as bad as before. The two things that occur to me at this point is: 1. no one will notice it from 10 feet away or on the water, so no big deal, and 2. this is all moot the first time I accidentally put her into the dock in a fluky wind and strip the side. This isn't one of those things one wished to happen, but like when talking about going down on a motorcycle, it isn't a matter of "if", as opposed to a matter of "when". Besides, it is my sense of personal performance that makes me upset about this. It sure isn't the first time I have had a paint job turn up problems that require rework, and it sure as heck wasn't the worst (I once did a car - complete paint job - that the paint self destructed on - long story, but as it turned out, it was a bad paint batch from the factory - and my simple splash and deliver turned out with a full body strip, redo all the bodywork on the car, prime block and seal, and try again - 30 hour job turned into a 300 hour nightmare, which incidentally ended up being entirely paid for by the paint company (I am legally not at liberty to mention which one)).
Suffice it to say, I got the base completed, finally, and once dry, unmasked it... The result? Nice...
Even without clear, I was able to tell exactly how it was going to look finished... Okay, now I am starting to feel better about the world in general...
The HAWK (104.1) is playing killer tunes from the 80's and 90's - they call it Sunday Flux Capacitor - My paint is starting to behave, and I am starting to see the finish line... Now it is time to let it all dry up nice and tight. The wonderful thing about base coat is that it is much like lacquer; it dries really fast, and can be worked with or recoated, in a very short time.
hull refinishing contined...
05 April 2009 | Stockton
beautiful
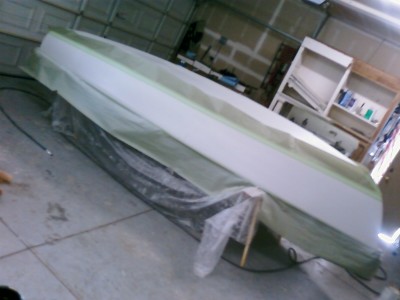
So... with the base down, finally... The next step was to lay the stripes... I decided that I was going to go with some classic yacht striping along the waterline. this consisted of breaking the side color and then a 3/4 inch white stripe followed by a 1/4 inch white, then a 1/4 inch blue, a 1/4 inch white, and another 1/4 inch blue... The picture above shows the hull all taped and masked to this end.

After I got all the striping laid out (BTW, this is a real nightmare on a flat white surface with no way of seeing the curves of the hull for reference, so I had to guesstimate the waterline of the hull, made worse by the fact that it was upside down, thus throwing off my ability to visualize. I am sure it is quite close... The next step was to mask the bottom up tight... The worst thing I could have happen at this point, would be to have a leaky mask that would allow dark blue to "dust" over the surface. It would just kill the very clean aesthetic of the pristine off-white base coat.
After I got all the striping laid out (BTW, this is a real nightmare on a flat white surface with no way of seeing the curves of the hull for reference, so I had to guesstimate the waterline of the hull, made worse by the fact that it was upside down, thus throwing off my ability to visualize. I am sure it is quite close... The next step was to mask the bottom up tight... The worst thing I could have happen at this point, would be to have a leaky mask that would allow dark blue to "dust" over the surface. It would just kill the very clean aesthetic of the pristine off-white base coat.
hull refinishing complete...
05 April 2009 | Stockton
beautiful

I am going to have to do this in multiple entries, as I haven't figured out how to pull multiple images from the photo album to place in my post...
Started out early this morning, moved the FJ off the prep trailer, and onto sawhorses (courtesy of my neighbor and close friend Chris). My projects always seem to catch neighborhood attention, so enlisting a little help in the transfer was relatively smooth.
Got it all masked off and ready for the first coat of base color (a creamy off white). The picture above is after the first coats of base went down. (Note to self: next time when asking the people at Worst Marine about paint compatibility, don't listen). I had gone down to pick up some marine primer/sealer, and after a long time trying to decide, I wanted a good sandable primer/ surfacer/ sealer, and I was concerned about compatibility with the catalyzed acryllic urethane that I was putting down, so of course I asked, told them what I was doing, and the primer they gave me was supposed to work... yeah... right... Got the first base down and half the transom lifted. Can you say p'd off? So after the base had flashed completely, I wet sanded it all down to the gel coat again, smoothed out the cratered substrate, washed and tacked it all again, and followed with several very light coats of base. It didn't end here, but stay tuned, and I will elaborate in the next couple posts.
hull refinishing contined...
05 April 2009 | Stockton
beautiful
Once I got it all masked up and ready to go, it was time to start applying the dark blue pearl base.
Remember the problem I had with the paint lifting on the transom??? Yup, did it again... This time it was the port bow... from the bow itself, back about a quarter to third of the overall hull length. Now I was just determined to get the job done... I will yell and swear about the WM sales person that promised me that the darned primer would work for my purposes. Next time I will just go up to
Auto-Industrial Paint Co. or one of the other body and paint suppliers in town and follow my initial thoughts of just using a good epoxy primer to seal the darned thing up prior to painting. Anyway, another hour and a half lost to wet sanding all the lifting out (back to the gel coat yet again), cleaning, tacking, and very light coats of base to keep it from massively re-lifting. This stuff is really reactive if one isn't really, really careful. Well, it didn't lift nearly as bad as before, but it came back... screw it, I will just blend it out to try and camouflage it a bit, I had to drop coat the blue anyway to get the pearls to stand up right, so that will help hide it, and what the heck... Once it is on the water, no one will ever notice... I never wanted it perfect... None of all this frustration will make a darned bit of difference once I stripe it on the dock the first time... >
Anyway...
This is actually a 2005 Cadillac color. The white, BTW was the base for a three step white pearl, which is also a very popular Cadillac color. I didn't want to go with the pearl this time, because I wanted to maintain that really clean aesthetic, and believe it or not, the white pearl, next to the blue pearl, kind of dirties it all up; at least it doesn't scream "Clean!". I learned this after painting my last boat. The difference there, however, is that was primarily white pearl with blue and blue graphics, and was on a West Coast hot boat. Here I was going for that pure sailboat look that never ceases to make me take a second look.
Here are a couple of looks at the stripes after I got the whole thing unmasked.
Even without the clear, this classic scheme really made me feel a lot better about the frustrations. The blems really aren't all that bad. Could be, and has in the past, been a hell of a lot worse than this.
Look how clean the waterline came out on these... Even I had to smile on that. Freehand striping like this is a heck of a challenge, because if you don't do it right the stripe won't flow smooth (they become really wavy and peaked... not flowing), an the 1/4 inch stripes wont appear uniform... Got lucky today. This made up for all the BS with the primer.
All Blocked Out and Ready for Paint
04 April 2009 | Stockton
Clear, Calm and Cool

Spent the day blocking out the primer, getting ready for paint. The intent is to base the whole thing in bright white, and then tape at the waterline, leaving the bottom white and then, adding a couple of classic yacht stripes paint up to the rub rail in midnight blue pearl.
After the hull has cured up, and I can put her back up on the trailer, I am thinking that the insides and topsides are going to go anti-skid white for safety purposes. I can roll those surfaces and add texture to the areas where traction is most important (floors and seat tops).
The missus has commented that I have finally taken on a project she can actually agree to. (the last few have been... how should I say... epic?) Now that the garage is cleaned out and I have gotten rid of all the artifacts from projects past, as well as deciding on just a couple of activities I wish to concentrate on, instead of letting my ADD suck me into way too many hobbies, I am actually feeling a lot less overwhelmed, more focused, and can attain my goal in a much more truncated timeframe.
Spoke with my pal DeltaRat today, and got a chance to catch up on his latest and greatest. Sounds like he is enjoying all the wonders which come along with being a boat owner. He is in the process of slowing restoring his newly acquired Catalina 25, which is currently a little rough around the edges cosmetically, yet seaworthy and a lot of fun to sail. He is in the throws of April Maintenance in preparation for May's opening to the season. The winds the last couple of months have been erratic at best, with the exception of the last week, and sailing the Delta has been subjugated to powered headway with an occasional lucky break when enough sustained breeze would come up to warrant hoisting the sails.
Got lucky over at West Marine and picked up some triple braided sheet line for half price (note to self: always sheck the clearance cart for pre-cut line that no-one claimed. They sell it for a very reasonable price, unlike their normally lofty pricing)
The boat was previously upgraded with all Harken and Ronstan blocks and cam-cleats for 3/8 sheets, so now I have 150 feet of 3/8 and 65 feet of 1/4 inch. This should be just right for re-rigging the running gear.
That is about all for now, more tomorrow...
Hull progress
04 April 2009 | Stockton
Chilly and Breezy
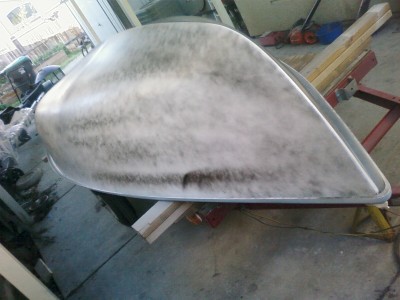
So, I got started this week on the repairs I needed to do on the hull. I started out by DA blocking the repair areas until they were relatively smooth, then they got filled and blocked out.
Went over to West Marine and picked up some marine primer, and spot primed the repair areas. Then blocked it all out.
The last two days I worked on it, I removed all the through-hull hardware, and got to sanding the rest of the hull. I went over the entire hull with a DA and 80 grit. This allowed me to smooth out 26 years of beach dragging, trailer marks, and dock scratches. I ended up sanding it pretty aggressively, and faired the bottom during the process.
This evening, I was able to get her into a final coat of primer, so all I have to do is block it lightly to get rid of the sanding scratches and start thinking about paint.
The above pic is tonight's end result. All primed up and guide-coated, so now we move to wet sanding and prep for paint.
continued..
04 April 2009 | Stockton
Chilly, clear
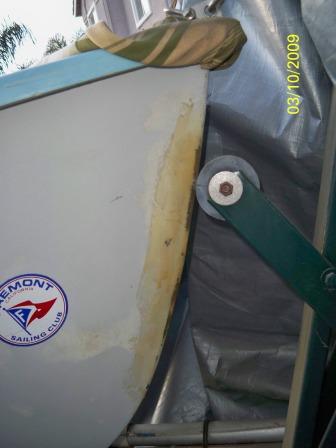
So now to the not so positive. There was a basic attempt, albeit, unfinished, to repair some minor dockside damage to the bow edge. By its nature, polyester resins commonly used in fiberglass don't like much direct exposure to water. It actually absorbs it if left unfinished (waterproofed), so this wasn't going to fly in my book. Being that I used to paint cars for a living, this wasn't going to pose much of a problem. I would just block it all down, make any fills as needed, prime her up and paint.
Seeing as how I don't care much for gray on gray, I saw this as an opportunity to use up some of the leftover paint from my last boat. Interestingly enough, I have quite a bit of midnight blue pearl base left. This is going to be a very unique paint to use, as I have never seen a sailboat painted up in pearl based paint before.
I figured I would do all the top surfaces (cockpit interior and rails) in anti-skid white deck paint. This is because I don't want to be slip-slidin' in the bottom when trying to tack or whatnot.
So fully intending that I was going to go at it straight away, I get the flu, and it takes me down for two weeks. Between that and an highly impacted work schedule, I missed working on my little gem for three weeks.
So work did not commence until this week.
continued
04 April 2009 | Stockton
Clear, chilly
Some of the things I observed when I got her home were as follows:
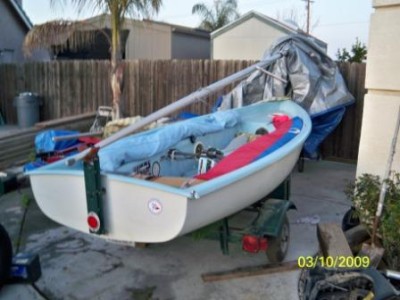
The tapered racing mast has been rebuilt/ rerigged with all new stays, foil spreaders, new halyards, cables and most hardware. Basically a newly refurbished standing rig. The running rig needs a little attention, as there were no sheets for any of the sails (no big deal); but the running hardware has been upgraded to Harken and Ronstan.... Harken ratcheting blocks and Ronstan cam cleats, not cheap stuff.
The boat was rerigged for racing, with sailtracks mounted to the inboard seat edges and movable blocks to allow for sail trim.
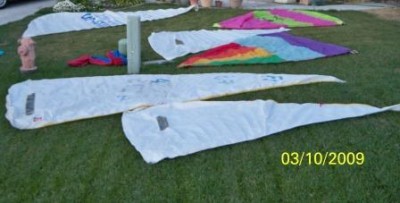
She came with 2 full sets of sails. One set for putting about (well used main, newer jib and spinnaker in very good condition), the other set is in excellent condition. The US Sails set has only been hoisted twice, from what I have been told, and I am inclined to believe it. They are still very crunchy and stiff.
The tapered racing mast has been rebuilt/ rerigged with all new stays, foil spreaders, new halyards, cables and most hardware. Basically a newly refurbished standing rig. The running rig needs a little attention, as there were no sheets for any of the sails (no big deal); but the running hardware has been upgraded to Harken and Ronstan.... Harken ratcheting blocks and Ronstan cam cleats, not cheap stuff.
The boat was rerigged for racing, with sailtracks mounted to the inboard seat edges and movable blocks to allow for sail trim.
She came with 2 full sets of sails. One set for putting about (well used main, newer jib and spinnaker in very good condition), the other set is in excellent condition. The US Sails set has only been hoisted twice, from what I have been told, and I am inclined to believe it. They are still very crunchy and stiff.
Second Chances
04 April 2009
Clear and Breezy
My new mistress is home...
Ever since my powerboat sold, and I just got flat tired of always having to drive all the way out to Berkeley Marina just to get an hour or two of time in on one of the club Laser Bahias, I decided that I neede to be able to ply my passions closer to home... After all, I do live right on the Delta.
So, with this in mind, I embarked on a quest to find a boat that is as fast (relatively) as a Laser Bahia (very similar to a 5o5) and much drier, with good handling characteristics and manners , a somewhat dry ride and strong potential for a little club racing.
So I put out the feelers, and very pleasantly, I came up with an International FJ 13. This is an Olympic class boat, is sailed internationally in the one design classes. It is known to be a very fast planing hull and has a very solid track record as one of the boats with the best safety records fir its class.
The boat has few major flaws... There was a repair made to the bow and was never blocked out and prepared for paint, few rigging issues, or otherwise negative attributes. Work has already begun to fair the hull and get it painted. So this is going to be a sort of mini chronicle of my time with her.
| Vessel Name: | I am thinking... Second Wind |
| Vessel Make/Model: | Sailnetics International FJ |
| Hailing Port: | Stockton, Ca. |
| Crew: | = |
Gallery not available

Who: =
Port: Stockton, Ca.
Cool Links
SailBlogs Friends
