
Maintenance Awareness
Tango is in really good shape after the lengthy COVID periods in New Zealand and our extended stay in Baltimore's Inner Harbor. That said, awareness of how you engine performs and sound is really important. As a motor-headed engineer I wasn't happy about what we heard and felt as we motored down Chesapeake Bay. I thought I was hearing more metallic engine sounds and more vibration that normal. After enjoying an amazing Thanksgiving Dinner with friends in the Norfolk area I had decided that Black Friday would be dedicated to investigating our power train "connected-ness". I wanted to ensure the motor mounts and propellor shaft coupler bolts were all tight.
Well... they were not. The starboard rear motor mount engine bolt was completely loose. The other three were fine. I also found one shaft coupler bolt / nut was loose and two more were "wrench" loose. Wrench loose means I could spin the bolt//nut with a wrench but not by hand. These bolts in particular should be TIGHT.
SO.,, listening and feeling paid off. The next thing is having the tools and knowledge to fix this. Again, I'm a motorhead so fortunately I do have the tools and knowledge. To tighten up the engine mount I had to use a battery powered impact wrench. There was no way I could have fully loosened the lock nut and the tightening nut on the mount without the impact wrench. Fixing this was straight forward. Loosen the locknut and nut, clean up the threads, apply never-seize, and retighten. Why was it loose... The washer between the bottom of the engine mount foot and the height adjusting nut was thin and pounded to a useless condition. The engine mounts were in stalled in 2013 or 2014 just after we bought Tango and the install was "lacking", obviously. I was able to tighten the mount nut but at the next boat yard haulout I'll have to get the engine loosened and a new washer installed. The other three mount were properly installed. These engine mount adjusting nuts allow you to raise or lower each corner of the engine allowing the shaft coupling flange to be made parallel to the opposite flange on the transmission (Borg-Warner V Drive for Tango). I've had this clearance checked several times without a problem being detected. For now... this is all fixed.
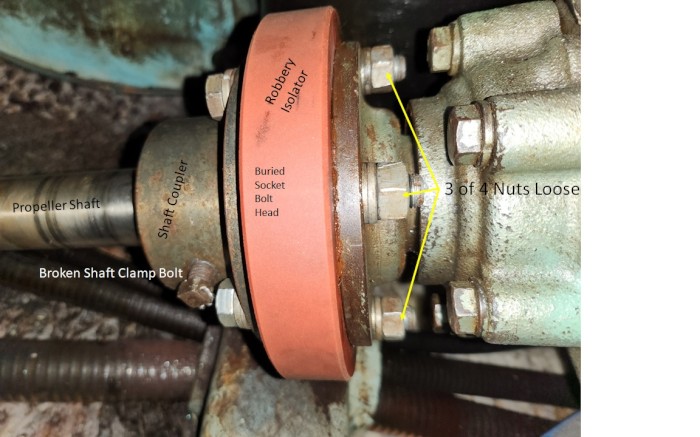
Now the shaft coupling bolts being loose was the biggest issue. The shaft coupler/flange is mounted on the end of the shaft. There is a keyway in the coupler and the shaft and the key makes the shaft and the shaft coupler rotate as one unit. The shaft coupler has two clamping bolts 90-degrees apart the screw through the coupler and press onto the actual shaft. It is imporant that each clamping screw is tight. So... I found the one of these clamp bolts is actually broken. When I loosened that bolt to get the coupler to move I found about 1/4" of the bolt is stuck in the coupler. The broken end of this bolt is not tight against the shaft. The other clamping bolt was removed, threads cleaned, reinstalled and torqued including application of Never Seize and lock wire to prevent any loosening. Fixing the broken clamp bolts requires removing the coupler from the shaft which requires a haulout because the propeller and dripless seal have to be removed allowing the shaft to slide back. Next haulout. SO... not moving the shaft coupler means I had very limited access to the bolt heads that needed tightening. Humm...
The coupler assembly has three parts. The shaft coupling flange, the matching flange on the transmission, and a 1-inch think rubbery plastic vibration isolator disk between the two flange faces. Most boats will have a similar set up. For Tango there are four 7/16" bolts screwing into embedded nuts in the isolation disk (all four of these were properly tight). There are also four 7/16" socket head bolts that pass through the isolation disk and through transmission flange that are tightened with nuts on the transmission sides. One of these nuts was completely loose and two more were wrench loose. This means that the transmission was only loosely coupled to the shaft. Tightening nuts took some figuring-out. The socket heads were hidden by the shaft side flange. Because of the broken coupler clamp nut I couldn't loosen shaft flange to move it aft or down the shaft toward the Dripless Seal. However, with the shaft side flange bolts removed I could slide the shaft through the seal getting about 1/2" of clearance so I could see the transmission side bolt heads using a mirror. Access was going to be hard. I found that the holes in the shaft flange actually matched the holes in the isolation disk and transmission flange. That means that I could rotated and haft 90-degrees and stick a BIG 3/8" Allen wrench through the shaft flange hole and engage the head of the transmission bolt. AH- HA - now I can tighten the transmission side bolts.
So, I did just that. Now all four of the transmission side bolts were removed, cleaned, and reinstalled (with Never-Seize) and tightened, TIGHT; real tight. Then the shaft flange was rotated 90-degrees and the shaft side flange bolts were installed, tightened and torqued. With the exception of the broken clamping bolt in the shaft coupler - this is all fixed.
In doing all this, I removed a shield that keeps engine oil drips from getting on the dripless shaft seal bellows. Time for a new shield to be made and installed (cut up big plastic bottle contraction). In doing this I found that the water hose providing cooling sea water to the dripless seal was brittle (from engine oil exposure) and started leaking while I was messing all this. Of course I don't have a 3/8" rubber seawater hose aboard, shocking as it is... this was supposed to be replaced in New Zealand when we replaced all the other hoses... anyway... it will be fixed today.
Well... they were not. The starboard rear motor mount engine bolt was completely loose. The other three were fine. I also found one shaft coupler bolt / nut was loose and two more were "wrench" loose. Wrench loose means I could spin the bolt//nut with a wrench but not by hand. These bolts in particular should be TIGHT.
SO.,, listening and feeling paid off. The next thing is having the tools and knowledge to fix this. Again, I'm a motorhead so fortunately I do have the tools and knowledge. To tighten up the engine mount I had to use a battery powered impact wrench. There was no way I could have fully loosened the lock nut and the tightening nut on the mount without the impact wrench. Fixing this was straight forward. Loosen the locknut and nut, clean up the threads, apply never-seize, and retighten. Why was it loose... The washer between the bottom of the engine mount foot and the height adjusting nut was thin and pounded to a useless condition. The engine mounts were in stalled in 2013 or 2014 just after we bought Tango and the install was "lacking", obviously. I was able to tighten the mount nut but at the next boat yard haulout I'll have to get the engine loosened and a new washer installed. The other three mount were properly installed. These engine mount adjusting nuts allow you to raise or lower each corner of the engine allowing the shaft coupling flange to be made parallel to the opposite flange on the transmission (Borg-Warner V Drive for Tango). I've had this clearance checked several times without a problem being detected. For now... this is all fixed.
Now the shaft coupling bolts being loose was the biggest issue. The shaft coupler/flange is mounted on the end of the shaft. There is a keyway in the coupler and the shaft and the key makes the shaft and the shaft coupler rotate as one unit. The shaft coupler has two clamping bolts 90-degrees apart the screw through the coupler and press onto the actual shaft. It is imporant that each clamping screw is tight. So... I found the one of these clamp bolts is actually broken. When I loosened that bolt to get the coupler to move I found about 1/4" of the bolt is stuck in the coupler. The broken end of this bolt is not tight against the shaft. The other clamping bolt was removed, threads cleaned, reinstalled and torqued including application of Never Seize and lock wire to prevent any loosening. Fixing the broken clamp bolts requires removing the coupler from the shaft which requires a haulout because the propeller and dripless seal have to be removed allowing the shaft to slide back. Next haulout. SO... not moving the shaft coupler means I had very limited access to the bolt heads that needed tightening. Humm...
The coupler assembly has three parts. The shaft coupling flange, the matching flange on the transmission, and a 1-inch think rubbery plastic vibration isolator disk between the two flange faces. Most boats will have a similar set up. For Tango there are four 7/16" bolts screwing into embedded nuts in the isolation disk (all four of these were properly tight). There are also four 7/16" socket head bolts that pass through the isolation disk and through transmission flange that are tightened with nuts on the transmission sides. One of these nuts was completely loose and two more were wrench loose. This means that the transmission was only loosely coupled to the shaft. Tightening nuts took some figuring-out. The socket heads were hidden by the shaft side flange. Because of the broken coupler clamp nut I couldn't loosen shaft flange to move it aft or down the shaft toward the Dripless Seal. However, with the shaft side flange bolts removed I could slide the shaft through the seal getting about 1/2" of clearance so I could see the transmission side bolt heads using a mirror. Access was going to be hard. I found that the holes in the shaft flange actually matched the holes in the isolation disk and transmission flange. That means that I could rotated and haft 90-degrees and stick a BIG 3/8" Allen wrench through the shaft flange hole and engage the head of the transmission bolt. AH- HA - now I can tighten the transmission side bolts.
So, I did just that. Now all four of the transmission side bolts were removed, cleaned, and reinstalled (with Never-Seize) and tightened, TIGHT; real tight. Then the shaft flange was rotated 90-degrees and the shaft side flange bolts were installed, tightened and torqued. With the exception of the broken clamping bolt in the shaft coupler - this is all fixed.
In doing all this, I removed a shield that keeps engine oil drips from getting on the dripless shaft seal bellows. Time for a new shield to be made and installed (cut up big plastic bottle contraction). In doing this I found that the water hose providing cooling sea water to the dripless seal was brittle (from engine oil exposure) and started leaking while I was messing all this. Of course I don't have a 3/8" rubber seawater hose aboard, shocking as it is... this was supposed to be replaced in New Zealand when we replaced all the other hoses... anyway... it will be fixed today.
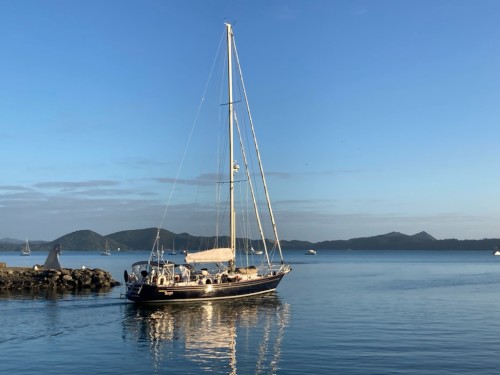
Tango departing Marsden Cove Marina, NZ in Jan2022 to return to the US
Who: Janet and John Harrington
Port: Houston TX, USA
Our Pacific Tracks, new map link below

Favorite Links
Table of Contents
- Boat Painting is DONE! (decks, cabin top...
- New Zealand and What We Are Up To
- Cruising Fiji
- Tonga 2023
- Moorea, Huahine, Taha'a, and Bora B...
- Tahiti - July 2023
- Catching Up in Fiji!
- Tahuata, Fatu Hiva, Nuku Hiva (Marquesas...
- Pacific Crossing #2, Panama Canal to Hiv...
- Shelter Bay Marina, Volunteer Line Handl...
Tango's Photo Galleries
 |
24 February 2024
21 Photos
|
 |
23 February 2024
16 Photos
|
Comments