Kaimusailing
s/v Kaimu Wharram Catamaran
| Vessel Name: | Kaimu |
| Vessel Make/Model: | Wharram Custom |
| Hailing Port: | Norwalk, CT |
| Crew: | Andy and the Kaimu Crew |
| About: | Sailors in the Baltimore, Annapolis, DC area. |

17 April 2024 | St Marys, GA
Dinghy Skeg
I was suffering with what seemed like a cold and also had allergy symptoms. I awoke and felt fine. The green pollen that was coating everything was gone. Maybe it will return.

07 April 2024 | St. Marys, GA
Clammy Hands
Items came in from TEMU, the Chinese cut rate retailer. One was a nice little drone that cost about twelve and a half dollars. It looked like an easy thing to play with while I coughed and sneezed. I was fighting a summer cold, even though it is not summer elsewhere, it seems like it here. A nice [...]

02 April 2024 | St. Marys, GA
Sun Doggie
After laminating the cedar strips onto the gunwales of the dinghy I found the screws I used wouldn’t come out. The epoxy had seized them. The screw heads were stripped so I cut a straight slot in the heads with the cut off wheel. The cedar smoked when the screw heads got red hot. I could remove [...]

21 March 2024 | St. Marys, GA
Just Add Water
The rainy weekend started off with overcast and fog but no rain. It looked like I might be able to get something done on the D4 dinghy. I wanted to change the bow seat which is really the bow deck. The sailing option uses the deck to hold the freestanding mast. I didn’t like how the deck looked, [...]

01 March 2024 | St. Marys, GA
D4 Dinghy Alternative Seats
The rain event was more wind than rain, strong winds with gusts up to 44 mph. We drove into town to see what the harbor was like. There was a small sailboat that had dragged anchor and was sitting close to shore. The tide was out. We left and played with Bleu at Notter’s Pond.

23 February 2024 | St. Marys, GA
D4 Inside Seams
Day two of the dinghy build started out with me finishing wiring the hull bottoms together on the centerline of the bottom panels. This was much easier than the wiring of the chine edges of the bottom panels and the side panels.
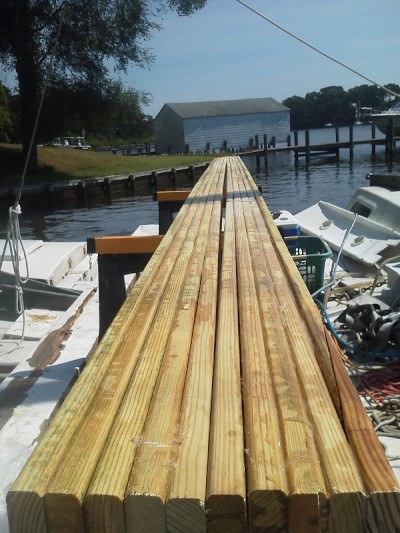
#1 Beam Pt III
.
This lamination process continued using the old beam to maintain a perfectly straight lamination up to 3 layers, that's when the best planks were used up. Because the remaining planks need clamping pressure to force them straight, the lamination had to be removed from the old beam so that clamps can get to both sides. At this point it was found that there were a few voids in the glue lines where the air nails didn't hold the planks properly. These voids were filled with a thickened epoxy/colloidal silica mixture that was not as thick as the vaseline consistency, a little more runny so that it could penetrate and fill the glue void. Then the lamination was clamped to close the voids.
.
The fourth layer could be clamped using 4 inch C-clamps to force the plank onto the lamination and 6 inch C-clamps to force the planks into alignment so that the edges were straight.
.
The fifth layer could only be clamped with the 6 inch clamps and a couple of bar clamps. All the 4 inch clamps were returned to the boat shed. Using 6 inch clamps to best effect involved clamping a short section of plank with a couple of clamps, then air nailing the plank onto the lamination. The air nails have proven ineffective at holding the plank to the lamination, but keep its lateral alignment while the next section is forced to match the edges of the lamination. In this way the four remaining 6 inch clamps and the pair of bar clamps could clamp two 12 foot planks onto the lamination properly aligned and with no voids in the glue line.
.
While this tedious labor was dragging on, usually taking from 2-4 hours per day, there was time to catch up on the internet. I found that Webb Chiles not only had a slew of books and articles available as pdf 's on his website, inthepresentsea.com, he has been maintaining a blog there as well, and he calls it a journal.
.
The journal is rather dry, but it has a wealth of information about the books he is reading, movies he is watching, and his sailing exploits which continue in between exploits on land. The voyage I just read is a captain's log of sailing from South Africa to the Caribbean. He is also a creative photographer and there are many beautiful pictures on the site. Unfortunately he persists in monohulls and many of his complaints while sailing would be cured by having a Wharram catamaran.
.
Webb's journal starts around 2006 and he is about my age at that time. Part of my interest is to see how his age is affecting him. He exercises and is very trim, but he has problems with his back when he has to lift heavy objects like batteries, also if he has a sudden strain with a line. He sails alone and sleeps when necessary. We'll see how he does in later pages of his journal. It seems to take a day or two to read one year of his journal.
.
The final step in the beam lamination process is to glue the two halves of the beam together with 5 layers on each half beam making a final lamination of 10 layers one inch thick and 5 3/8 inches wide. I was hoping for the half beams to be perfectly straight, but it turned out that they drooped slightly on the sawhorses, so the surfaces that had to be glued together meet at the ends but leave about ¾ inch space in the middle. The bar clamps could take up this space, but I used the porta power to quickly jam the beam halves together, then quickly hold them there with the bar clamps.
.
The picture is of the beam lamination, lining up the planks for gluing. The concave space between the two half beams is in the middle. The half beams were flipped face up for the epoxy, then flipped back down like in the picture for gluing.
