Kaimusailing
s/v Kaimu Wharram Catamaran
| Vessel Name: | Kaimu |
| Vessel Make/Model: | Wharram Custom |
| Hailing Port: | Norwalk, CT |
| Crew: | Andy and the Kaimu Crew |
| About: | Sailors in the Baltimore, Annapolis, DC area. |

17 April 2024 | St Marys, GA
Dinghy Skeg
I was suffering with what seemed like a cold and also had allergy symptoms. I awoke and felt fine. The green pollen that was coating everything was gone. Maybe it will return.

07 April 2024 | St. Marys, GA
Clammy Hands
Items came in from TEMU, the Chinese cut rate retailer. One was a nice little drone that cost about twelve and a half dollars. It looked like an easy thing to play with while I coughed and sneezed. I was fighting a summer cold, even though it is not summer elsewhere, it seems like it here. A nice [...]

02 April 2024 | St. Marys, GA
Sun Doggie
After laminating the cedar strips onto the gunwales of the dinghy I found the screws I used wouldn’t come out. The epoxy had seized them. The screw heads were stripped so I cut a straight slot in the heads with the cut off wheel. The cedar smoked when the screw heads got red hot. I could remove [...]

21 March 2024 | St. Marys, GA
Just Add Water
The rainy weekend started off with overcast and fog but no rain. It looked like I might be able to get something done on the D4 dinghy. I wanted to change the bow seat which is really the bow deck. The sailing option uses the deck to hold the freestanding mast. I didn’t like how the deck looked, [...]

01 March 2024 | St. Marys, GA
D4 Dinghy Alternative Seats
The rain event was more wind than rain, strong winds with gusts up to 44 mph. We drove into town to see what the harbor was like. There was a small sailboat that had dragged anchor and was sitting close to shore. The tide was out. We left and played with Bleu at Notter’s Pond.

23 February 2024 | St. Marys, GA
D4 Inside Seams
Day two of the dinghy build started out with me finishing wiring the hull bottoms together on the centerline of the bottom panels. This was much easier than the wiring of the chine edges of the bottom panels and the side panels.
Well Hung
.
With his permission I began pressing the stainless rod. It would lay out straight, then spring back, I would have to over bend it to make it straight. How much to over bend was the question. It was taking a lot of time to bend it to a certain point, then see how straight it was afterwards, then bend it again a little further.
.
Bob the mechanic came into the shop with a long shaft that was bent and more or less shoved me aside, “You’re gonna take all day, we’ve got to straighten this shaft right now”. He was working for someone and it’s his livelihood, so I stepped aside. Remarkably his shaft was straight in just one pressing. The steel in that shaft must be untempered. After he left I was able to finish. I cleaned up the shaft and my hands using that old Italian mechanics trick, wash with olive oil to dissolve grease and grime, then use soap and water.
.
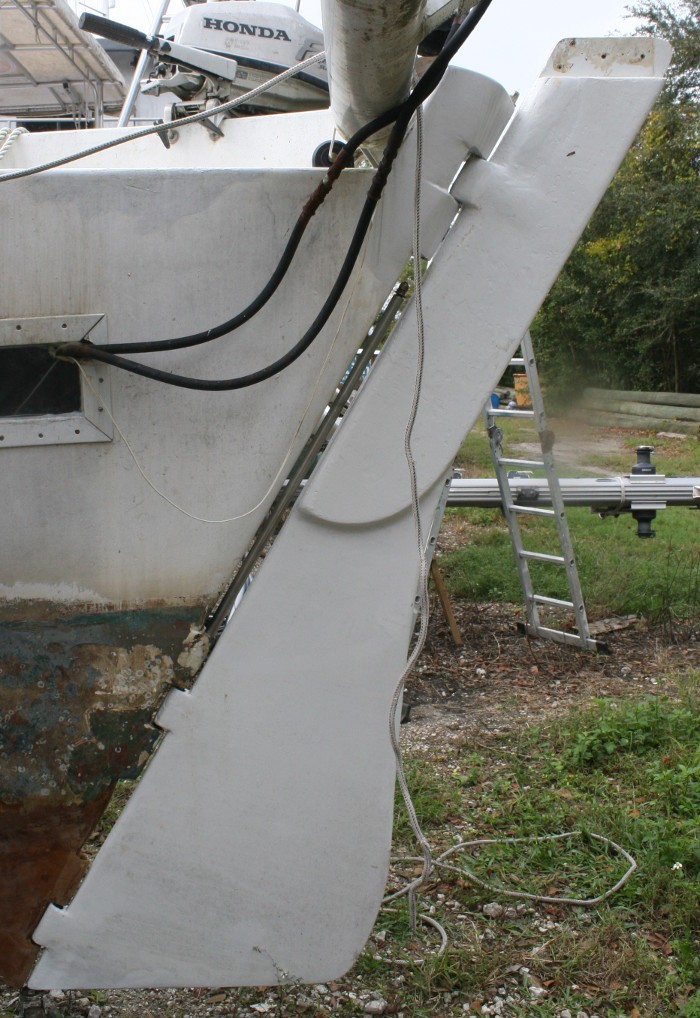
Back at Kaimu I set up an elaborate system of ropes, automobile jack, and a pry bar to lift the rudder into position and hold it there and allow it to be finely positioned for the pintles. Each rudder has a short top pintle that passes through the two gudgeons on the sternpost and the top gudgeon on the rudder. Down below is a longer pintle about 3 1/2 feet long that passes through the lower four gudeons on the sternpost and skeg, and the lower two gudgeons on the rudder. Getting it all lined up is tricky. There are also plastic washers that act as bearings in between the gudgeons.
.
When the top of the rudder is in place, the top pintle is driven into the top gudgeon on the sternpost, then plastic washers are inserted into the space between the top gudgeon and the top rudder gudgeon. The pintle is driven further downward until it starts to exit the rudder’s top gudgeon, then washers are added there and it is driven down completely. At the same time the lower gudgeons are lined up. I used a ratchet drive extension to temporarily hold the lower gudgeons in alignment.
.
Next the long lower pintle is positioned over the middle pair of gudgeons on the sternpost and driven down just like the upper pintle. After is passes through the middle sternpost gudgeons and the middle rudder gudgeon, it travels down to the lowest gudgeons. This was brutal work, hammering on the top of the pintle and it barely moving, all 3 1/2 feet of it.
.
When I was done with that rudder, the port one, I began on the starboard rudder. This time I did not use a time consuming system of ropes, pulleys, and winches. I manhandled the rudder and tied it off in position. The bottom of the rudder was supported by the car jack. The top pintle went in more slowly than when I did the port rudder. I noticed that some additional fairing I did on the skeg was obstructing the rudder from being exactly in line. The multitool with straight blade trimmed the surface. I took material off the edge of the rudder and off the sternpost, not off any of the gudgeons. The gudgeons have to maintain their strength. Later the areas that were trimmed will be refaired with epoxy with fillers.
.
The bottom pintle on the starboard rudder was particularly stubborn and it took 2 1/2 hours of pounding with a heavy hammer to get it driven home. Time for ibuprofen. The image is of the starboard rudder before all the pounding.
.
