Kaimusailing
s/v Kaimu Wharram Catamaran
| Vessel Name: | Kaimu |
| Vessel Make/Model: | Wharram Custom |
| Hailing Port: | Norwalk, CT |
| Crew: | Andy and the Kaimu Crew |
| About: | Sailors in the Baltimore, Annapolis, DC area. |

07 April 2024 | St. Marys, GA
Clammy Hands
Items came in from TEMU, the Chinese cut rate retailer. One was a nice little drone that cost about twelve and a half dollars. It looked like an easy thing to play with while I coughed and sneezed. I was fighting a summer cold, even though it is not summer elsewhere, it seems like it here. A nice [...]

02 April 2024 | St. Marys, GA
Sun Doggie
After laminating the cedar strips onto the gunwales of the dinghy I found the screws I used wouldn’t come out. The epoxy had seized them. The screw heads were stripped so I cut a straight slot in the heads with the cut off wheel. The cedar smoked when the screw heads got red hot. I could remove [...]

21 March 2024 | St. Marys, GA
Just Add Water
The rainy weekend started off with overcast and fog but no rain. It looked like I might be able to get something done on the D4 dinghy. I wanted to change the bow seat which is really the bow deck. The sailing option uses the deck to hold the freestanding mast. I didn’t like how the deck looked, [...]

01 March 2024 | St. Marys, GA
D4 Dinghy Alternative Seats
The rain event was more wind than rain, strong winds with gusts up to 44 mph. We drove into town to see what the harbor was like. There was a small sailboat that had dragged anchor and was sitting close to shore. The tide was out. We left and played with Bleu at Notter’s Pond.

23 February 2024 | St. Marys, GA
D4 Inside Seams
Day two of the dinghy build started out with me finishing wiring the hull bottoms together on the centerline of the bottom panels. This was much easier than the wiring of the chine edges of the bottom panels and the side panels.
15 February 2024 | St. Marys, GA
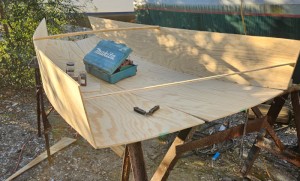
D4 Dinghy Day One
A Wharram Pahi 26 had been anchored in the river nearby the boatyard and was hauled out with the travel lift. I went around to look at it and talked to the owner couple. I was surprised that it had been built in Martinique in 1988. The boat is more than 30 years old.
Ama Sutra
.
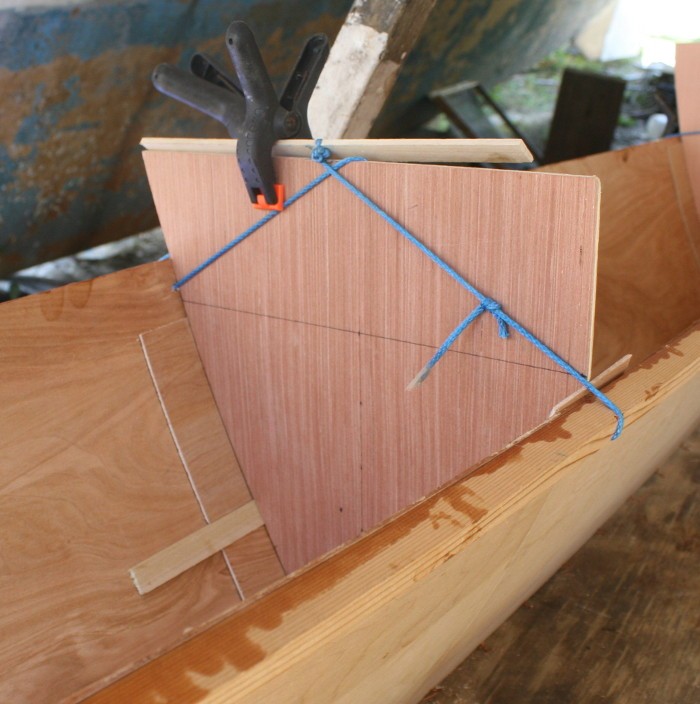
I made a jig out of a short piece of cedar stringer stock, about 4 inches long. I cut a rabbet and drilled a couple of holes in it to use as a drilling guide. The rabbet holds the jig against the edge of plywood, and the holes, 3 inches apart and 5/16“ from the edge, are used to drill the holes for stitch and glue construction. One hole has a sheet rock screw partially threaded, so after you drill the first hole in the plywood, the tip of the screw is centered in the hole and the remaining hole in the jig lines up your drill for the next hole in the plywood.
.
After drilling the holes (50), I used some donated solid copper wire, about 18 gauge, to twist and tie the panels together. Only the keel edges were tied, the bows will be done later. I used 5mm ply to cut out three bulkheads, one for amidships and two 3 feet forward and aft of amidships. The bulkheads were temporarily pushed down into position, forcing the hull into shape. I had to get a look at it.
.
Next I cut out butt blocks, more like butt plates, 4 inches wide and extending from gunwale to keel. Two plates to each bulkhead. They serve to spread out the pressure of the bulkhead against the hull side so that the hull side doesn’t have its ribs showing. At the amidships bulkhead I added 3mm thick hardwood splines that ran fore and aft across the edge of the bulkhead to keep the hull sides fair. They were about 8 inches long and bisected the butt plate into two smaller plates on each side of the bulkhead.
.
The whole shooting match was dry fitted with a hole drilled just under the gunwale on each side of each bulkhead, dynema string threaded through the holes and over the top of the bulkhead in a figure 8 loop, and the loop tightened with a spanish windlass, forcing the bulkhead downwards, and pulling the gunwales up tight against the bulkhead edge. The positions of the butt plates, splines, and bulkheads were marked and labeled so that they could be reassembled for the final gluing.
.
I had expected the seam at the amidships bulkhead to need trimming, but it wasn’t necessary. A mix of epoxy was brushed onto the gluing surfaces, then mixed with “glue strong” filler and applied to one side of each glue joint. My mix for “glue strong” is 4 parts of colloidal silica to one part of milled glass fibers. The pieces were assembled again and the spanish windlasses were wound up. The pieces were finally tapped into position with a small hammer. The joint between the bulkheads and the butt plates was filled with the epoxy mixture. Later they will get filleted when the keel and bows are filleted.
.
The photo is of the midships bulkhead. It has the spanish windlass of blue dynema line over its top and the white piece of wood used as a handle to wind it up is there with a clamp to keep it from unwinding. The butt plates and spline can be seen jammed against the hull side by the edge of the bulkhead. The pencil line across the bulkhead is the normal gunwale height and it intersects with the gunwale on the right. The gunwale on the left is higher, raised so that the deck will have an angle to match the crossbeams, which curve downwards to the ama. This picture was taken while dry fitting the bulkheads. Later they were glued in permanently.
