Kaimusailing
s/v Kaimu Wharram Catamaran
| Vessel Name: | Kaimu |
| Vessel Make/Model: | Wharram Custom |
| Hailing Port: | Norwalk, CT |
| Crew: | Andy and the Kaimu Crew |
| About: | Sailors in the Baltimore, Annapolis, DC area. |

23 April 2024 | St Marys, GA
D4 Launchie
The laptop pooped the bed, so I have to scurry around with alternatives. Not as bad as typing on the phone.

17 April 2024 | St Marys, GA
Dinghy Skeg
I was suffering with what seemed like a cold and also had allergy symptoms. I awoke and felt fine. The green pollen that was coating everything was gone. Maybe it will return.

07 April 2024 | St. Marys, GA
Clammy Hands
Items came in from TEMU, the Chinese cut rate retailer. One was a nice little drone that cost about twelve and a half dollars. It looked like an easy thing to play with while I coughed and sneezed. I was fighting a summer cold, even though it is not summer elsewhere, it seems like it here. A nice [...]

02 April 2024 | St. Marys, GA
Sun Doggie
After laminating the cedar strips onto the gunwales of the dinghy I found the screws I used wouldn’t come out. The epoxy had seized them. The screw heads were stripped so I cut a straight slot in the heads with the cut off wheel. The cedar smoked when the screw heads got red hot. I could remove [...]

21 March 2024 | St. Marys, GA
Just Add Water
The rainy weekend started off with overcast and fog but no rain. It looked like I might be able to get something done on the D4 dinghy. I wanted to change the bow seat which is really the bow deck. The sailing option uses the deck to hold the freestanding mast. I didn’t like how the deck looked, [...]

01 March 2024 | St. Marys, GA
D4 Dinghy Alternative Seats
The rain event was more wind than rain, strong winds with gusts up to 44 mph. We drove into town to see what the harbor was like. There was a small sailboat that had dragged anchor and was sitting close to shore. The tide was out. We left and played with Bleu at Notter’s Pond.
Canoe Hanging
.
I needed to paint the dinette portlight bezel and some spots on the pilothouse, but it was less than 20 sq ft, so I had to come up with more arctic white paint projects. The two hatches on the forward storage compartments were very rough looking. I was going to make new ones later, after the boat was relaunched, so I had left them as they were. They would be good candidates for repainting. Plus, they were each about 4 sq ft. That’s 16 square feet painting top and bottom of both hatches. Perfect.
.
I ran over them with the belt sander, angle grinder with flap disk, and palm sander with 3M gold 150 grit stick-on paper. They needed some epoxy repair to glue the sheathing where it had come loose around the edges, and some filling where the wood had gone soft.
.
There was another epoxy job to do. The crossbeams for the outrigger canoe were showing voids in the laminations. Although the laminations were glued strongly, gaps had to be filled.
.
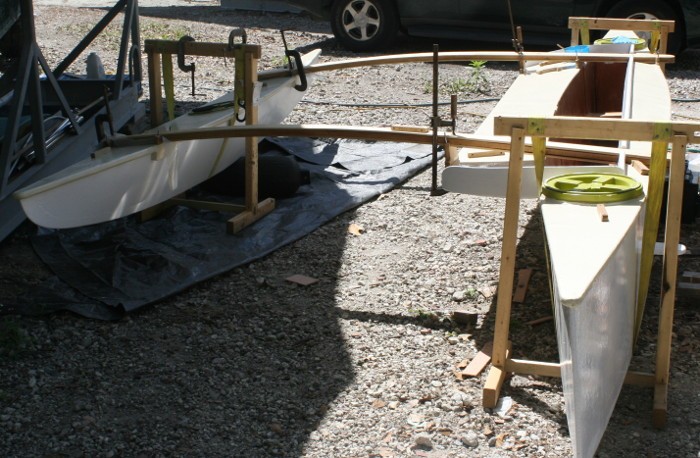
Setting up the canoe on its sawhorses resulted in it tumbling off, it was too unstable and too high to comfortably work on. I got an idea to suspend the canoe on tie down straps that hang from the top bar of the sawhorses. The ends of the canoe would fit inside the sawhorses, it was just a matter of attaching one end of the strap to one end of the sawhorse bar, then run the canoe into the sawhorse part way, then pull the strap under the canoe, up to the other end of the bar, and adjust it so the canoe was up off the ground. Then the ends of the straps were permanently screwed to the sawhorse bar. After both ends of the canoe were suspended, the outrigger was similarly suspended, this time the sawhorse was right in the middle of the outrigger float (ama) and adjusted to hold it just at the right height. The photo is of this arrangement.
.
The hiking seat was put on the outrigger crossarms and moved around while I sat on it in different positions. I didn’t come up with one that felt comfortable, so that part will have to be sussed out maybe after the canoe is in the water. It will be OK for paddling around, the hiking seat is only for when a sailing rig is installed. To my surprise, the hiking seat just happened to fit the aluminum scaffold I had been using. I had had a piece of plywood on it with pieces of 2X4 to try to keep it from wobbling. It didn’t work and I injured my knee as a result a few weeks back. Now I can use the hiking seat on the scaffold while I work on the topsides.
