Kaimusailing
s/v Kaimu Wharram Catamaran
| Vessel Name: | Kaimu |
| Vessel Make/Model: | Wharram Custom |
| Hailing Port: | Norwalk, CT |
| Crew: | Andy and the Kaimu Crew |
| About: | Sailors in the Baltimore, Annapolis, DC area. |

17 April 2024 | St Marys, GA
Dinghy Skeg
I was suffering with what seemed like a cold and also had allergy symptoms. I awoke and felt fine. The green pollen that was coating everything was gone. Maybe it will return.

07 April 2024 | St. Marys, GA
Clammy Hands
Items came in from TEMU, the Chinese cut rate retailer. One was a nice little drone that cost about twelve and a half dollars. It looked like an easy thing to play with while I coughed and sneezed. I was fighting a summer cold, even though it is not summer elsewhere, it seems like it here. A nice [...]

02 April 2024 | St. Marys, GA
Sun Doggie
After laminating the cedar strips onto the gunwales of the dinghy I found the screws I used wouldn’t come out. The epoxy had seized them. The screw heads were stripped so I cut a straight slot in the heads with the cut off wheel. The cedar smoked when the screw heads got red hot. I could remove [...]

21 March 2024 | St. Marys, GA
Just Add Water
The rainy weekend started off with overcast and fog but no rain. It looked like I might be able to get something done on the D4 dinghy. I wanted to change the bow seat which is really the bow deck. The sailing option uses the deck to hold the freestanding mast. I didn’t like how the deck looked, [...]

01 March 2024 | St. Marys, GA
D4 Dinghy Alternative Seats
The rain event was more wind than rain, strong winds with gusts up to 44 mph. We drove into town to see what the harbor was like. There was a small sailboat that had dragged anchor and was sitting close to shore. The tide was out. We left and played with Bleu at Notter’s Pond.

23 February 2024 | St. Marys, GA
D4 Inside Seams
Day two of the dinghy build started out with me finishing wiring the hull bottoms together on the centerline of the bottom panels. This was much easier than the wiring of the chine edges of the bottom panels and the side panels.
The D4 Pitch
.
I used the same time lapse mode that I had used the previous evening, one frame every .5 seconds. I tried to set up the tripod the same way for the same framing of the same shot and when they got going I slowly panned and followed them as they ran by, stopped, and then backed into the well. I didn’t have to move the camera after that, so went along to do other things.
.
A couple of new batteries had come in for the drone, so I was looking at 3 fresh batteries, all ready to go. I ended up flying the drone 3 times at about 10 minutes each time. The learning process takes a long time and it is time in the air that trains the operator. The goal is to react and control the drone without thinking about it, but of course making the right moves. At this point I was hesitating and joggling it a bit when I made a bad move. I’m getting better though.
.
The drone is looking bedraggled from all the crashes. I’ve had to resolder a wire from one of the motor interfaces. The replacement blades now look as bad as those they replaced.
.
When I felt a little hungry I remembered we had 9 hard boiled eggs that a lady had left on the communal kitchen table for anyone to take. I boiled them right away, but they were in the carpenter’s fridge and he didn’t do anything with them. Now he was off on his weekend job, so it was up to me to eat some of those eggs. I brought a squeeze bottle of olive oil mayonnaise and the pepper grinder down to the communal kitchen, got 4 of the eggs out of the fridge, deshelled them, halved them, and made a filling out of the hard boiled yokes with a fork, some of the mayo, and some paprika that was there. Then I filled the egg halves with the filling and dusted them with black pepper. The lady happened by the kitchen and looked at the eggs and asked if she could have one. I said they’re yours, you know.
.
Then I had transfered the videos from the GO Pro-like camera to the computer and then started using an editing app I was unfamiliar with, Kdenlive, which stands for KDEnONlinearvIDEOeDITOR. This is another open source linux program that is freely available from the internet. As familiar as I am with nonlinear editing, I had trouble using this program, because there are many obscure rules that have to be met. My cut away shot would crash the program when I tried to load it, that’s why the video has a jump cut, a really violent jump cut, but, hey, that’s an effect also. I was able to add an audio track and fade it out at the end. There are many features of this program that I can use in the future, once I learn how.
.
Next I was off to shop for toilet paper and ended up getting scalped, my hair cutter was on duty at the salon when I walked past and how could I hide my hair that was bushy and needed to be tamed. I went in and got clipped.
.
Next I headed to the local home improvement store where I hoped to buy some plywood for a rowing dinghy. I had no way to transport it, but the carpenter was there at work and he had a large van...
.
It ended up there was a sale, but he had to pay for the plywood to get the discount, but he was not supposed to buy lumber for other persons. I let him do it and treated him to pizza at a nearby Turkish pizza parlor. They undercooked the pie and we sent it back for further roasting. We had both worked in Connecticut where the best pizza is made. Even a New Yorker would have sent the Turkish pizza back.
.
After seeing Richard and Gill’s little catamaran dinghy perform last fall, I realized sometimes a dinghy has to be entirely utilitarian. It has many requirements and has to give up all the extremes. It has to fit at a dinghy dock, it has to carry a lot of cargo, it has to row or power back and forth from the mother ship to the shore. My outrigger canoe would work in some outlying areas and it certainly has capacity and stability, but it is too large for most USA marina dingy docks. I think the one in Marathon has a 14 foot limit and even at that they will frown. The outrigger is 18, well it is like a canoe with an outrigger, you’d let a canoe in, wouldn’t you? Maybe not.
.
I didn’t want to spend a lot of time building a dinghy. Design is not needed for a pram dinghy, there are thousands of designs already. I may adapt a couple of designs just to be kind of original, but it is not necessary. I’ve kept my eye out for something to turn up in the wake of the hurricane damage, someone who has lost their boat but now has a dinghy they don’t need. So far, nothing, well, nothing that appeals. I don’t want an inflatable, they too often develop leaks, plus they don’t row well. I had mine for 30 years and of course it is history now. It served me well, but it began to leak. I could row it, it was a chore, and under power it was what everyone else was doing. Very stable, very utilitarian, could hold a lot of stuff.
.
Chesapeake Light Craft has been tantalizing me with a new design of theirs called “Tenderly 10“, trademark. It is a ten foot dingy with a normal bow and a very traditional look. It rows well, sails well, and powers well. It carries the same amount of gear that a blunt nosed 8 foot pram would. What? It certainly weighs more than the pram. The pram is the ugly workboat that does it all, yet there is an aversion to it. As I looked at the Tenderly dinghy again and again I thought why not have a pram and enjoy the light weight bringing it aboard, plus it will carry whatever I need to carry, and it will row as well as almost anything else. The key is light weight and hull shape. It has to have a Vee bottom, not a flat bottom. The flat bottom prams do not track well when rowing and seem to be “stuck” to the water. Slow.
.
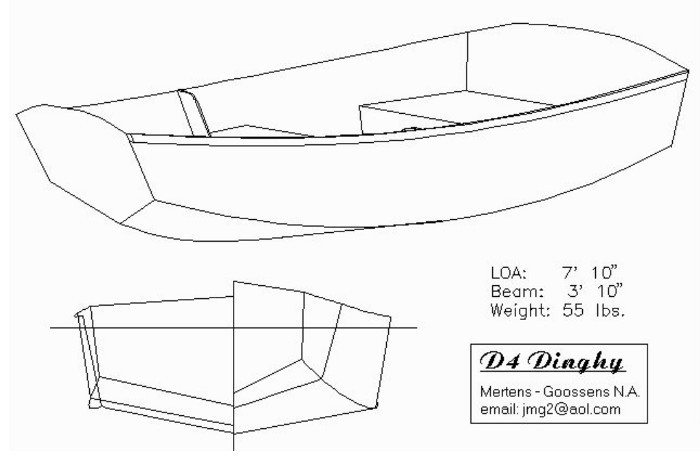
I kept coming across a design that might be the universal 8 foot pram, the D4 dingy. The rowing version can be built in 20 hours out of two sheets of 5 mm plywood and one sheet of 10. Stitch and glue epoxy work, OK, done a lot of that. I have the oarlocks on hand, the epoxy, the skill, the woodshop, and about half of the plywood. Now that the carpenter has obtained the rest, we have a dinghy, just have to build it.
.
The method is very simple, no jigs or backbones to build. The main plywood parts are cut out and edges drilled for wire loops that bind the edges together. So, you end up with a flexible construction of two sides, two bottom panels, and two transoms, one for the bow and one for the stern. All the edges are joined by little wire loops twisted tight. Epoxy putty is squeezed into the joints formed by these plywood pieces, and the putty is shaped with something like a tongue depressor. The other pieces that shape the hull are bulkheads that serve as seat risers, they are temporarily put into the hull to get it into exact shape. It is supported and checked for twist. The epoxy hardens. The hull is cast into shape.
.
Now the seat risers are epoxied into the hull and after it is all set up, the hull is turned over, the corners are rounded and glassed with glass tape. The sides and bottom are faired and coated with epoxy and paint. Turned right side up, the voids under the seats are filled with styrofoam and the seat tops put on. There is more glassing of the joints, then coating with epoxy and fairing and painting. I left out adding a towing eye at the nose. A pair of oarlocks are necessary for the rowing position at the center seat, but also another pair for rowing at the bow seat should be installed.
.
I bought, or the carpenter bought, a spare panel of ply for a repair on the catamaran. One of the deck plates is going off and getting spongy, so I can take it off and with double layers of 5 mm and a layer of glass we will have a new one.
.
The image is from the naval architects who designed the dinghy and their contact information is on the image. They are true artists who can’t wait to give away their craft to others.
