Kaimusailing
s/v Kaimu Wharram Catamaran
| Vessel Name: | Kaimu |
| Vessel Make/Model: | Wharram Custom |
| Hailing Port: | Norwalk, CT |
| Crew: | Andy and the Kaimu Crew |
| About: | Sailors in the Baltimore, Annapolis, DC area. |
23 April 2024 | St Marys, GA
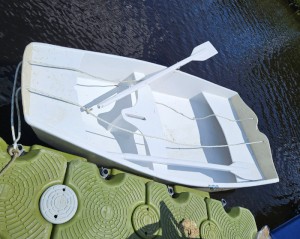
D4 Launchie
The laptop pooped the bed, so I have to scurry around with alternatives. Not as bad as typing on the phone.
17 April 2024 | St Marys, GA
Dinghy Skeg
I was suffering with what seemed like a cold and also had allergy symptoms. I awoke and felt fine. The green pollen that was coating everything was gone. Maybe it will return.
07 April 2024 | St. Marys, GA
Clammy Hands
Items came in from TEMU, the Chinese cut rate retailer. One was a nice little drone that cost about twelve and a half dollars. It looked like an easy thing to play with while I coughed and sneezed. I was fighting a summer cold, even though it is not summer elsewhere, it seems like it here. A nice [...]
02 April 2024 | St. Marys, GA
Sun Doggie
After laminating the cedar strips onto the gunwales of the dinghy I found the screws I used wouldn’t come out. The epoxy had seized them. The screw heads were stripped so I cut a straight slot in the heads with the cut off wheel. The cedar smoked when the screw heads got red hot. I could remove [...]
21 March 2024 | St. Marys, GA
Just Add Water
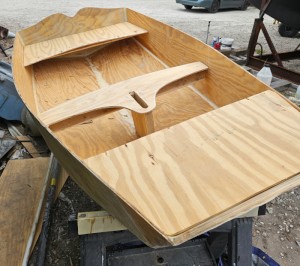
The rainy weekend started off with overcast and fog but no rain. It looked like I might be able to get something done on the D4 dinghy. I wanted to change the bow seat which is really the bow deck. The sailing option uses the deck to hold the freestanding mast. I didn’t like how the deck looked, [...]
01 March 2024 | St. Marys, GA
D4 Dinghy Alternative Seats
The rain event was more wind than rain, strong winds with gusts up to 44 mph. We drove into town to see what the harbor was like. There was a small sailboat that had dragged anchor and was sitting close to shore. The tide was out. We left and played with Bleu at Notter’s Pond.
D4 Hit and Run

.
I had to make duplicates of all the parts I had cut out. The bulkheads, transoms, and seats were supposed to come out of a 3/8“ thick ply, but I was using 5 mm, so I would have to have double thickness by having two layers of ply. The hull side and bottom plank needed to be duplicated to have the two sides and two bottom pieces necessary. So, I got my old weak trim router out of the pilothouse and put a straight flush cutting bit in it and adjusted it to cut 5 mm depth and follow the perimeter of whichever part I was duplicating, clamping the part to a fresh sheet of uncut plywood.
.
It worked and quickly the smaller parts were cut out. The larger parts, the hull side and 1/2 bottom panel, were more difficult because it was hard to reach across the larger parts to cut the far edge. I had some help holding the panels flat and keeping the offcuts from drooping down.
.
Next I glued the bulkheads, transoms, and seats to a double thickness using a small foam roller and unthickened epoxy. I stacked them up, largest on the bottom, and placed whatever heavy items were available in the woodshop on top of them.
.
I also glued two small pieces of ply to form a jig for drilling the holes for the small wires used to stitch the panels together. This jig is just two small straight pieces of ply offset so that the offset edge slides along the edge of the plywood part and the jig has a sheet rock screw about 1/4“ from the offset and a drill hole 4“ away that is also 1/4“ from the offset. The holes drilled for the wires are thus 1/4“ from the edge of the plywood part and 4 inches apart, the point of the sheet rock screw resting in the previously drilled hole while a new hole is drilled using the hole in the jig as a guide. I will provide a picture of it in action after it is completed and I start drilling holes. I calculate that about 93 holes have to be drilled.
.
I did the drilling, and made a time lapse video of it. I continued working with the hull and tried to get the bow and stern transoms connected to the rest. I put 3 inch copper wires, culled from free romex house wiring, into the drilled holes and twisted them, trying not to make them too tight.
.
As I worked along, someone who was not a yardbird kind of person, not skilled in any way with boatwork, intruded. It was a discussion about batteries and electrolytes. Somehow the dinghy bumped from one support to the other and a bunch of the wire ties ripped through the wood and the boat literally jumped out like a woman with a corset that had snapped.
.
I continued to work. I went back to Kaimu and brought back the sawhorses I made for the outrigger canoe and put the dinghy on it. I went underneath and removed the wire ties that had ripped through the wood. I drilled new holes in between the failed ones and put new copper wire there to twist up and bring the hull plates back together.
.
It seemed my activity invited other yardbirds into the shop to converse about about whatever came into their minds, or ask questions, distracting. Then I had to go on my tasks like a jerk and ask them to step out of the way, I had epoxy setting up with one batch, and I was now mixing up another, there was no time for loose gossip. But they kept coming in, it was like maybe the pollen that was killing me with my allergies was also calling in all the local gossips and hanger ons who appeared occaisionally, but now showed up all at once. I felt that I was being rude, trying to get out of the woodshop with an epoxy mix, to mix it for about 3 minutes, as required, through a crowd of pipe smoking, and generally, impassable, stolid, boatyarders, yardbirds, eager to pass the time away.
.
My work was thus double and I had been at it for a while. I went to mix another batch of epoxy and I found that the resin jar I was using was unusually warm. It also had two levels in it. Something was wrong. The resin syringe for measuring was also warm and sluggish when I tried to work it. I picked out a clot from the resin jar. It all became clear. I had poured the hardener into the resin jar and had used that mixture on the last batch. I dumped out the contaminated resin and flushed out the resin syringe. I then realized that the whole first batch of resin that was used to prime the seams on the dinghy were likely just mixes of mostly hardener and almost no resin, they had to be removed.
.
There was a half batch of thickened resin that would probably have to be removed. I stopped right there and decided that I had done enough damage to call it a day.
.
Ron, the carpenter, said I had been working too fast. Maybe I was. But I had made a basic mistake that I had never made before, pouring A into B or pouring B into A. It was a part of my procedure to make any mistake a small effect on the whole operation. I took the big containers of epoxy components and poured them into smaller containers, and then used the smaller containers to siphon off a small amount to make the mix. If I goofed and messed up the pour into the smaller containers, it would be just a small portion of the epoxy at stake. Also, if I goofed with the syringes to siphon off epoxy for the mix, I could throw the mix away.
.
Now we had two mixes, that is one mix used for priming all the surfaces, and the half of that used as a start for a fillet mix, which was sort of like peanut butter consistency, and then another mix of the fillet mix, and then the discovery that something was wrong. So, we have to remove all of the bad mixes, and probably have to purge the wood surfaces with a solvent, like acetone, and start over.
.
The next day it proved that most of the stuff that had been applied to the build was solidified, but some was soft, like weak plastic. I had expected wet liquid and a trip to get some acetone to clean that stuff off, and maybe scraping the more solid stuff, and washing that area with acetone. Instead I began to renew the fillets, and knew that overlaying good epoxy will bond it with the other stuff down below. It would be OK.
.
This is a day’s work, applying epoxy fillets to an 8 foot dingy, and laying glass tape over the fillets, mixing your epoxy, and brushing it, wetting out the cloth, working around the boat, start with the centerline keel, lay that in first, then it seems more comfortable to work, for me, with the right hand, and continue to my left, in effect dragging along from bow to stern on the starboard side, and from stern to bow on the port side.
.
It is best to do all this in one shot. Fillets and glass tape all in one grand glassing adventure. A bit of work, but keep in mind it is not strenuous, there is art in brush strokes, and you will be doing a lot of brush strokes, keep dragging the brush over the epoxy pot and scrape off the residue that will drip, otherwise. The glass tape will become transportable after it gets wet, so you can move it with stabs of the brush. You can stab bubbles of air under the glass and move them to the edge and dispel them.
.
Let it set up overnight. Take a look at the boat from a distance and see if the gunwales are parallel. If not you have to work the boat to twist it straight. Another way to check is to put two battens across the gunwales, one near the bow and another near the stern, if they are parallel, then the boat is probably not twisted.
.
The twenty hour dingy is more likely a forty hour dingy, but this is very quick, even a lackadaisical (I had to use spell check to get that one right) worker could make one in a week.
.
This is a story of a plan and an idea with details that subvert the plan and ideal, like flying into an ideal terrain, but then at the end approaching roughness, crash, abrasion, destruction. But surviving. And I was able to continue filleting and glassing tape onto the joints of the dinghy.
.
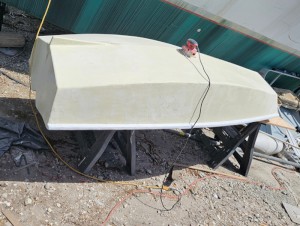
I am going on too far and have to end this blog post. It was a hit and run attempt at making a 20 hour dingy, but more like 40 hours. The image of Hit and Run by Karen Forer of New Jersey, caught my eye at saatchiart.com, who continue to thwart my efforts, Google and Saatchiart.com, but go look at her other sculptures and she is also an architect, and a bronze caster.
