Kaimusailing
s/v Kaimu Wharram Catamaran
| Vessel Name: | Kaimu |
| Vessel Make/Model: | Wharram Custom |
| Hailing Port: | Norwalk, CT |
| Crew: | Andy and the Kaimu Crew |
| About: | Sailors in the Baltimore, Annapolis, DC area. |

17 April 2024 | St Marys, GA
Dinghy Skeg
I was suffering with what seemed like a cold and also had allergy symptoms. I awoke and felt fine. The green pollen that was coating everything was gone. Maybe it will return.

07 April 2024 | St. Marys, GA
Clammy Hands
Items came in from TEMU, the Chinese cut rate retailer. One was a nice little drone that cost about twelve and a half dollars. It looked like an easy thing to play with while I coughed and sneezed. I was fighting a summer cold, even though it is not summer elsewhere, it seems like it here. A nice [...]

02 April 2024 | St. Marys, GA
Sun Doggie
After laminating the cedar strips onto the gunwales of the dinghy I found the screws I used wouldn’t come out. The epoxy had seized them. The screw heads were stripped so I cut a straight slot in the heads with the cut off wheel. The cedar smoked when the screw heads got red hot. I could remove [...]

21 March 2024 | St. Marys, GA
Just Add Water
The rainy weekend started off with overcast and fog but no rain. It looked like I might be able to get something done on the D4 dinghy. I wanted to change the bow seat which is really the bow deck. The sailing option uses the deck to hold the freestanding mast. I didn’t like how the deck looked, [...]

01 March 2024 | St. Marys, GA
D4 Dinghy Alternative Seats
The rain event was more wind than rain, strong winds with gusts up to 44 mph. We drove into town to see what the harbor was like. There was a small sailboat that had dragged anchor and was sitting close to shore. The tide was out. We left and played with Bleu at Notter’s Pond.

23 February 2024 | St. Marys, GA
D4 Inside Seams
Day two of the dinghy build started out with me finishing wiring the hull bottoms together on the centerline of the bottom panels. This was much easier than the wiring of the chine edges of the bottom panels and the side panels.
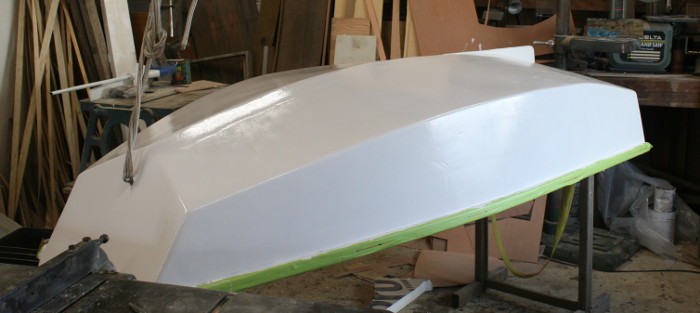
D4 Paint Job
.
Now the seat tops were glued down on the bulkheads and transoms. The transoms had a batten glued on that had the angle of the seat top and was glued right at the height of the bottom of the seat so that the seat would be level and supported by a bulkhead and by the batten on the transom. This was easy to mark because all the seats are at the same height from the baseline, a batten run over all the bulkheads will be flush with all of them, and marking that level on either transom was straightforward.
.
The mix of epoxy to glue down the seats was of course “glue hard”, 4 or 5 parts of colloidal silica to 1 part of glass microfibers. This produces a manageable putty that sets up rock hard and is a very good structural adhesive. The method to apply the mix to the bulkhead tops was to scrape off a straight blade with the mix on it across the edge of the bulkhead top. Excesses and thin areas could be rescraped, just get along until the bulkhead tops of that seat are looking evenly piled with a 3/8“ string of epoxy mix. Now the seat which has been lightly coated on the bearing surface with the same mix is plopped down on the bulkhead(s). Excess that squeezes out is scraped up and added to the mixing bowl. Now the gaps between the seat top and the hull sides are filled with the same mix, jam it in there, fair it, remove any excess, it will be difficult to remove it without power tools after it sets up. The edges of the seat that meet the transoms are also filled this way. The seat tops are held in place with gallon jugs of, what else, a new shipment of epoxy, three gallon jugs, three seats. Yes, I planned it this way.
.
The next day the edges of the seat tops that jutted out a bit here and there were trimmed off, mostly with the angle grinder and the flap disk. The trim router and the rounding off bit were used for most of these edges to make a smooth curve from seat top to vertical seat riser. The edges closest to the hull sides had to be shaped with the flap disk and the pad sander.
.
Now there was fairing work, applying an epoxy mix of 50/50 microballoons/colloidal silica and trying to get a smooth surface on the interior of the boat. First some high spots had to be ground off. This might be a piece of previous fiberglass or glue hard that stood out, or it could be drips that had set up. The procedure is to get it as smooth and level as possible by grinding and sanding. Running the gloved fingers over the surface might reveal imperfections that the eye can’t see. It seems that when a coat of paint is spread over a surface that seems to be smooth, then the imperfections are revealed, so, there is an alternate finishing procedure that coats the surface with high build epoxy primer, which will reveal some of those imperfections, then they can be sanded out. We won’t be doing that one. After we have sanded and ground as much as we care to, remembering to leave some epoxy on the surface. The more epoxy that is left on the surface, the more protection the wood underneath has. It is a case of cosmetics vs. utility. We now trowel on the 50/50 mix making it thin as possible, and fair, and tapering fair curves in the surface.
.
What ended up was not as good as I would have liked, but mostly it was fair. I was missing a tool that would get the corners of the fillets smooth, but I was satisfied with a less than perfect finish. First the interior of the hull was faired, then the exterior, which was easier, no inside corners. A persistent problem was getting small pieces of grit into the mix. These track through the surface of the fairing compound on the hull, producing small valleys. They can be removed by running the trowel by again, but you also might make another little valley if the piece of grit is still there on the trowel. Good luck trying to find and remove it.
.
Now the hull is left to set up hard and the next day the endless sanding begins. I used a random orbital grinder and 60 grit velcro pads. My grinder, from Harbor Freight needed a vacuum cleaner attached to it. This does a nice job, until it fries, Harbor Freight. Next was a loaner from Ron the carpenter, a Bosch unit that had its own receptacle to remove the sanding particles. They both sanded about the same, except the Bosch didn’t burn up. The sanding went well into the night with one half of the hull bottom and 3/4 of one hull side sanded, and one grinder apart, smoking.
.
It turns out that disassembling the Harbor Freight grinder was a blessing in disguise. On the one hand it helped cool the smoking parts from the interior of the sander, and on the other hand I found out how the random orbital sander worked. It is simple, there is a central motor and shaft which tries to spin around the sanding pad, but the sanding pad is not attached directly to the shaft. Instead it is attached to a large bearing that is off center to the shaft. When the shaft tries to turn the pad and bearing, it all spins, but when the pad is brought down on the surface to be sanded, it starts oscillating like one of those circus rides that spin in and out. In our case the big bearing started to seize up and now the pad was not oscillating, it was just spinning, and being off center it made vibration. Also the big bearing squealed while all this was happening. Sissy.
.
I sprayed some WD-40 into the big bearing, not very much, didn’t want WD-40 all over the woodwork, and found it to rotate freely. I reassembled the sander and tried it out. It sanded well, but after about 18 hours of sanding, it started to squeal again. It actually worked better than the Bosch, when its bearing was binding a bit. I found that using minimal pressure on the sander and letting it run almost as fast as when it was not in contact with the surface was best.
.
After the hull was sanded inside and out, the areas that were to be finished bright, that is, clear to allow the wood texture to show, were masked off with masking tape and pieces of plastic drop cloth cut to size. This took a while. It ended up best to lay the plastic down and get at least one edge to fit within about 1/2“, mark the other edges with sharpie pen, then cut it out and tape it down. The areas masked off included the knees and breasthooks, the seat tops, and the gunwales. The tops of the gunwales were masked off with just tape, later the bottoms were masked when the hull was turned over after painting the interior.
.
Yes, were were laying paint on this hull. I had a quart can of gloss white Rustoleum and ended up using the whole quart for one coat of the hull. It seemed that the bare 50/50 mix just ate up the paint. Probably the second and third coats won’t use as much.
.
I went to the local home improvement store and bought a gallon of the same paint. What I don’t use will be useful to Col. “Smokey” Johnson, 83 years old, who is restoring a steel boat that needs this same paint.
.
I took a picture of the paint project in the morning. The green masking tape is on the gunwales.
