Kaimusailing
s/v Kaimu Wharram Catamaran
| Vessel Name: | Kaimu |
| Vessel Make/Model: | Wharram Custom |
| Hailing Port: | Norwalk, CT |
| Crew: | Andy and the Kaimu Crew |
| About: | Sailors in the Baltimore, Annapolis, DC area. |

07 April 2024 | St. Marys, GA
Clammy Hands
Items came in from TEMU, the Chinese cut rate retailer. One was a nice little drone that cost about twelve and a half dollars. It looked like an easy thing to play with while I coughed and sneezed. I was fighting a summer cold, even though it is not summer elsewhere, it seems like it here. A nice [...]

02 April 2024 | St. Marys, GA
Sun Doggie
After laminating the cedar strips onto the gunwales of the dinghy I found the screws I used wouldn’t come out. The epoxy had seized them. The screw heads were stripped so I cut a straight slot in the heads with the cut off wheel. The cedar smoked when the screw heads got red hot. I could remove [...]

21 March 2024 | St. Marys, GA
Just Add Water
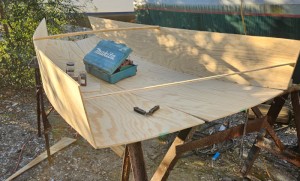
The rainy weekend started off with overcast and fog but no rain. It looked like I might be able to get something done on the D4 dinghy. I wanted to change the bow seat which is really the bow deck. The sailing option uses the deck to hold the freestanding mast. I didn’t like how the deck looked, [...]

01 March 2024 | St. Marys, GA
D4 Dinghy Alternative Seats
The rain event was more wind than rain, strong winds with gusts up to 44 mph. We drove into town to see what the harbor was like. There was a small sailboat that had dragged anchor and was sitting close to shore. The tide was out. We left and played with Bleu at Notter’s Pond.

23 February 2024 | St. Marys, GA
D4 Inside Seams
Day two of the dinghy build started out with me finishing wiring the hull bottoms together on the centerline of the bottom panels. This was much easier than the wiring of the chine edges of the bottom panels and the side panels.
15 February 2024 | St. Marys, GA
D4 Dinghy Day One
A Wharram Pahi 26 had been anchored in the river nearby the boatyard and was hauled out with the travel lift. I went around to look at it and talked to the owner couple. I was surprised that it had been built in Martinique in 1988. The boat is more than 30 years old.
Hangkai 6HP 2 Stroke Repair
.
One more thing I needed was to complete the running backstays. These are almost like shrouds, cables that support the mast, but on the lower end there is no turnbuckle, there is a purchase, a system of blocks that can be tensed up. Maybe 7:1 purchase where you pull 7 feet of line to move the blocks 1 foot. Thus they are not as difficult as the other shrouds to predict length, just add more line, but don’t make them too long and the blocks are clanging together. My problem was that I had bought some swageless fittings where the running backstays attach to the mast. These are called toggle jaws. Toggle means they can move to adjust to the direction of the load. The other end is near the deck and it’s where we attach a triple block, then there is another triple block shackled to the chainplate. The toggle jaws are $78 apiece. This is another case of highway robbery. You have a sailboat, you need a fitting that no one else in this world needs, so they’ve got you, you have to pay. So I paid. But now it seems I must pay again to terminate the other end of the cable. What can I attach the triple block to? A toggle jaw would be OK, but I had hoped to put a simple, cheap, nicopress eye loop there.
.
I have to say that with all my crashing and burning with this boat, the nicopress eyes have never given a problem. They are on the two parts of the headstay bridle and on the original headstay, that I put aside when I went to the roller furling headstay, and they were on the lower ends of the old running backstays. The stays are 5/16“ 1X19 stainless, which means, they are 5/16“ in diameter and are made up of 19 individual strands of stainless wire which is described as stiff wire rope suitable for sailboat standing rigging. The individual strands are quite stiff and can be used as Cotter pins in some cases. To work with them to make a splice is one of the first things I learned from an old salt, don’t work with them. You end up with lacerations from the wire and that with an exhausting effort to do anything else with the wire. But, $78 to terminate a wire? Plus I needed some internet fodder for my blog, let’s go ahead and try to splice this stuff.
.
I found a simple splice called a Flemish Eye and I would need cable clamps and thimbles to make these splices, so I ordered on Amazon and got free shipping by buying more stuff to make their minimum. The splices are made by unraveling a group of strands from the 1X19 and then bending the two groups of strands toward each other and wrapping them together, then putting cable clamps on the standing part of the cable.
.
I helped Capn Jane Morgan with her companion way water leaks. She started to take it all apart, then found a single screw on either side of the hatch slide that was directly under her main traveler which is mounted on her cabin top. I went with her to the hardware store and she got a right angle ratcheting screwdriver kit and I got a 1/2“ stainless shackle for my inner forestay. We came back and finished removing her hatch slider rails, which was where we thought the leak was coming from. The bedding compound was stuck on the fiberglass gel coat so I started to try to scrape it off. Tedious. Tom Chawkley showed up and gave me a razor blade holder that worked pretty well while he discussed installing a windlass on Jane’s boat. I just finished my work when they were through with their discussion. I left her with the job of trying to remove the little bit of the remaining compound with a rag and paint thinner. She was cooking pot roast with vegetables and I returned to have dinner complete with a cabernet.
.
The next day my Yamaha pulser coils arrived from Singapore and I compared them with the innards of the Hangkai 6 HP 2 stroke motor. It is a Yamaha clone, but not quite identical. There was no obvious mounting point for the second pulser coil. The original pulser coil was mounted where Yamaha puts its “low speed pulsar coil”, which is where a cut out in the flywheel passes by at top dead center or thereabouts. The second pulser coil, “high speed pulsar coil”, is mounted about 80 degrees further on as the flywheel flies. There are a pair of mounting posts similar to the charge coil mounting posts but 180 degrees from them. In most Yamaha engines this is where a lighting coil is mounted to provide electricity to charge a battery, for instance. I made a simple adapter, maybe like a triangle that the high speed coil could mount on with two holes for little 4mm bolts and the corner was drilled for a 5mm bolt to mount it to one of the mounting posts. While out shopping for the little metric bolts I forgot to get the nuts needed to clamp the coil to the adapter. I felt pretty stupid. Then I found, amazingly, a pair of little bolts on a table near where I was working the nuts on those bolts fit the little metric bolts perfectly.
.
I reassembled the motor with the flywheel and recoil starter and fed the new wires to the CDI box where the color codes of the wires matched up just right. Doc, the boat cutter upper, came in on his vehicle and came over and immediately advised me how to complete the work, but it was not an annoying intrusion, he knew how to do this work and he was right, I was getting the assembly of the wires and rubber grommet all wrong. We got it back together, clamped the spark plug to the engine chassis, and while I pulled the starter cord he reported, “You have spark."
.
I didn’t do any more till the next day when I rowed into the boatyard with hopes to fuel up the outboard and run it in a tank of water. Doc loaned me some 2 stroke fuel that has oil mixed with the gasoline and I had the motor all put back together and sitting in the water tank. I had a can of “ether”, or more properly, starting fluid, which has things like ether and some lubricants as well. After several attempts to start the engine and one attempt that produced a kick back when the cylinder fired, I gave up. Maybe I was depressed. I was elated when Doc said I had spark, but now I had the spark plug out and I couldn’t see any spark. I got my reading glasses to look and I knew it should be very apparent if there was a spark, but I didn’t see any.
.
I ended up wandering around the boatyard doing little jobs, cycling back and forth to pick up a tool or bring a part to the workshop to grind or wirebrush it. Capn Jane was up on her deck and asked if I could help her test the bedding job we did on her companionway, so I climbed up and she blasted the cabin top with a hose. I was inside and I saw some peculiar leaks. Water was running off the hatch cover and then kind of sticking to the surface and whipping back inside, then raining down. I have similar problems on Kaimu, but there are bigger problems, so I don’t worry about the leaks so much, it’s only water. I discussed with her some tests and temporary remedies that would indicate what permanent changes should be made.
.
Each time I would wander away and do something, I would return to the Chinese outboard and give a few tugs on the starting lanyard. Nothing happened.
.
I expected that Rocky, the owner, general manager, and chief crane operator, would be asking me about when to haul out. He had said he had to move 3 “cradle boats” to clear out the place where he would hoist Kaimu out with a crane. It looked like he needed more cradles.
.
The smaller boats can be set down on a cradle which is a metal framework with jackstands built into it, and then the boat and cradle can be moved around the boatyard and parked relatively close together. Boats that are too large for the cradle have to be moved with the travel lift which needs more space, plus the jackstands have to be individually placed to support the hull.
.
The last time Rocky moved Kaimu it was a big affair, he had to move a bunch of other boats first, then use the crane to pick Kaimu up and set her down where his tugboat usually moors, which means he had to fire up and move his tugboat. I think he doesn’t really want to do all that, plus he has new arrivals that need boat cradles, so the metal workshop looks like WWII welding shop, lot’s of metal, sparks, acrid smoke, and the boat cradles will be coming out to meet the need.
.
Geoff the British chemist came by on his bicycle, as usual, and had been following my progress with the Chinese outboat and offered to look at it one more time with me. We went to it and he said “you have plenty of spark” when I pulled the recoil starter and he placed the spark plug against the motor. We put the plug back in and the motor ran for a few seconds after several pulls. It did not run again until we sprayed starter fluid into the carburettor. The carburettor must be gummed up.
.
The next day I brought a small cheap tool chest, from Harbor Freight for about $30, from Kaimu when I rowed in. The tool chest has lots of tools organized in individual snap in pockets and it is very handy for working on mechanical jobs.
.
I removed the carburettor by removing 2 10mm bolts that hold the carburettor to the engine, loosening the throttle cable, and pulling off the fuel line. The choke control came apart on its own, I hadn’t even thought about unhooking it. The carburettor disassembles easily by removing the float bowl and a small plate on top of the carburettor. This provides access to all the jets and the inside of the float bowl. The carb was fouled with crystallized deposits that looked like salt and I cleaned all the jets and passages with sea foam. After reassembly the carb was mounted on the engine and when it was started with the starting fluid it kept running. I ran about a pint of fuel through the engine and exercised it in forward gear. It ran pretty well, was kind of rough at idle but smoothed out at higher speeds.
.
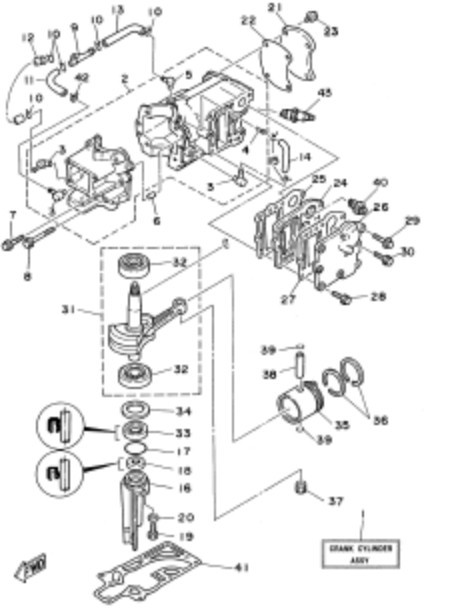
This motor is 103 cubic centimeters displacement which is exactly the displacement of the 1997 Yamaha 4 and 5 horsepower 2 stroke outboards. A video on YouTube showing the tear down of a Yamaha 4 horsepower motor looked exactly like the Chinese motor I have. I paid $40 for the motor and about $110 in Yamaha ignition parts, in fact the entire ignition system of a 1997 Yamaha 4 or 5 horsepower 2 stroke.
.
The image is an exploded view of the motor from Yamaha's website.
