Kaimusailing
s/v Kaimu Wharram Catamaran
| Vessel Name: | Kaimu |
| Vessel Make/Model: | Wharram Custom |
| Hailing Port: | Norwalk, CT |
| Crew: | Andy and the Kaimu Crew |
| About: | Sailors in the Baltimore, Annapolis, DC area. |

17 April 2024 | St Marys, GA
Dinghy Skeg
I was suffering with what seemed like a cold and also had allergy symptoms. I awoke and felt fine. The green pollen that was coating everything was gone. Maybe it will return.

07 April 2024 | St. Marys, GA
Clammy Hands
Items came in from TEMU, the Chinese cut rate retailer. One was a nice little drone that cost about twelve and a half dollars. It looked like an easy thing to play with while I coughed and sneezed. I was fighting a summer cold, even though it is not summer elsewhere, it seems like it here. A nice [...]

02 April 2024 | St. Marys, GA
Sun Doggie
After laminating the cedar strips onto the gunwales of the dinghy I found the screws I used wouldn’t come out. The epoxy had seized them. The screw heads were stripped so I cut a straight slot in the heads with the cut off wheel. The cedar smoked when the screw heads got red hot. I could remove [...]

21 March 2024 | St. Marys, GA
Just Add Water
The rainy weekend started off with overcast and fog but no rain. It looked like I might be able to get something done on the D4 dinghy. I wanted to change the bow seat which is really the bow deck. The sailing option uses the deck to hold the freestanding mast. I didn’t like how the deck looked, [...]

01 March 2024 | St. Marys, GA
D4 Dinghy Alternative Seats
The rain event was more wind than rain, strong winds with gusts up to 44 mph. We drove into town to see what the harbor was like. There was a small sailboat that had dragged anchor and was sitting close to shore. The tide was out. We left and played with Bleu at Notter’s Pond.

23 February 2024 | St. Marys, GA
D4 Inside Seams
Day two of the dinghy build started out with me finishing wiring the hull bottoms together on the centerline of the bottom panels. This was much easier than the wiring of the chine edges of the bottom panels and the side panels.
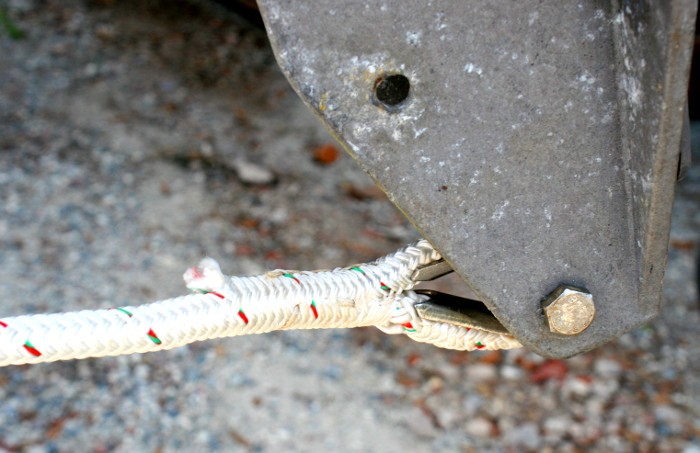
I Fid You Not
.
Meanwhile the Chinese Hangkai outboard is waiting to be put back in service after I’m done with the Lehr. The Boat/US inflatable that responded to green slime inside and inflatable top coating on the outside began to lose air more and more quickly. It was also on the dock and I began repairing it again.
.
The Seaworthy inflatable that I had replaced a valve in was now being used, it was the boat propelled by the Lehr. After replacing the valve it still had an air leak and I did the soapy water method with a wide brush to find the two leaks. I thought about getting a patch kit to patch it but I was impatient. I had the Sika Construction Adhesive, Gray, on hand, left over from gluing the rub rail on the Boat/US dinghy. The gray color almost perfectly matches a gray hypalon dinghy. Would it work? I deflated the Seaworthy and applied the adhesive with a tongue depressor kind of like spreading cake frosting. The cure time is said to be 5-7 days, but I was impatient and inflated the dingy after only 2 days. It held air. I launched it with the Lehr and began using it.
.
I went back to Lowe’s and bought another tube of the adhesive. A 10 oz. tube is about 8 1/2 dollars, while the 30 oz. tube is on clearance at about 6 1/2 dollars. I had to buy the larger caulking gun for the larger tube, so for about a total of $18 I got the equivalent of $25 worth of adhesive and now have the large caulking gun as well.
.
The Boat/US inflatable was now pumped up and soapy water tested and all the leaks were marked with a white laundry marker. Then it was deflated and the Sika was applied to all the leaks. After 2 days it inflated and testing showed a few more leaks, so I have applied the Sika again. Eventually the dinghy will hold air.
.
The hard dinghy was taken out of the water and brought to the breezeway where I am doing most of my work inside. The bottom was cleaned of a huge amount of grass. The damaged fore and aft transoms were cut off flush with the bow and stern seats. The edges of the cut out areas were prepared with the angle grinder with a flap disk. I went to Lowe’s and bought a 2 ft X 4 ft 3/4“ panel of lauan plywood. The idea was to build stronger transoms that could take the Hangkai outboard, also they would be more resistant to abuse.
.
The original transoms were 10 mm thick and the new pieces were about twice as thick. To fit in the same space and match up against the original knees, the new pieces were rabbeted so that only 10 mm would go into where the original transom was, and the excess would overhang, so that there would be an edge right across the middle of the transoms outside, but inside the inner face would fit the boat just like the original transoms.
.
The bare wood was primed with epoxy, then sanded, and given another coat. There were some delaminated spots in the old plywood and these were soaked with epoxy and clamped back together. Finally the new pieces were screwed and glued into place. Later some screws were removed but the screws into the knees were kept and all the screws in the aft transom were kept.
.
After more sanding the new areas were given another coat of epoxy and the leftover epoxy was mixed up with fairing mix (50/50 glass microspheres/fumed silica) and used to fill screw holes and clean up some of the gaps and divots in the battered dinghy. At the same time there was a request by Capn Jane Morgan to replace her propane cylinder holder, which was rotting old plywood clamped to her stern rail. I used a leftover piece of the lauan plywood to quickly fashion a replacement, so I was epoxying a bunch of wooden parts along with the dinghy.
.
I needed to put an eye in the end of the new topping lift so that I could pin it to the masthead. It then comes down to the end of the boom, goes through inside to the gooseneck where there is a rope clutch for it. I reviewed several of the videos on YouTube showing how to make an eye splice in double braided line. It looked like a very complicated and tedious operation. Plus I needed a fid, which I didn’t have. I asked the rigger and he didn’t have any fids for double braid. Chris of A to Zincs, the local mechanical contractors, had a fid and said he would bring it to the boatyard and maybe help me make the eye or just loan me the fid. Instead he was out sick and I found that West Marine in Jacksonville had fids in stock. We went there and got a fid meant for 5/16“ double braided line. I was using 3/8“ line and the 5/16 fid was the closest to that size. They didn’t have any fids for 3/8“ line. “We don’t sell many fids” said the guy in the store.
.
When I was asking around about eye splices most people said they would pay someone to make their eyes and in one case it was Ron the carpenter who made the eyes. He didn’t have a fid for 3/8“ line and was using a Samson fid. The procedure using that fid was simpler and faster than what I had to do with the fid from West Marine.
.
I won’t go into the procedure, but it was something I didn’t try to understand, just follow the instructions that came with the fid. It’s something like a 10 step process and you make a whole bunch of marks on the line and clip out little strands to taper the end of the line. Because I was using a 5/16 fid on 3/8 line I had to find out the length of a 3/8 fid and use those measurements to mark the line. Normally the fid is used to measure the marks. There is the full length of the fid and there is a mark on the fid that separates it into a long and a short measurement. The information was in a chart downloaded from the internet. I printed it out and kept it with the instructions.
.
It took 3 tries before I finally had my eye splice on a thimble. The first attempt failed because I was using Gorilla tape that was thick and very sticky, but too thick, and wouldn’t allow the line to pass through the last reinsertion. Next I borrowed some Gorilla packing tape which is thinner and allowed the line to pass, but I must have made a mistake in the process, because I couldn’t form the eye. There is a warning to be careful and not snag any strands of the part of the line the fid is supposed to pass through. Maybe that’s what happened. The eye was finally formed around the thimble and it came out OK. The final step is to lock stitch the splice with sailmaker’s twine and a needle.
.
The photo is of the eye-on-thimble pinned to the masthead with a 5/16“ bolt.
