Kaimusailing
s/v Kaimu Wharram Catamaran
| Vessel Name: | Kaimu |
| Vessel Make/Model: | Wharram Custom |
| Hailing Port: | Norwalk, CT |
| Crew: | Andy and the Kaimu Crew |
| About: | Sailors in the Baltimore, Annapolis, DC area. |

07 April 2024 | St. Marys, GA
Clammy Hands
Items came in from TEMU, the Chinese cut rate retailer. One was a nice little drone that cost about twelve and a half dollars. It looked like an easy thing to play with while I coughed and sneezed. I was fighting a summer cold, even though it is not summer elsewhere, it seems like it here. A nice [...]

02 April 2024 | St. Marys, GA
Sun Doggie
After laminating the cedar strips onto the gunwales of the dinghy I found the screws I used wouldn’t come out. The epoxy had seized them. The screw heads were stripped so I cut a straight slot in the heads with the cut off wheel. The cedar smoked when the screw heads got red hot. I could remove [...]

21 March 2024 | St. Marys, GA
Just Add Water
The rainy weekend started off with overcast and fog but no rain. It looked like I might be able to get something done on the D4 dinghy. I wanted to change the bow seat which is really the bow deck. The sailing option uses the deck to hold the freestanding mast. I didn’t like how the deck looked, [...]

01 March 2024 | St. Marys, GA
D4 Dinghy Alternative Seats
The rain event was more wind than rain, strong winds with gusts up to 44 mph. We drove into town to see what the harbor was like. There was a small sailboat that had dragged anchor and was sitting close to shore. The tide was out. We left and played with Bleu at Notter’s Pond.

23 February 2024 | St. Marys, GA
D4 Inside Seams
Day two of the dinghy build started out with me finishing wiring the hull bottoms together on the centerline of the bottom panels. This was much easier than the wiring of the chine edges of the bottom panels and the side panels.
15 February 2024 | St. Marys, GA
D4 Dinghy Day One
A Wharram Pahi 26 had been anchored in the river nearby the boatyard and was hauled out with the travel lift. I went around to look at it and talked to the owner couple. I was surprised that it had been built in Martinique in 1988. The boat is more than 30 years old.
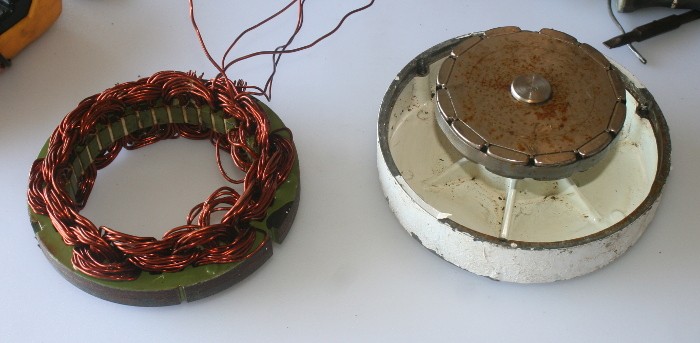
Air 403 Stator Wiring
.
The wind turbine was routinely putting out voltages more appropriate for 6 volt batteries than 12, so I took it apart again to see if there was anything else wrong with it inside. I couldn't find anything, but I wanted to clean up the internal wiring. Also I never could figure out the winding scheme on the stator. Now I think I know how it is wound. It's called delta, because the three phase windings are connected to each other forming, schematically, a triangle, like the Greek letter D, delta. This should result in three pairs of leads coming out of the stator, but instead we have two pairs and two singles. Aha, the two singles would be the third pair if they were connected together, but they are not. Someone on the internet referred to the windings as open delta. Actually open delta is delta windings with one phase tapped in its center. This is to provide a lesser voltage, for instance, three phase 220 service and the separate tap into the windings gives 110 single phase service. It's a cheap way to provide the 110 service. In the wind turbine I guess when they were prototyping they used two full wave bridges and thus had 4 places to connect the stator wiring to, so they were simply using all their rectifier diodes and spreading the load around.
.
It might make sense that the phasing of the windings might make a difference, but all the connections are to a pair of diodes that conduct to either the positive or negative buss. All the connections are conducting through the same two channels, plus and minus, so it doesn't matter what phase any particular winding coil is.
.
The bottom line is the turbine was putting out 30 volts DC when spun by the Harbor Freight Warrior drill, which tops out at 3000 rpm's. That is about twice what the wind turbine is designed to top out at. Charging voltage should be available at 500 rpm's and it doesn't look like that is happening. When the wind is really honking, when a storm comes through, I will see what it does.
.
Now on to the bread recipe. The fellow is named Steve on YouTube and in all his bread videos he hawks his recipe book. I like his videos, but if you don't throw flour all around while you're making his recipe, the dough comes out very wet. It doesn't bake well. It comes out heavy. I will try some other bread recipes after I get over this one.
.
We had a storm front come through with winds in the 15 knot range. The most the wind turbine would put out was 8 or 9 volts. One again I took it apart and didn't find anything obviously wrong inside. I suspected the stator windings were damaged. When I started prying on the wires to try to figure out how it was wound I snapped a wire. Then all bets were off, I tore into it and I think I have the details of the windings figured out.
.
Because this information isn't available on the internet, I will describe the wiring in some detail. I was surprised because I expected to find coils wound on the stator but instead the wiring is like a serpentine weave from side to side. The stator body has 36 holes around its circumference, kind of like a revolver pistol's magazine that has only 6 holes. Each phase passes through its first hole, then skips 2 holes (they're for the other 2 phases) and passes through, and it keeps on going passing back and forth through the stator. 36 holes, 3 phases, that's 12 holes for each phase. There are 12 magnets on the rotor that spins inside the stator and the magnets line up almost perfectly with the holes. The magnets are arranged so each magnet has the opposite pole of its neighbor, so along the rotor you have North-South-North-South, etc. When a North magnet is passing a stator wire, a South magnet is passing the same wire further down where the wire is passing through the stator in the opposite direction. In fact all the North magnets are passing the parts of the wire that pass through the stator in the same direction while the South magnets are passing the parts of the wire that pass through in the other direction. Along the whole wire there is magnetic excitement and it is all pushing the electrons in the one direction along the wire. The wire is wound around and around the stator passing through it back and forth. The 3 phases wind around the stator different numbers of times. The smallest goes around 7 times, then the next largest goes around 10 times, and the largest goes around 14 times. This design is meant to start charging at slow speed with the largest phase, then the other phases begin to be productive at higher speeds. There is also a little trick, when I was pulling the wire out of the stator for the 7 winding phase I noticed that the wire does a U-turn after it has built up the 7 wires and then winds back going through the same holes as the first 7 windings, but in the opposite direction. Although this would mean the AC voltage induced in the second set would be 180 degrees out of phase with the first set of windings, because they are going in the opposite direction the electric current is going in the same direction along the wire.
.
I removed the rest of the wiring from the stator and wire brushed it. It will need to be enameled or varnished before the new wires can be wound onto it. The wire I removed was 18 gauge and the new wire I ordered is 14 gauge. It looks like the original manufactures of the Air 403 changed the wiring from 7-10-14 in 18 gauge to 6-8-12 in 14 gauge. The output will be lower at the lowest speeds but the wire is a lot less resistive so current will be higher and also less heat generated.
.
The photo is of the rotor on the right with its magnets and the stator on the left.
