Kaimusailing
s/v Kaimu Wharram Catamaran
| Vessel Name: | Kaimu |
| Vessel Make/Model: | Wharram Custom |
| Hailing Port: | Norwalk, CT |
| Crew: | Andy and the Kaimu Crew |
| About: | Sailors in the Baltimore, Annapolis, DC area. |

07 April 2024 | St. Marys, GA
Clammy Hands
Items came in from TEMU, the Chinese cut rate retailer. One was a nice little drone that cost about twelve and a half dollars. It looked like an easy thing to play with while I coughed and sneezed. I was fighting a summer cold, even though it is not summer elsewhere, it seems like it here. A nice [...]

02 April 2024 | St. Marys, GA
Sun Doggie
After laminating the cedar strips onto the gunwales of the dinghy I found the screws I used wouldn’t come out. The epoxy had seized them. The screw heads were stripped so I cut a straight slot in the heads with the cut off wheel. The cedar smoked when the screw heads got red hot. I could remove [...]

21 March 2024 | St. Marys, GA
Just Add Water
The rainy weekend started off with overcast and fog but no rain. It looked like I might be able to get something done on the D4 dinghy. I wanted to change the bow seat which is really the bow deck. The sailing option uses the deck to hold the freestanding mast. I didn’t like how the deck looked, [...]

01 March 2024 | St. Marys, GA
D4 Dinghy Alternative Seats
The rain event was more wind than rain, strong winds with gusts up to 44 mph. We drove into town to see what the harbor was like. There was a small sailboat that had dragged anchor and was sitting close to shore. The tide was out. We left and played with Bleu at Notter’s Pond.

23 February 2024 | St. Marys, GA
D4 Inside Seams
Day two of the dinghy build started out with me finishing wiring the hull bottoms together on the centerline of the bottom panels. This was much easier than the wiring of the chine edges of the bottom panels and the side panels.
15 February 2024 | St. Marys, GA
D4 Dinghy Day One
A Wharram Pahi 26 had been anchored in the river nearby the boatyard and was hauled out with the travel lift. I went around to look at it and talked to the owner couple. I was surprised that it had been built in Martinique in 1988. The boat is more than 30 years old.
Clammy Hands
.
I tried again. The controller had a button to try to correct for the crazy flight. This time it soared off and I panicked, what could I do, it zoomed up and took a turn for Rocky’s shop. It crashed into it. Everybody laughed. I put it away.
.
I was feeling poorly and didn’t have energy to continue with the drone. I regressed into hunker down mode.
.
The news was that the Francis Scott Key Bridge collapsed after a ship rammed it. From what I know now, the accident was a freak event, the pilot and the crews that man the ship have contingencies for almost anything that can happen. When they lost power and propulsion they were able to alert the local authorities about 90 seconds before the impact. Traffic was halted by the sheriffs and the only people on the bridge were a pot hole repair crew who ended up in the drink, in Patapsco River water that was frigid enough to kill anyone in minutes, this at 1:30AM.
.
While I was under the weather I was under the weather. A storm came through with a tornado warning and I hunkered in. All my tools were under cover, mostly, and I lay down in my bunk to suffer. Eloisa called me, we are here. I had to get up and go down to see her. She was upset. Her windshield wipers were stuck. We had worked on replacing her spark plugs and that required removing the cowling that held the wiper motor and the wiper motor electrical connection had to be disconnected.
.
The spark plug replacement on this vehicle, a Ford Windstar, is a nightmare, which continues afterwards.
.
I took the windshield wiper arms off and Eloisa cycled the wipers. I put one wiper on and she cycled them again. I put the other wiper on. She cycled again. They seemed to mechanically be assembled correctly. Then she tried other settings of the wipers and they intermittently ran or stopped all over the place.
.
I washed the grease off my hands and tried the wiper control myself. There was obviously a problem, but if you ran the wipers on speed 8 they operated normally, and you could stop them at speed 1, then shut them off. Other speeds were erratic. We had the company of Geoff, the genius phd chemist, who can also fix almost anything, and he looked at things. Eloisa went off for the evening. Geoff said, I think that little connector that you can’t find a plug for might be the problem.
.
The front, with a tornado warning, came through, thunder and lightning, big rain, dripping from the same old drip on the overhead hatch. No tornadoes.
.
The next day was wet and overcast. I stayed in and began the cure for the common cold, wait it out for a few days.
.
Eloisa was up in the mountains to “take care of business”. I wasn’t up for any fun anyway. I felt like I had the flu and was coughing up phloem prodigiously. I had once had bronchitis during a bad allergy season and this seemed the same. It was difficult to sleep, so when I did sleep, usually in the morning, I stayed in my bunk and got the most of it. I could get no work done and the weather and gnat swarms didn’t help.
.
Geoff was relaunching his beautiful yacht for the upcoming trawler fest in Fernandina and his near neighbor was in the yard with his trawler just 50 feet away from Kaimu. I hope I am well and can visit the event, even though I don’t have a trawler.
.
The SailGP racing series went to Christchurch, New Zealand, and I found a synopsis of the highlights on YouTube. The announcers sound like they are calling a horse race. The racing is exciting and if you like watching sailboats race, and who doesn’t, try it out. The USA team has recently changed its crew and they are obviously learning how to handle the boat. New Zealand won the final race on their home waters.
.
I had no appetite, didn’t go out to the restaurants, and didn’t go shopping, just lay low and let time cure the cold or whatever it is. I ran out of wine and coffee. I gutted it out for a couple days. I was running out of my already meager supply of food. I could still make a mean ham and cheese omelet sandwich for breakfast but when din-din came around I simply didn’t eat, I wasn’t hungry. Then I had a night of really bad coughing, etc. I was getting worried. If I went to the health clinic it would be the VA clinic and I would have to get permission from the Maryland clinic at Pocomoke to visit the one here in St. Marys. At least I have it available as a last resort.
.
I was able to try some work on the dinghy. When the rains came I had to turn it upside down to prevent it filling up with water. The last storm dumped about 3 inches of rain. While it was upside down I worked on the bottom and the bottom edges of the gunwales. Epoxy fairing mix was applied to any divots. The next day I could smooth the patches with the angle grinder with flap disk and pad sander. The bottom edge of the gunwales was rounded with these tools after I marked where the oarlock sockets would be mounted, where the gunwale had to remain square.
.
Next I turned the dinghy upright and began working on the top outside edges of the gunwales the same way. The ends of the gunwales at the bow and stern were blended into the shape of the hull. Work was interrupted by rest breaks which included flying the new little drone.
.
I found on YouTube how to properly set up the drone. Unlike the fractured instructions that came with it, the video showed a gyro calibration button. If you don’t calibrate the gyro the drone immediately goes haywire and becomes a Japanese Kamikaze killer, not the cheap meek Chinese drone clone. It is, I think, a clone of the Mavik Pro Drone. Of course it isn’t as good, but I haven’t flown the real thing. The clone drone has 3 speeds. Supposedly on the higher speeds it will have enough power to fight the breeze, which my old Bugs2 could do, but I found even a light breeze would make it difficult to hold position. I’ve been meeting more boatyarders who are either annoyed that I’m flying into their air space or happy to have some entertainment at my expense. Any landing you can walk away from is a good landing, I am told. The drone cost $12.98 from TEMU.
.
I finally felt well enough to go shopping and Komputer Ken said he was going to the hardware store and he’d take me along. We had a nice chat, hadn’t been out on the road with him for some time. I chatted about clam farming. It was my new food obsession. When I was really low on available food and didn’t want another ham and cheese sandwich or peanut butter, I made a quick soup, like a Thai clam chowder.
.
I put about a cup of water in a bowl with some instant tom yum paste, about a heaping teaspoon, and microwaved it till it was boiling. In a second bowl I scrambled an egg, then poured the hot water into the bowl. Instant egg drop soup, but then the clams went in as well as some sesame oil. It was surprisingly tasty, but maybe I was starving by that time and would eat anything.
.
The YouTube clam farming videos were from Cedar Key, of course, and from Virginia’s Eastern Shore, just South of Crisfield. Another came from Vietnam or Philippines. They showed the process of incubating the tiny, microscopic, clam larvae, nursing them along, and then letting them grow up in the local waters. They need no food at this stage, they filter feed, and as a result, the local waters get cleaned up. Of course the local waters cannot be polluted.
.
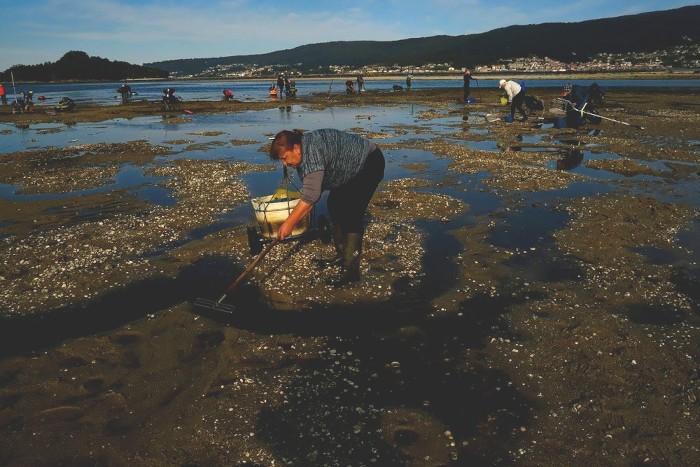
The image is of clam harvesting from the Associated Press, photographer Alvaro Barrientos.
Sun Doggie

.
We had another rain forecast so Komputer Ken helped me flip the dinghy over, bottom side up. Everything else was covered or put away. The weather pattern is a few dry days then a front coming through with rain and thunder. It was remarkable how much rain fell. At least 3 inches.
.
With the dinghy upside down I could run the flap disk on the underside of the gunwales. There were other small spots here and there that needed cleaning up with the disk. Someone said “looking good” and I said they needed eyeglasses.
.
Because I stupidly installed the seats and their crossbeams without priming them with epoxy I now had to figure out a way to apply the epoxy. It would be impossible with the dinghy right side up and to have enough room to fit myself into the upside down dinghy I would need to put it on taller sawhorses. I ended up laying the dinghy on its side propped up against the catamaran. It was still difficult to get a paint brush in under the seats, but I was able to apply a coat of epoxy.
.
The wooden oars were also given a coat of epoxy.
.
We were falling into a routine of going to Angelo’s, a small Italian restaurant near exit 3 of I-95 on Tuesdays when the place was not packed, as usual. We found their Pesto Pizza to be exceptional. It had both mozzarella and feta cheese. Eloisa remarked that it had no pesto on it, but I think all the ingredients were there, somewhere, maybe no pine nuts, but there was spinach and ham. I would never have thought of that combination of toppings. I said to the wait staff, I make pizza, and if I made one like this I would be very happy.
.
Eloisa was describing a beach on Amelia Island and we decided to picnic at the beach. While on our way we stopped at a Publix market for wine and then I thought why bother trying to organize picnic snacks, let’s just get Cuban to go. We stopped at 1928 Cuban Bistro and she ordered the food. The total was $34, the wine total was about $12.
.
She drove past the entrance to Fort Clinch State Park which surprised me. She said you have to see this beach. We went North on a semi paved road along a barrier sand dune and stopped at an access point where a wooden boardwalk with gazebos and picnic tables ran over the dune to the beach.
.
No alcoholic beverages are allowed. We brown bagged the wine. A constant flow of beachgoers came and went. The sky had wispy cirrus clouds and a sun dog overhead. I took a photo.
.
The vehicle had been running rough so we got a half dozen spark plugs, oil and oil filter, for an oil change. The procedure to replace the plugs seemed to be rather ridiculous. My guess is the Ford dealer would change the plugs using proprietary tools with the car on a lift. Our repair manual had a procedure that included removing the two cowlings that covered the windshield wiper motor and the air intake system for the cars ventilation.
.
The plastic fasteners were impossible for me to remove. Geoff, the phd chemist, was working nearby on his Bayliner yacht and stopped by. He was able to remove the fasteners while I worked at replacing the 3 plugs on the front face of the engine. How many plugs have you replaced he asked. One. The plug wires were so seized onto the plugs that I was afraid I would damage the wires. We removed the windshield wiper blades and the two cowlings. The plugs on the rear of the engine were not visible. I had to feel around. Everything was so tight and seized. Geoff loaned me his Snap On ratchet drive which I quickly dropped into the abyss behind the engine. He ran off to get a jack.
.
While Geoff was gone I was able to remove the rear plug wires using a short piece of wood to pry them off. I was able to change the plugs with my own ratchet. He came back and jacked the car up and retrieved his ratchet drive.
.
The manual says to replace the spark plugs at 60,000 miles. It looked like the plugs were aftermarket, so probably were the second set installed on the car. The plugs we took out were very badly worn.
.
We replaced the lower cowling and the wiper blades. A new ventilation filter was on order and we would put the upper cowling on after replacing the filter. The space under the cowlings was jam packed with leaves and other debris. We had vacuumed all that up.
.
The next day we installed the filter and the upper cowling. The car was good to go with new oil. I was not feeling well with a lot of congestion, coughing, maybe it was the pollen which has been especially bad this year. Eloisa took Bleu to Crooked River State Park while I remained in the boatyard, under the weather.
.
The photo is of the sun dog on that beautiful afternoon at the beach.
Just Add Water

.
My idea was to follow through with my copy cat of the Eastport Pram seat arrangement. The flat square shaped deck with its crossbeam located right across the aft edge would be replaced with the same piece of plywood which has already been fit to the bow, but the crossbeam would be moved forward, forward of the mast which passes through the deck through a hole that is centered 3” forward of the aft edge of the deck. My idea was to cut away the deck in a curve so there would be one less straight line.
.
I bent the deck over a ¾” piece of wood to see how much I could crown the top of the deck. It looked like I could crown it even more. I set up the crossbeam with temporary screws to bend a batten across the aft edge of the deck. The curve would pass through the center of the mast hole. In fact, there would be no more mast hole, just a semicircular indentation. The mast would fasten to the crossbeam. Maybe with a U-bolt.
.
I dry fitted everything together and cut blocks to support the rear seat at the transom. I then disassembled everything and mixed up a batch of epoxy. All mating surfaces were coated with epoxy and the rest of the batch was mixed with “glue hard”, a mix of colloidal silica and glass microfibers. This mix was dabbed onto one side of mating surfaces. When I finished I began screwing things back together. The front deck was screwed to its crossbeam, the rear seat was screwed to its crossbeam, the centerboard case was screwed and clamped together, the middle seat was screwed to its crossbeam, and I finished the last of that batch of epoxy. I made another smaller batch and applied it in the same way to the top of the centerboard case, the top of the rear seat blocks, and any remaining mating surfaces.
.
Next the deck was screwed in place at the bow and the rear seat was screwed in place at the stern. The middle seat was attached to the centerboard case and the whole apparatus was fastened into the hull. Thunder was starting off to the South and I quickly put away the power tools, flipped the dinghy on the saw horses, and covered everything else. Rain began pelting down. I had finished just in the nick of time.
.
The front came through and I began work on the dinghy again the next day. The middle seat came loose, it was not completely glued in place. I removed it with the centerboard case attached and did more shaping with the angle grinder with a flap disk. The seat and case were then glued back into the hull. I used leftover epoxy mixed with colloidal silica and glass microspheres to fill any gaps and screw holes.
.
While all this work was going on, maybe 2 hours a day, I was also trying my hand at day trading and if I made enough money, celebrating. Although I had no luck day trading when I first retired, now it was working very well. I thought about all that time my account had been sitting with the traders making 2% while in some cases a fund that they had purchased lost $6,000. There were several funds that were not in the black. The pandemic was particularly harsh.
.
I picked up a cedar 2X4 from RPM lumber in Yulee, FL. 6 years ago I made a pair of wooden cedar oars. I now only had one of the pair, so I planned to make a replacement. No sense in having one cedar oar and nothing to match it. I also needed 1/4X1 ½ wood strips to laminate rub rails on the dinghy. To do that I cut 1/4X4 off the face of the 2X4 and cut that into 3 strips. After taking off two faces I had 6 strips and the leftover cedar, maybe a 1X4. That should leave enough to make an oar.
.
After going over the dinghy with the flap disk to smooth epoxy blobs I added more epoxy/silica. The transoms were rounded over with the disk, carefully, then sanded with the pad sander. The centerboard slot was drilled with a very long drill, from the top, then that drill hole was expanded with a ½” drill, drilling from the bottom. A ½” straight laminate trimmer bit made a perfect slot for the centerboard.
.
The leftover cedar 1X4, which is actually more like 1 1/4x4 was cut to around 62” and then in half to make a pair of sticks to make the handle of the oar. The remaining 4” wide piece was cut in two to make two halves of the blade. Pictures to follow.
.
Eloisa loves wood storks and when we found that one of the two local breeding areas was right across the North River Marsh at the old paper mill site, she went there and counted about a dozen wood storks, some American ibis, osprey, and a bird she couldn’t identify, like a skimmer.
.
Another front was forecast to come through and there was a tornado watch. I put things away and felt listless, like I was coming down with something. There is news of norovirus up North and some in the boatyard have had a sort of stomach flu. I had no appetite but wanted to get some food by mid afternoon.
.
The clouds of the front were like cloud formations in the Caribbean. These signal the summer weather pattern. We went to the Southern River Walk where we were sitting under cover but had the sky open to us to the Southwest. It was early, before 4PM, and I had a plate of shrimp alfredo and ordered a bottle of pinot noir, the last one they had in stock. I felt better after having some food and wine.
.
Geoff and Karen, phd chemists, arrived and joined us. Another couple from the St. Marys Yacht Club arrived and we had a full table with intelligent conversation. As the Caribbean clouds came in and the sky grew darker the winds picked up. Lightning began flashing to the Northwest. The bulk of this weather passed us by. I awoke the next morning with a half bottle of wine at the swimming ladder, where did this come from? It is what’s left of the third bottle.
.
The next day was an attempt to have fun at the beach. We had a bottle of malbec at a table looking out at the sea. Surf was not big. Eloisa had a poke bowl. There was a second bottle of malbec. I had shrimp cocktail, but it was not well presented. Good protein, bad presentation. I had to go inside the restaurant to get lemon wedges.
.
We went into Fort Clinch for a bit, then headed to Southern River Walk. I had the tomato soup with a grilled cheese sandwich. We were celebrating a 1220 dollar stock trade windfall.
.
The day at the beach meant I had to insist to do a day of work on the dinghy while Bleu and his mistress go kayaking and catalog the ducks and geese at the pond, Notter’s Pond.
.
I wasn’t sure how to put together the gunwales, laminated from 3 layers of cedar. I thought I would dry fit them using my assortment of SST screws. I only needed one screw at each end, drilled and dry fitted each end. The other glue job on the list was putting the cedar oar together.
.
I was being very careful, the oar needed to have a joint cut for the blade to set into the shaft and the shaft to be glued to the blade. I cut the joint with the woodshop table saw and remedial trimming with the multitool, with a blade that was less than a half inch wide. After dry fitting I needed to mount the oar in a vise to get the blade out of the shaft.
.
I dry fit the gunwale laminates and then decided to start gluing. If you dry fit everything, you stand a good chance of gluing everything up nice, perfect. But not now. I had an afternoon temperature at around 80 and as I painted epoxy on the gluing surfaces and then mixed the rest of the epoxy mix with some additive fillers, I realized the epoxy was doing its natural thing, it was coalescing, gelling, I was losing my opportunity to get it to work. I had to screw, clamp, and glue everything together, but there was too much. Too late.
.
The result was a mess. Sometimes it’s better to quit while you are behind, stop the damage.
.
The next day I used the multitool to cut the bad glue lines. I borrowed more clamps from the boatyard and put the starboard gunwale back together. I glued one lamination on the port gunwale.
.
The next day I epoxied the two remaining laminate strips and glued them onto the port gunwale. When they were set up I ran the flap disk over them removing excess glue splotches. The forward ends of the gunwales were trimmed to match the angle of the bow transom.
.
These days consisted of working an hour or two on the dinghy, then going to the local Irish pub where St. Patty’s Day was an entire weekend affair with live music. The bands were very good and we played with Bleu, he was like a seal, bopping a ball back to us when we tossed it to him.
.
We were exploring Crooked River State Park where Eloisa had a pass. It is near the submarine naval base and is another place where migratory birds stop on their way North and South. There is a boat ramp, put put golf course, campsites, and kayak rentals.
.
The image is of the wooden oars prior to applying epoxy.
D4 Dinghy Alternative Seats
.
Back at the boatyard I had to refasten a tarp. The wind was really howling.
.
Supplies were coming in for the dinghy project, epoxy, 1708 glass cloth, plastic syringes to measure epoxy, mini paint rollers, and a dozen multitool blades. Some of the items came from TEMU and cost a fraction of the prices at the local stores.
.
I glassed most of the exterior of the dinghy with 1708 and found it difficult to lay flat. Cutting darts in the cloth helped. The scissors soon became dull. I had to babysit the epoxy as it began to cure. I got most of it to stick and stay stuck.
.
The next part of the project was the seats. I was straying off the building plans now, I was making seats with similar shape to the Eastport Pram by Chesapeake Light Craft. Also I cut a curve into the top of the bow transom and a compound curve into the top of the stern transom. The Eastport Pram has beams under the seats to stiffen them. Also there is a daggerboard case that is part of the middle seat.
.
Next I laminated 1708 to the transoms inside and out. I found some scrap lumber from some long ago project. I made 1X3 seat crossbeams and two 1” wide cleats for the centerboard case. The cleats are spacers to hold the two sides of the centerboard case 1” apart. The centerboard case attaches to the middle seat seat beam and the seat is fastened atop.
.
The bow seat is actually a bow deck if you are building the dinghy rigged for sailing. It took a long time to shape it, compound angles all around. I contemplated putting a crown in the little deck but kept it flat.
.
The edges of the seats are curved. I used the angle grinder with a flap disc to round off the edge and smooth out the curves. I dry fitted the seats and beams and was ready to glue it all up when I remembered there are small wooden blocks underneath the ends of the seats and across the stern transom to support the rear seat. A cold front was approaching so I had a yardbird help me flip the dinghy upside down on the sawhorses. The bottom is glassed already so rain will not hurt it.
.
All the tools had to be put away under cover. While I was scurrying around doing that, the boatyard came and took away the gray Westsail 32 (nickname Wet Snail) to be put into the Travel Lift slings for launching. Now there was a big space between me and Komputer Ken, a space big enough for a certain catamaran, CATNAPPER, waiting for haul out.
.
Eloisa arrived just as I was about to call her and invite her to have dinner at the China Wok. She had never eaten there before. It has great food but the ambiance is of a take out place with just a couple booth tables. I had Hot and Spicy Shrimp and Hot and Sour Soup. Eloisa had Egg Foo Young and the soup with some spring rolls. We then left and had some wine and tea at Southern River Walk.
.
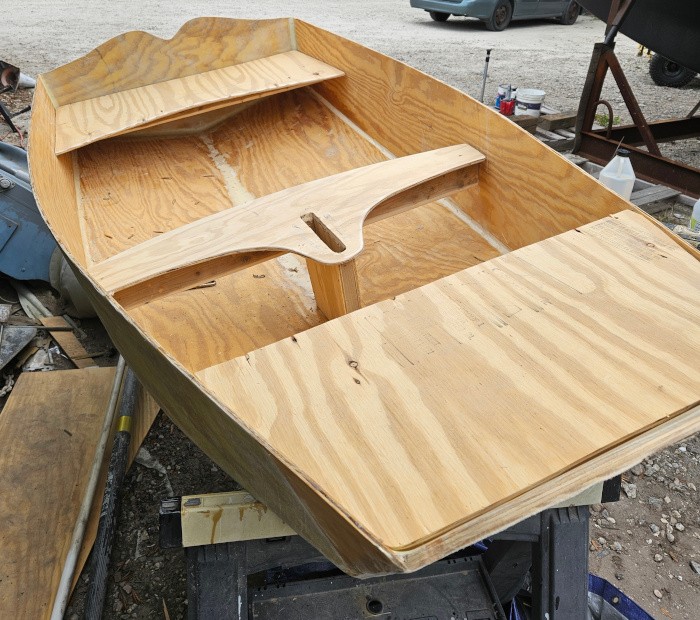
The night was chilly and rain was imminent. We will have a rain day and then get back on the dinghy project over the weekend. The image is of the dinghy with seats dry fitted in place.
D4 Inside Seams
.
Next I cut out a temporary form that was a bulkhead in the original plans, a bulkhead that formed the support for the rear edge of the middle seat. This was cut from scrap ¼” ply. Next the bow and stern transoms were cut out of ½” ply.
.
When I tried to force the bulkhead form into place in the middle of the boat it wouldn’t fit. I tried to wire it in place, tried banging on it, prying it with a pry bar, it just wouldn’t go. I quit and went shopping with Komputer Ken and Doc, of Doc’s Chop Shop.
.
Doc and Ken had cats that needed to see the vet. They dropped me off at Walmart to shop for epoxy tools. I needed individual small jars for the hardener and resin, plus marinade syringes I use to measure the epoxy. It turned out that they no longer carried the syringes. After finishing my shopping I had a Subway sub for a very late lunch. The dynamic duo and their cats did not return for a couple hours. The afternoon was shot.
.
Back at the boatyard I ripped the bulkhead form out of the dinghy hull and remeasured it. It was cut correctly. Perhaps the CAD design had not taken into account the thickness of the planking.
.
The next day I looked at the bulkhead form and saw it was exactly ½” too wide. I trimmed ¼” off each side where it contacted the hull sides. Now it should fit, but the sides and bottoms wouldn’t bend enough for the keel centerline to form the correct angle. I tried a pry bar, wedges, nothing would bend the hull into shape. The final thing that worked was setting up a Spanish windlass and clamps at the very rear of the bottom panels and forced them into a vee. This vee also veed the bottoms under the bulkhead form. I was able to wire the form to the hull sides.
.
Next I worked on the stern transom. I had left the hull sides and bottoms untrimmed because I remembered there being a discrepancy when I built this same design back in 2018. I could see the markings on the starboard hull bottom and starboard hull side. The marks were ½” different in the length of the panels. I duplicated the marks onto the port side panels. First the starboard hull side was wired to the transom at the top and the transom was forced down and wired to the top of the port hull side. The rest of the fastening will have to came later.
.
The bow transom was impossible to force into position. The angle of the bottoms at the bow transom was close to 90 degrees. I could not put a Spanish windlass there and install the bow transom at the same time. It took a long time and many wires, longer than what was used on the hull bottom chine seam, but the edges were forced into position. Wires broke, were replaced, a little here, a little there, eventually it all came together. The bottom panels had a twist at the bow where the vee angle increased and that was difficult to force into the ¼” plywood. The earlier build in 2018 used 5mm Revolution ply which was more pliable and easy to work with, but unfortunately not water resistant, resulting and a beautiful dinghy that lasted only 2 years.
.
The stern needed more attention, the transom was attached at the top corners, but the lower edges were not. Once again the stiffness of the plywood required more wires, longer, and after a while the stern was attached all around.
.
The next step would be applying epoxy fillets to the inside corners of the hull along both chines, the centerline keel, and the vertical corners at both transoms. This would have to wait, rain is forecast for the weekend, so the project will sit under wraps till Monday.
.
TEMU, the Chinese merchants that I have been using for a while now, are sending me an optical thermometer and a nice brass hose nozzle. I have been shopping for plastic barbecue marinade syringes which I use to accurately measure epoxy before mixing. They are calibrated in half ounce increments. For use with epoxy the tips have to be enlarged, drilled out a bit, sorry, no pun intended. Walmart used to carry them $.88 each, no longer. Not available. I searched. TEMU has them so I ordered. Like 4 for 3 bucks. They also have the small paint rollers which come with a small roller frame for about 3 bucks. I needed to buy more, ten dollar minimum, so I ordered a set of 12 multitool blades, expensive at twelve and a half bucks. Check the prices at Harbor Freight. The twelve blade assortment will come in handy. That’s like a buck a blade. Check the prices at Harbor Freight.
.
The multitool is extremely useful. When I have to replace a section of plywood I have already chopped into it to see where it has gone bad. I continue chopping until all the bad plywood is gone. I tape measure the area and come up with a simple shape that will fix it, then cut that shape out of new plywood of the correct thickness. It can be a rectangle or any other simple shape. I place the shape on top of the repair area and run the multitool around the edge. Then I gouge out what’s inside the cut and glue the new piece of plywood in place. Done. Simple, not much measuring.
.
The young couple with the Wharram Pahi 26 were put in the boatyard right across from the Pandemic Porch. I walked over and conversed with them. I conversed, they went about their business, but I found out they purchased the small catamaran in Marinique and sailed it here, not directly, a big adventure on a small boat. They may not even have a motor on board.
.
I use a Chinese half liter tin cup for my coffee, it lets it cool down faster, and for my evening wine, kill two birds with one stone. One morning I noticed, before making coffee, that the no-see-um’s were going crazy at the tin cup. They were obviously after the leftover wine in the cup. I realized then that I had been drinking coffee with a substantial tincture of no-see-um every day.
.
In Crisfield we put our cell phones over our glasses of wine to prevent the swarming insects from polluting. Now I am doing the same. The gnats come into a closed boat drawn by some faint wine aroma. But my wine aroma is probably not faint. My wine process results in no leftover wine, but plenty of leftover wine aroma. This draws the gnats. They are drawn to my boat and to the boatyard. What about the town?
.
Maybe if I stopped drinking wine and pressure washed most of my boat, the gnats would lose interest and stop pestering me, the boatyard, and the town. But I know I won’t get any credit for that. Let them suffer, I will keep drinking wine.
.
The weekend forecast was rain, rain, rain. Everything was put away out of it. I went back and read again my work on the D4 in 2018. There is a time lapse video link there of me putting the gunwales on, laminating them. I was in touch with Eloisa again and sent her the link. Her phone service, wherever she is now, is intermittent. Probably in the mountains, keys, or nearby Fort Clinch.
.
The rain is light but steady. Too wet to work outside. The boatyard is quiet. Now and then there is a sound of a power tool somewhere. Eloisa gave me a compliment on a sample of writing I sent her. It was a fluke.
.
Work resumed on the D4 dinghy. I made the usual 50/50 colloidal silica/glass microspheres mix with epoxy resin and when it was at the consistency of peanut butter began applying it to the inside seams of the dinghy. At first I tried putting the mixture into a zip lok bag, cut off a corner, and use it like a cake decorator. This resulted in too much of the mixture remaining in the bag. I then used a large tongue depressor to put the mix into the seams. The end of the depressor had a radius of about ¾”, so the fillet in the seam would have a smooth curve for later when it gets fiberglassed. The fiberglass has a minimum radius it can conform to.
.
The inner seams of the bow and stern transoms were not filleted as well as short segments of the long seams amidships where the bulkhead form was keeping the hull sides at the correct angle. I didn’t want to glue the form to the hull.
.
The next day I did the remainder of the inside seams. The dinghy was strong enough to turn it over. I also changed sawhorses to lower the dinghy to work on its exterior. I made the mixture again and worked it into the exterior seams. I then used a flexible piece of plastic to smooth the seams, worked like a charm.
.
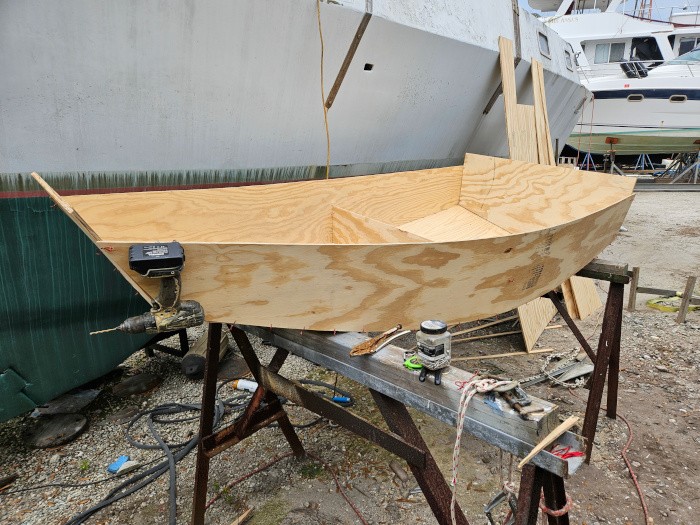
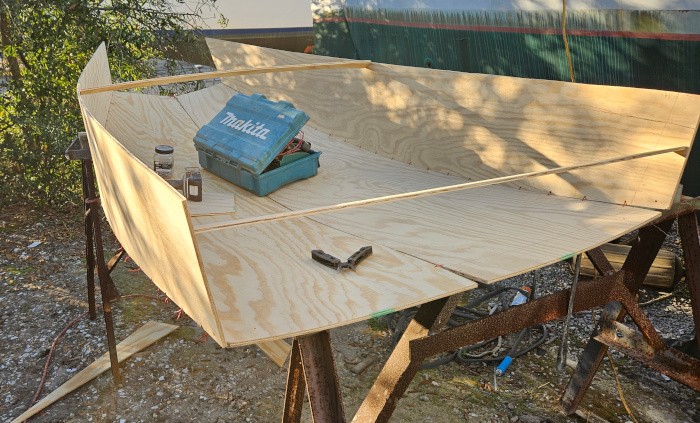
Rain was forecast so everything was put away out of the wet. The next job would be glassing the exterior of the dinghy with 1708 biaxial cloth. The image is of the D4 dinghy just before flipping it to work on the outside seams.
D4 Dinghy Day One
.
I planned to watch the Super Bowl on my TV aboard Kaimu, but Geoff and Karen invited me to watch it with them and have some shrimp gumbo dinner. I biked to their house, the longest ride I’ve taken since Crisfield. The gumbo was perfection, the shrimp came right from the docks in Fernandina, as fresh as you can get. The game started out as a defensive slug fest that began to morph into a continual display of offensive genius by both teams. In the end Patrick Mahomes threw a touchdown pass to Mecole Hardman in overtime to win the game. Mecole was on the NY Jets to start the season, now he will get a Super Bowl ring.
.
I biked back to the boatyard very late. The road is not well lit and I took care not to run into anything. After a long phone call to Hawaii I got to sleep well after midnight. The next day I was slowly going about my business and hoping to watch my daughter’s wedding via the link she sent me by Skype. Alas, the video was not kept long enough and after a late breakfast I realized I had missed it. Later it was reposted and I watched and shared it with family in Hawaii and Pennsylvania.
.
The next day we planned on going to Yulee to buy plywood. After looking at online home improvement stores I decided to try the local Lowes store. I was looking for BCX or ACX, basic plywood, not marine, although ¾” marine plywood was available, I was looking for ¼” and 3/8”. I had trouble finding the plywood and the checkout said someone would come and help me. It ended up I found the pile of ¼” and grabbed a couple sheets. The plywood looked acceptable to build a dinghy. Nearby was some nice ½” ply which I grabbed. I liked the looks of it and it would suffice to replace the 3/8” called for in the plans for the bow and stern transoms and the seats. When I checked out I received a 10% discount because I am a military veteran.
.
Komputer Ken who was transporting me and the plywood received a Chinese lunch at China Wok. I could not finish my lunch special, shrimp in garlic sauce, and saved it for later. We brought the plywood to the boatyard and stacked it on sturdy sawhorses. I gathered tools for scribing cut lines on the plywood and began trying to decipher the D4 plans, which are a .pdf file from long ago. There are some dimensions that are difficult to read.
.
I worked my way over the top sheet of plywood and all went well. Took a while to plot the points to make the cut lines. After plotting and drawing the outline for one hull side I squatted down and tried to determine if the lines were smooth and fair. They looked good. I went on and plotted the lines for ½ of the bottom. The dimensions on the plans were not straightforward and the result on the plywood wasn’t fair. I quit for the day and pondered what the effects of the unfairness would be. The unfairness was in the forward chine edge of the hull bottom. It looked like just making it fair to the eye would do.
.
I had the remainder of the chinese shrimp and couldn’t finish the leftovers.
.
I redrew the chine edge and ignored the one point that wasn’t fair. I dug out my makita circular saw and began cutting the plywood dinghy parts. The plywood panels were fastened together face to face with the bad sides in and the good sides out. The first two cuts were following the chine edge of one hull side and the chine edge of one hull bottom half. This left just a small strip between the hull side and hull bottom to be cut. The forward edges at the bow were cut off but the stern edges were left uncut. I remember there being a discrepancy at the stern when I built the previous dinghy in 2018. The stern ends will be trimmed after the hull is wired together.
.
I made a jig to drill the holes for the wire that is used in “stitch and glue” construction. The holes are about ¼” from the edge of the plywood and 4” apart from each other. The jig rests against the edge of the plywood and it has a small sheet rock screw that can fit into a drill hole in the plywood and it has a drill hole 4” away from the screw. The procedure is to drill the first hole, then use the jig to drill all the rest of the holes in that edge of the plywood.
.
The seam between the pair of bottom panels must have the holes perfectly lined up when the panels are paired together. The same is true for the hull bottom chine edge and the hull side chine edge. I chose to start the chine holes at the front of the panels where the bow transom would be attached. All these panels are in pairs, left and right, and all have been fastened together face to face so that drilling puts holes in both exactly identical.
.
The panels are unfastened and the job of wiring them together begins. I started with one hull bottom panel and its adjacent hull side panel putting a short piece of solid copper wire about 3” long through the first hole near the stern of the panels. I reasoned that the panels narrow toward the bow, so leaving the bow at the end of the wiring would be easier to manage than going the other way.
.
This job took about 2 hours just to wire two panels together. It was extremely difficult to do it alone. The panels want to collapse flat and when that happens the wires get pulled apart. There is a lot of leverage in the panels to undo the wiring. It took time to hook up weights, clamps, and ropes to hole the panels in place as well as the difficulty in getting the wire in through the holes and twisting it. Sounds simple to do but is not easy to do.
.
Geoff the chemist came by and said he couldn’t see how the panels would fit together. I didn’t want to spend another 2 hours to wire two more panels together so I changed my technique. I started the second pair of panels at the same point but then went to the middle of the panels and wired one hole there, then went to the bow of the panels and used a long piece of the same wire to bring the bow end of the panels together. To keep the panels from collapsing I jammed the wire stripper tool which had rubber handles and a sharp tip between the panels to force them into an angle where the chine edges were aligned together. This wiring session took about 45 minutes and didn’t need any clamps, etc.
.
Finally I placed both pairs of panels together at the centerline seam of the bottom and wired the hole at the stern end, a hole in the middle, and finally the hole at the bow. Then I put spacers to warp the hull sides and bottom panels into shape. I could see that the chines and keel were fair. There was about ½” discrepancy at the stern where the transom would be mounted, but that will be trimmed after fitting the transom.
.
The next step is to cut out the bow transom and the stern transom. A pram has two transoms. The bow will be lined up and fastened to the front edges of the bottoms and the sides. The stern transom will be fastened to the rear edges of the bottoms and the sides and they will be trimmed to fit the transom.
.
The original design had 4 bulkheads that supported seat edges and also define the angle of the bottom and side panels, so I will have to make at least one fake bulkhead to hold the hull into shape while fiberglassing the seams. My plan is to fiberglass tape the interior seams, then flip the hull over and fair and glass the whole bottom. When that sets up the hull is in its final shape. The interior is glassed, then seat stringers, centerboard case, mast step, seats, and gunwales are attached. I hope to accomplish all that in about a week. Finishing will take about another week.
.
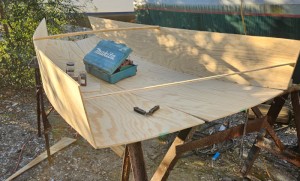
The image is of the progress of day one, bottom panels and side panels wired together.
