
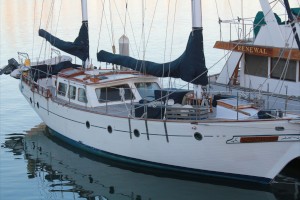
Moonshadow
1983 Hudson Force 50 Ketch
30 December 2015
12 March 2015 | SF Bay
07 December 2014 | SF Bay
24 November 2014 | San Francisco Bay
New Helm Seat
30 December 2015
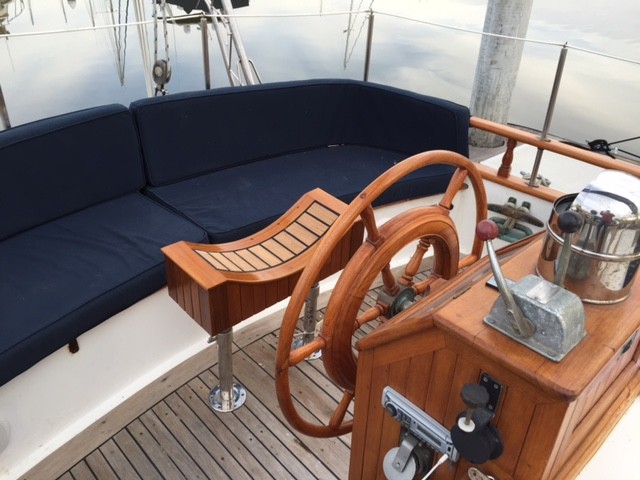
Helm Seat
I've been thinking about building a helm seat for some time. The aft bench on our 50ft Ketch is too far away from the helm to easily reach the wheel so the only option is standing behind the helm or engaging the auto pilot. I thought about the design for a helm seat that would work for our boat for quite a while. It should be adjustable so that people of different heights could be accommodated. It should be narrow so that it was easy to move from one side of the boat to the other without being blocked by the seat. It should be strong so that we could mount cup holders and hang canvass storage bags from it. It should double as a table when dining "Au Fresco" and most importantly it should match the teak trim around the helm. All these thoughts were just idle ruminations in the back of my brain until one day I was walking through my favorite used boat part store and I came across a matched pair of stainless adjustable stands that would be perfect for my project. Now I had the stands I just needed to build the seat.
I traced the curve of the wheel on a piece of whiteboard to get a pattern for the helm seat and worked up a sketch taking into account the space I had available and the teak trim that I wanted to match in the cockpit. Once I had approval from the Admiral on the sketch I went to work. My first idea was to build it out a piece of 1'' X 8"teak planking but that proved far too expensive. 10 ft. of 1 X 8 teak planking would be over $750. My next thought was to use teak plywood but I was afraid that it wouldn't hold up to the weather. Finally I decided to make it out of hardwood and cover it with some teak trim to match the rest of the cockpit area.
The box frame is built from maple plank then assembled with epoxy and stainless screws
So first we needed to build a box. A trip to my local lumber yard netted me about 10ft of 1X 8 maple and some smaller 3/8 by 2" planking
After the teak strips were cut to size they needed to be epoxy-ed into place
Once the box was assembled the next step was to start applying the teak trim to match the look of the teak in the cockpit. I cut all of the pieces for one side and then trimmed them until they fit each side well. I left the lengths a little long for finishing later and then "epoxy-ed" them in place. This process was repeated on all four sides.
The next step was to finish the top. Fitting the trim pieces for the top was going to require making the teak flexible enough so it would bend without breaking. I watched some videos on Youtube to understand the steam-bending process. I didn't want to build a steam box just to bend two pieces of wood but I thought I could make use of the strategy with the tools I had at hand. I soaked the wood in hot water in the sink and boiled the kettle several times and poured it over the wood. I also used scraps of wood to bend the wood when it was heated. After the wood had soaked for a few hours I tried clamping it to the top of the box but it wasn't flexible enough to bend very far. I needed to add more steam.
My first attempt to bend the pieces didn't work very well so I had to boil them on the stove in a modified steam box
I made my own version of a steam box. I boiled a big pot of water on the stove and stood the pieces of teak inside and covered it with a plastic cooking bag like you would use to cook a large turkey. I boiled it for several hours and tried to fit the teak to the box again. This time it was much more flexible. I also drilled a hole on each end of the teak boards and ran a few strands of high strength wire from end to end like a bow and arrow. I inserted a small piece of wood between the wires and as I clamped the teak into place I turned the wire round and round to take up the slack. This way I could hold the curve of the board in place while it dried. It took a few more soakings in the sink and a couple more boiling on the stove but eventually I got two pieces of trim to fit the curve of the seat.
The Admiral insisted that I add here that I actually broke the first two pieces of teak trim by rushing the process. What you see here is my second attempt. Hey I had some extra teak anyway!
After the curved pieces are in place it was time to cut the ends off square so that the end pieces could be fitted
When the end pieces where cut and installed I cut a number of teak strips to fill in the top of the seat. I allowed for a ¼' space around each plank so I could caulk them later to match the design of my cockpit seating. When all of the pieces were cut and sanded I "epoxy-ed" them in place and used small pieces of trim to hold them in place until the epoxy cured
Pegs were used to ensure even spacing between the teak planking.
After everything was set I went over all of the sides carefully and adjusted the overhang and removed any excess epoxy. I also cut a hole in the bottom of the box and installed a removable plastic cover. Through the access hole I was able to paint the inside of the box with a couple of coats of epoxy to ensure that it would be waterproof. After a thorough sanding it was time to apply the finish.
I went over each joint to ensure that I removed the excess epoxy. Then the teak was sanded and wiped down with acetone
I chose to go with the same finish that I have been using on the rest of my exterior teak. 3 coats of Cetol Natural Stain followed by 3 coats of Cetol Gloss.
The Cetol Natural really brings out the color of the teak and the pigment evens out the finish
The top boards where caulked and left to weather naturally to match the design of the cockpit seating
I also fitted an inspection cap into the bottom of the seat. This allowed me to coat the inside of the box with epoxy for waterproofing and provided a small storage area for sunglasses, radios, etc.
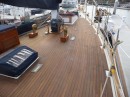
Here is the final result with the Helm Seat screwed into place. The height of the legs can be adjusted for the Helmsman.
Future plans include adding some cup holders on each end, a cushion to make the seat a little more comfortable and the Admiral just asked if I could build a serving tray that could fit over the helm seat and make a cockpit table when we are in port. Hmmmm. This project doesn't looks like it will end anytime soon. The next time I see a pair of support stands for sale I think I'll just keep walking!
Fold down cup holders will be added to each end. Plus a canvas cover with a cushion built in.
Resources
• Stainless adjustable stands - Minney's Marine, Newport Beach, CA
• Cetol Paint Supplies- West Marine
• Teak Lumber- West Marine
• Maple Lumber- Home Depot
I've been thinking about building a helm seat for some time. The aft bench on our 50ft Ketch is too far away from the helm to easily reach the wheel so the only option is standing behind the helm or engaging the auto pilot. I thought about the design for a helm seat that would work for our boat for quite a while. It should be adjustable so that people of different heights could be accommodated. It should be narrow so that it was easy to move from one side of the boat to the other without being blocked by the seat. It should be strong so that we could mount cup holders and hang canvass storage bags from it. It should double as a table when dining "Au Fresco" and most importantly it should match the teak trim around the helm. All these thoughts were just idle ruminations in the back of my brain until one day I was walking through my favorite used boat part store and I came across a matched pair of stainless adjustable stands that would be perfect for my project. Now I had the stands I just needed to build the seat.
I traced the curve of the wheel on a piece of whiteboard to get a pattern for the helm seat and worked up a sketch taking into account the space I had available and the teak trim that I wanted to match in the cockpit. Once I had approval from the Admiral on the sketch I went to work. My first idea was to build it out a piece of 1'' X 8"teak planking but that proved far too expensive. 10 ft. of 1 X 8 teak planking would be over $750. My next thought was to use teak plywood but I was afraid that it wouldn't hold up to the weather. Finally I decided to make it out of hardwood and cover it with some teak trim to match the rest of the cockpit area.
The box frame is built from maple plank then assembled with epoxy and stainless screws
So first we needed to build a box. A trip to my local lumber yard netted me about 10ft of 1X 8 maple and some smaller 3/8 by 2" planking
After the teak strips were cut to size they needed to be epoxy-ed into place
Once the box was assembled the next step was to start applying the teak trim to match the look of the teak in the cockpit. I cut all of the pieces for one side and then trimmed them until they fit each side well. I left the lengths a little long for finishing later and then "epoxy-ed" them in place. This process was repeated on all four sides.
The next step was to finish the top. Fitting the trim pieces for the top was going to require making the teak flexible enough so it would bend without breaking. I watched some videos on Youtube to understand the steam-bending process. I didn't want to build a steam box just to bend two pieces of wood but I thought I could make use of the strategy with the tools I had at hand. I soaked the wood in hot water in the sink and boiled the kettle several times and poured it over the wood. I also used scraps of wood to bend the wood when it was heated. After the wood had soaked for a few hours I tried clamping it to the top of the box but it wasn't flexible enough to bend very far. I needed to add more steam.
My first attempt to bend the pieces didn't work very well so I had to boil them on the stove in a modified steam box
I made my own version of a steam box. I boiled a big pot of water on the stove and stood the pieces of teak inside and covered it with a plastic cooking bag like you would use to cook a large turkey. I boiled it for several hours and tried to fit the teak to the box again. This time it was much more flexible. I also drilled a hole on each end of the teak boards and ran a few strands of high strength wire from end to end like a bow and arrow. I inserted a small piece of wood between the wires and as I clamped the teak into place I turned the wire round and round to take up the slack. This way I could hold the curve of the board in place while it dried. It took a few more soakings in the sink and a couple more boiling on the stove but eventually I got two pieces of trim to fit the curve of the seat.
The Admiral insisted that I add here that I actually broke the first two pieces of teak trim by rushing the process. What you see here is my second attempt. Hey I had some extra teak anyway!
After the curved pieces are in place it was time to cut the ends off square so that the end pieces could be fitted
When the end pieces where cut and installed I cut a number of teak strips to fill in the top of the seat. I allowed for a ¼' space around each plank so I could caulk them later to match the design of my cockpit seating. When all of the pieces were cut and sanded I "epoxy-ed" them in place and used small pieces of trim to hold them in place until the epoxy cured
Pegs were used to ensure even spacing between the teak planking.
After everything was set I went over all of the sides carefully and adjusted the overhang and removed any excess epoxy. I also cut a hole in the bottom of the box and installed a removable plastic cover. Through the access hole I was able to paint the inside of the box with a couple of coats of epoxy to ensure that it would be waterproof. After a thorough sanding it was time to apply the finish.
I went over each joint to ensure that I removed the excess epoxy. Then the teak was sanded and wiped down with acetone
I chose to go with the same finish that I have been using on the rest of my exterior teak. 3 coats of Cetol Natural Stain followed by 3 coats of Cetol Gloss.
The Cetol Natural really brings out the color of the teak and the pigment evens out the finish
The top boards where caulked and left to weather naturally to match the design of the cockpit seating
I also fitted an inspection cap into the bottom of the seat. This allowed me to coat the inside of the box with epoxy for waterproofing and provided a small storage area for sunglasses, radios, etc.
Here is the final result with the Helm Seat screwed into place. The height of the legs can be adjusted for the Helmsman.
Future plans include adding some cup holders on each end, a cushion to make the seat a little more comfortable and the Admiral just asked if I could build a serving tray that could fit over the helm seat and make a cockpit table when we are in port. Hmmmm. This project doesn't looks like it will end anytime soon. The next time I see a pair of support stands for sale I think I'll just keep walking!
Fold down cup holders will be added to each end. Plus a canvas cover with a cushion built in.
Resources
• Stainless adjustable stands - Minney's Marine, Newport Beach, CA
• Cetol Paint Supplies- West Marine
• Teak Lumber- West Marine
• Maple Lumber- Home Depot
Rebuilding the Bowsprit
12 March 2015 | SF Bay
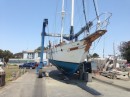
What started out as a simple project is starting to grow exponentially into a pretty complex undertaking. Our idea was simple enough. Let's widen the bow rollers so that we can carry a heavier anchor. By the time we got everything pulled apart it had evolved into refinishing the bowsprit, galvanizing the anchor , reconditioning the windless and let's not forget a little beauty treatment for the Little Mermaid that is MoonShadow's figurehead. But first things first. The bow rollers are only 2.5" wide. This was fine for the 45lb CQR that came with the boat but experience has taught us that we need something much more substantial to hold MoonShadow's full figure 58,000 lbs in position in a windy anchorage. I wanted to upgrade to a pair of 75lb CQR's plus a large Fortress as well for muddy bays. So the first task was to remove the rollers so that I could widen them to a more reasonable 4". Unfortunately this meant removing the 2 furling jibs, the 2 front stays, the stainless rail and the bowsprit platform. All this had to be done without the big stick accidently falling over . But I need not have worried . With all of the stays loosened the mainmast stood comfortably on it's keel mounted step.
Eventually all of the pieces were removed and it was time to break things down into their logical components.
-Bow Roller- I took the bow rollers off to the welder for some discussion. Originally I thought I would just widen the channel and add a pair of 4" rollers . But the sales clerk at my local West Marine advised me that replacing the bronze rollers with modern rubber roller was probably a step backwards strength-wise so we ended up adding some 3/4' marine board cheeks on each side to fill the gap. (See bowsprit photo album for more pictures).
-Teak Repair- The bowsprit and the teak platform needed quite a bit of repair. I priced out having a new teak grate made but it was just too expensive so I decided to repair and replace the broken pieces of my current teak platform. It is slow tedious work but strip by strip I'm getting the new pieces installed. I'm also using lots of epoxy to ensure that everything is well fastened.
-Windless Rebuild- The Ideal windless works well but I thought it deserved a little bit of servicing . The base was rusty so I ground everything down and repainted it with rustolem primer and new gloss enamel. The electrical wires were looking a bit frayed so I cut off a couple feet of exposed wiring and installed new end pieces that are exposed to the weather. I also plan to have the windless motor rebuild as it's been a few years
-Mermaid- Finally it was time to give our figurehead a little beauty treatment. Our little Mermaid received several coats of paint remover and a detailed sanding. We are currently thinking about adding some subtle color to the paint scheme as we re-finish her .Perhaps some green and blue to the tail and some blond streaks in the hair. Watch the photo gallery as the work progresses
Americas Cup 2013
07 December 2014 | SF Bay
Dale Bagnell
Americas Cup- Patrolling the Line
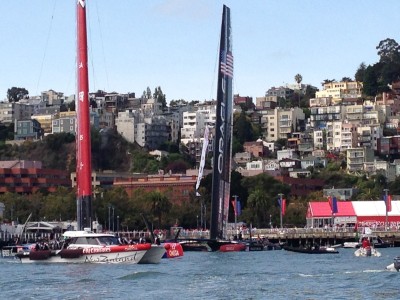
By now the 34th Americas Cup has come and gone and everyone is still wondering how Oracle Team USA fought their way back from a 1-8 deficit to win the Cup 9-8 over Emirates Team NZ. So now that the drama has quieted down a bit and we have 4 years to wait for 35th AC , I wanted to give you a little glimpse of what goes on behind the scenes as hundreds of people worked to bring this event to life. Some of you may remember that Bill Wood and I were Course Marshalls at last year's AC 45 races. This year we were fortunate enough to be invited back to work the AC 72 finals. We needed to commit to a minimum of 12 days on the water plus some training as a part of our volunteer agreement. We had no idea that this commitment would stretch to nearly 20 days by the time we were done.
Daily Schedule
Working the AC race is a full time job. Typically we would leave early each morning to beat the traffic and be on-site by 9:30 at Pier 23. After prepping the Marshall Boat for the day and getting a cup of coffee we would assemble with all of the teams for our morning briefing. These talks would cover everything from anticipated course conditions (i.e. wind and currents) to special considerations for other activities that were going on in the harbor (i.e. Cruise Ships coming and going and other races and events that could interfere with the race). The on-water volunteers consisted of several press boats, medical teams, security, race committee, course marshalls, photography and graphics , etc. All of the skills necessary to keep the racing on track were represented.
The Race Committee Boats docked in the center of Pier 23. Other boats found docking space in the nearby SF Bay marinas
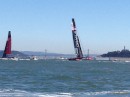
There were about 20 Marshalls selected to patrol the outlines of the course and keep the spectator boats from coming unto the course.
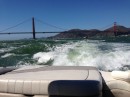
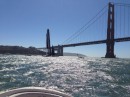
Typically our briefing would finish about 10:30 and then it was time to gather up our equipment and head down to the boats. After a quick stop at the fuel dock we would head out unto the course to begin patrolling our assigned sectors. Our task was to patrol a line between 2 stake boats that marked the perimiter of the course. The course had been expanded this year for the 72's to give them a bit more room to maneuver and showcase their capabilities up wind and down wind. The course covered most of downtown waterfront from the GG Bridge to the east of Alcatraz. It required approximately 10 Stake Boats and 20 Marshall Boats to secure the boundary of the new course. Our assignments changed each day but in general we worked the western most boundary of the course under the bridge so we had a great view of the 72's as they rounded the upwind mark at the end of leg 3.
We would lock down the course by 12:15 and the big boats would start their practice runs. By 1:15 the race would begin, if the conditions were within the guidelines. If there was too much wind there was danger of a capsize. Too little wind and the race boats couldn't complete the course in the maximum of 40 minutes allowed. Most days we had too much wind and it could take quite a while to find a window where the conditions were within limits.
After the races were completed for the day, we gathered up our equipment from the stake boats and headed back to home base. Once our equipment was stowed away and the radios charging, then we could watch the highlights of the days racing. Although we were able to monitor the action on VHF 20 during the race it was nice to see the team interview and the racing highlights on the big screen before we went home for the day. In the evening we would get our Shift Schedules for the next day and whole process would start all over again.
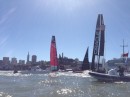
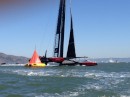
Built for Speed
It's hard to appreciate just how fast these race boats move. Some of the AC Protector chase boats with 4- 200hp outboards were having trouble keeping up with the 72's when the wind reaches 20+ knots and the seas are 4-6 feet. These big monsters just climb up onto their foils and they are gone . I thought that the majority of our time would be spent holding the spectators back from the race course but we quickly discovered that we also had to keep looking over our shoulder in case one of the 72's was bearing down on us. Several times we had to take evasive maneuvers to keep out of their path.
Generally the spectator boats were well behaved and would stay outside the course boundaries. Typically these sailors were out there with their families and just trying to get a good view of the race. We would patrol the line and let them know where the boundaries were. We did have a few repeat offenders that would wander unto the course again and again until we had to call the Coast Guard over to have a little talk to them. Some days we had close to 1000 boats on the Bay watching the action. On other days during the week when the weather was blustery only a few hundred spectator boats appeared.
Occasionally we would have a big cruiser break through the course boundary and motor at full speed down the bay ignoring all directions to stay off the course. The first time this happened we gave chase but quickly realized that now there were two boats in the middle of the course obstructing the race and I wasn't looking forward to being featured on the TV evening news! So the next time it happened we called ahead and had a reception committee waiting for them on the other side of the course when they arrived. Radio waves are definitely faster than our boat!
Volunteer Appreciation
As we neared the end of the racing series, the organizing committee held a special thank you dinner to recognize all of the volunteers that had helped make the 34th AC event a success . There were over 750 Volunteers in total that participated, They did everything from driving dignataries around in golf carts to crewing on various VIP Boats, answering questions at the AC Park and of course working the races. Each volunteer was presented a special momento of appreciation for their service.
Bringing Home the Cup
All too soon the series was over and as we closed down the race course for the last time we were instructed to form a protective ring around AC Park so that the officials could present the Cup to the winning team.
The Americas Cup being delivered to AC Park for the Official presentation
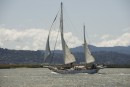
The sailing teams arrived in their support vessels. The AC Officials asembled and the trophy was presented to the winning team. We were exhausted but happy to have seen our commitment through to the end and watch AC 34 go into the history books. If you would like to view some of the highlights of the Americas Cup racing, please go to www.americascup.com. If you watch some of the videos you may even see a liitle blue boat cruising around in the background patrolling the line.
By now the 34th Americas Cup has come and gone and everyone is still wondering how Oracle Team USA fought their way back from a 1-8 deficit to win the Cup 9-8 over Emirates Team NZ. So now that the drama has quieted down a bit and we have 4 years to wait for 35th AC , I wanted to give you a little glimpse of what goes on behind the scenes as hundreds of people worked to bring this event to life. Some of you may remember that Bill Wood and I were Course Marshalls at last year's AC 45 races. This year we were fortunate enough to be invited back to work the AC 72 finals. We needed to commit to a minimum of 12 days on the water plus some training as a part of our volunteer agreement. We had no idea that this commitment would stretch to nearly 20 days by the time we were done.
Daily Schedule
Working the AC race is a full time job. Typically we would leave early each morning to beat the traffic and be on-site by 9:30 at Pier 23. After prepping the Marshall Boat for the day and getting a cup of coffee we would assemble with all of the teams for our morning briefing. These talks would cover everything from anticipated course conditions (i.e. wind and currents) to special considerations for other activities that were going on in the harbor (i.e. Cruise Ships coming and going and other races and events that could interfere with the race). The on-water volunteers consisted of several press boats, medical teams, security, race committee, course marshalls, photography and graphics , etc. All of the skills necessary to keep the racing on track were represented.
The Race Committee Boats docked in the center of Pier 23. Other boats found docking space in the nearby SF Bay marinas
There were about 20 Marshalls selected to patrol the outlines of the course and keep the spectator boats from coming unto the course.
Typically our briefing would finish about 10:30 and then it was time to gather up our equipment and head down to the boats. After a quick stop at the fuel dock we would head out unto the course to begin patrolling our assigned sectors. Our task was to patrol a line between 2 stake boats that marked the perimiter of the course. The course had been expanded this year for the 72's to give them a bit more room to maneuver and showcase their capabilities up wind and down wind. The course covered most of downtown waterfront from the GG Bridge to the east of Alcatraz. It required approximately 10 Stake Boats and 20 Marshall Boats to secure the boundary of the new course. Our assignments changed each day but in general we worked the western most boundary of the course under the bridge so we had a great view of the 72's as they rounded the upwind mark at the end of leg 3.
We would lock down the course by 12:15 and the big boats would start their practice runs. By 1:15 the race would begin, if the conditions were within the guidelines. If there was too much wind there was danger of a capsize. Too little wind and the race boats couldn't complete the course in the maximum of 40 minutes allowed. Most days we had too much wind and it could take quite a while to find a window where the conditions were within limits.
After the races were completed for the day, we gathered up our equipment from the stake boats and headed back to home base. Once our equipment was stowed away and the radios charging, then we could watch the highlights of the days racing. Although we were able to monitor the action on VHF 20 during the race it was nice to see the team interview and the racing highlights on the big screen before we went home for the day. In the evening we would get our Shift Schedules for the next day and whole process would start all over again.
Built for Speed
It's hard to appreciate just how fast these race boats move. Some of the AC Protector chase boats with 4- 200hp outboards were having trouble keeping up with the 72's when the wind reaches 20+ knots and the seas are 4-6 feet. These big monsters just climb up onto their foils and they are gone . I thought that the majority of our time would be spent holding the spectators back from the race course but we quickly discovered that we also had to keep looking over our shoulder in case one of the 72's was bearing down on us. Several times we had to take evasive maneuvers to keep out of their path.
Generally the spectator boats were well behaved and would stay outside the course boundaries. Typically these sailors were out there with their families and just trying to get a good view of the race. We would patrol the line and let them know where the boundaries were. We did have a few repeat offenders that would wander unto the course again and again until we had to call the Coast Guard over to have a little talk to them. Some days we had close to 1000 boats on the Bay watching the action. On other days during the week when the weather was blustery only a few hundred spectator boats appeared.
Occasionally we would have a big cruiser break through the course boundary and motor at full speed down the bay ignoring all directions to stay off the course. The first time this happened we gave chase but quickly realized that now there were two boats in the middle of the course obstructing the race and I wasn't looking forward to being featured on the TV evening news! So the next time it happened we called ahead and had a reception committee waiting for them on the other side of the course when they arrived. Radio waves are definitely faster than our boat!
Volunteer Appreciation
As we neared the end of the racing series, the organizing committee held a special thank you dinner to recognize all of the volunteers that had helped make the 34th AC event a success . There were over 750 Volunteers in total that participated, They did everything from driving dignataries around in golf carts to crewing on various VIP Boats, answering questions at the AC Park and of course working the races. Each volunteer was presented a special momento of appreciation for their service.
Bringing Home the Cup
All too soon the series was over and as we closed down the race course for the last time we were instructed to form a protective ring around AC Park so that the officials could present the Cup to the winning team.
The Americas Cup being delivered to AC Park for the Official presentation
The sailing teams arrived in their support vessels. The AC Officials asembled and the trophy was presented to the winning team. We were exhausted but happy to have seen our commitment through to the end and watch AC 34 go into the history books. If you would like to view some of the highlights of the Americas Cup racing, please go to www.americascup.com. If you watch some of the videos you may even see a liitle blue boat cruising around in the background patrolling the line.
Teak Deck
24 November 2014 | San Francisco Bay
Dale Bagnell
Teak Deck- The 80% Solution
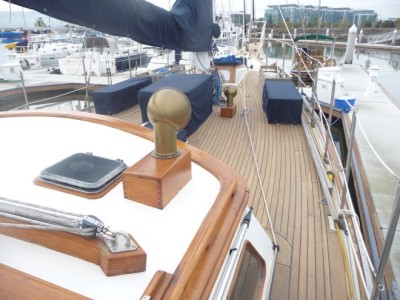
If you want to start a heated discussion among sailors just bring up the subject of teak decks. Some of you may know that Wendy and I bought a Hudson 50 about 18 months ago and we are busy fixing her up to do some Blue Water sailing in a few years' time. One of the reasons that I bought MoonShadow is that she has teak decks and I personally think that there is nothing better than the feel of teak on bare feet when you're out sailing on a warm afternoon.
The trouble is that MoonShadow' s decks have seen better days. There are about 100 screw plugs missing, some of the caulking is pulling loose and a few of the deck planks are broken or cracked and truthfully there are a few soft spots in the deck that bear further investigation. On top of that the decks are gray and the planking is cupped and bears the scars of too much scrubbing and bleaching over the years. I spoke with the previous owner and he said that he sanded the deck once during the 18 years that he owned her but it quickly turned gray again so he didn't bother with it after that. I've got lots of teak to refinish in other parts of the boat so I didn't bother with it either until I was doing some work rebuilding the helm station and I decided to sand the deck under the helm as I had it all torn apart .
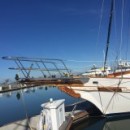
It looked so good that I kept going and I sanded all of the aft deck. There were a few plugs missing and a couple of bad planks but it really looked good compared to the other decks and it got me thinking about tackling the rest of the decks.
Unfortunately, after a few weeks the deck began to turn gray again and didn't have that freshly sanded look any more and that's when I started asking all my boating friends for their advice on caring for teak decks. The feedback I got was all over the place as you might expect. Some said that teak decks should never be sanded just scrubbed across the grain and kept clean, some argued that they should be scrubbed with salt water only and brined to stay a light gray color. Others said it should be bleached once a year with a commercial 2 part product and teak oil applied. One said that I should just get a shovel and tear the deck off and patch the fiberglass underneath and be done with it. The advice went on and on but I wasn't hearing a solution that I liked. I watched all of the teak care videos I could find on YouTube and it was just more of the same.
A marine carpenter that I trust told me that if I did sand the decks I could preserve them for a little while with a sealer from the hardware store similar to what you might use on a deck at the back of your house. That got me thinking so I went to my neighborhood West Marine to ask them if they had a sealer product that was suitable for the marine environment.They recommended a product called Semco. It is a sealer so it preserves that just sanded look I wanted but it does make the caulking sticky for a few days. My caulking was on its last legs anyway so I didn't have much to lose. I did a careful survey of the deck and found that I had about a half inch of thickness left in the teak so with some trepidation I started in. The first place I tried sanding was around the deck fitting for a little cabin heater that I had installed a few weeks before.
The results were so good that I was encouraged to keep going. I had an orbital sander so I bought some 80 grit sandpaper and started sanding. It was slow going at first. The caulking was about an eighth of an inch above deck and the planks had deep crevices as well. It was taking me about 1 hour to finish 1 square foot.
I was tempted to get a heavier sander from an equipment rental yard but I have sanded hardwood floors in houses before and I was worried about gouging the deck. After a couple of days of sanding I had finished the deck in front of the companion way hatch and re-sanded the aft deck. I found that I needed to sand it 5 times to get the finish I wanted- Once with the 60 grit sandpaper, once with the 80 grit and 3 times by hand with 80 grit sandpaper sanding with the grain. It was starting to look pretty good and it was time to try out the Semco. I chose the hatch cover as a starting place. The sealer went on like water and had to be worked into the wood and the excess wiped off.
The result was pretty good and after a few days of drying it really started to have that raw sanded look I wanted but things were going too slowly. I needed some help. There was a long weekend coming up so I went to my local Home Depot and bought two more orbital sanders and a large supply of sandpaper and I hired a couple of "day workers" who spoke some English. I figured I could practice my Spanish at the same time as we worked. The men had never worked on a boat before but after an hour or so they got the hang of it. It took the 3 of us a couple of days to sand the port side of the deck on the bow. At that point the oldest sander burned out it's bearings and had to be replaced. A couple of days later the sanding pad base on the other sanders began to wear out and wouldn't hold the sandpaper so I needed to use some contact spray adhesive to hold the sandpaper in place.
It was looking good and time to move on. This was dirty work. We had to change sanding disks every 10 minutes and vacuum up our mess to keep the sawdust down so my neighbors didn't complain too much. The Marina owner came by each day to ensure that we were keeping a clean workplace and nothing was going in the water. My neighbors were pretty good about all the noise and dust although one fellow who came in for the weekend was not happy about the whine of the sanders and all of the dust. We quit early for the day and didn't start up again until 10:00am the next day to give him a little peace but he soon asked the Marina owner to move him to another slip. I can't say that I blame him. I probably should have waited until I was in a boatyard somewhere to tackle a project of this scope. The rest of my neighbors were away for the Thanksgiving weekend so we pressed on. A few days later we were almost finished and we sanded out the last few square feet of deck.
We then sanded the deck 3 times by hand to get the planks as nice as possible. I did find a few boards that needed to be repaired as I went along. I didn't want to get side tracked too much but these boards couldn't be ignored so t I mixed up some epoxy and thickened it with west system 403 and some teak sawdust to patch a few of the worst cracks. Once everything was ready I put on two coats of Semco and let it dry. I finished about 6 hours before the rain started. We'd had beautiful weather for about 10 days for the project and I just managed to get everything done before a series of 4 winter storms blew through. When the rain had departed and the decks dried out I went over the deck to inspect our work. The first thing I noticed was how fast the decks dried after the rain. The second thing I noticed is that the sealer had worked its way into the wood and it now had a nice raw look to it like it was freshly sanded.
I probably should have tackled this project in a boat yard but we worked carefully and kept the work space a clean as we could. We emptied the vacuum I gallon canister at least 20 times so we captured a lot of the dust. Most of my neighbors are speaking to me again and I'm trying to keep a low profile for the next few weekends.
-It did cost more than I had planned
• Labor- $1,600
• Sanders- $100
• Sandpaper and other supplies- $200
• Semco- 4 Quarts at $50 each- $200
In total it added up to more than $2000 for a project that really wasn't on my critical path right now. But it did give me a tremendous psychological lift. I get happy every time I look at the deck now. It's a great back drop for the other work I need to do.
-But that's not the end of the story .Semco needs to be reapplied every 6-12 months. So there will be more light sanding and sealing in my future but hopefully nothing like this again for a few years.
Summary
The deck looks pretty good. Is it perfect? No, but it looks good enough that I am encouraged to tackle the other problems I have with the deck. I've already started putting in new bungs. After that I'll re-caulk it on a section by section . In some places I will need to use a router to clean out the seam so it will be slow going. Ultimately I will have to replace some wood and check out some soft spots in the deck but for now an 80% solution looks pretty good to me. In fact it is giving me the energy to keep working on it. I really like the contrast between the deck and the varnished trim. As Voltaire once said "don't let the perfect be the enemy of the good" and right now an 80% solution is good enough to keep me focused. A complete deck replacement would have cost me $30K plus and taken my entire repair budget. For 10% of that amount I can keep my project moving forward. Even my grumpy neighbor , who originally said I should scrap the deck admitted that there might be some life left in the old decks after all. So if you stop by my boat please say something nice about my deck even if you don't mean it. It makes me happy and keeps me working!
If you want to start a heated discussion among sailors just bring up the subject of teak decks. Some of you may know that Wendy and I bought a Hudson 50 about 18 months ago and we are busy fixing her up to do some Blue Water sailing in a few years' time. One of the reasons that I bought MoonShadow is that she has teak decks and I personally think that there is nothing better than the feel of teak on bare feet when you're out sailing on a warm afternoon.
The trouble is that MoonShadow' s decks have seen better days. There are about 100 screw plugs missing, some of the caulking is pulling loose and a few of the deck planks are broken or cracked and truthfully there are a few soft spots in the deck that bear further investigation. On top of that the decks are gray and the planking is cupped and bears the scars of too much scrubbing and bleaching over the years. I spoke with the previous owner and he said that he sanded the deck once during the 18 years that he owned her but it quickly turned gray again so he didn't bother with it after that. I've got lots of teak to refinish in other parts of the boat so I didn't bother with it either until I was doing some work rebuilding the helm station and I decided to sand the deck under the helm as I had it all torn apart .
It looked so good that I kept going and I sanded all of the aft deck. There were a few plugs missing and a couple of bad planks but it really looked good compared to the other decks and it got me thinking about tackling the rest of the decks.
Unfortunately, after a few weeks the deck began to turn gray again and didn't have that freshly sanded look any more and that's when I started asking all my boating friends for their advice on caring for teak decks. The feedback I got was all over the place as you might expect. Some said that teak decks should never be sanded just scrubbed across the grain and kept clean, some argued that they should be scrubbed with salt water only and brined to stay a light gray color. Others said it should be bleached once a year with a commercial 2 part product and teak oil applied. One said that I should just get a shovel and tear the deck off and patch the fiberglass underneath and be done with it. The advice went on and on but I wasn't hearing a solution that I liked. I watched all of the teak care videos I could find on YouTube and it was just more of the same.
A marine carpenter that I trust told me that if I did sand the decks I could preserve them for a little while with a sealer from the hardware store similar to what you might use on a deck at the back of your house. That got me thinking so I went to my neighborhood West Marine to ask them if they had a sealer product that was suitable for the marine environment.They recommended a product called Semco. It is a sealer so it preserves that just sanded look I wanted but it does make the caulking sticky for a few days. My caulking was on its last legs anyway so I didn't have much to lose. I did a careful survey of the deck and found that I had about a half inch of thickness left in the teak so with some trepidation I started in. The first place I tried sanding was around the deck fitting for a little cabin heater that I had installed a few weeks before.
The results were so good that I was encouraged to keep going. I had an orbital sander so I bought some 80 grit sandpaper and started sanding. It was slow going at first. The caulking was about an eighth of an inch above deck and the planks had deep crevices as well. It was taking me about 1 hour to finish 1 square foot.
I was tempted to get a heavier sander from an equipment rental yard but I have sanded hardwood floors in houses before and I was worried about gouging the deck. After a couple of days of sanding I had finished the deck in front of the companion way hatch and re-sanded the aft deck. I found that I needed to sand it 5 times to get the finish I wanted- Once with the 60 grit sandpaper, once with the 80 grit and 3 times by hand with 80 grit sandpaper sanding with the grain. It was starting to look pretty good and it was time to try out the Semco. I chose the hatch cover as a starting place. The sealer went on like water and had to be worked into the wood and the excess wiped off.
The result was pretty good and after a few days of drying it really started to have that raw sanded look I wanted but things were going too slowly. I needed some help. There was a long weekend coming up so I went to my local Home Depot and bought two more orbital sanders and a large supply of sandpaper and I hired a couple of "day workers" who spoke some English. I figured I could practice my Spanish at the same time as we worked. The men had never worked on a boat before but after an hour or so they got the hang of it. It took the 3 of us a couple of days to sand the port side of the deck on the bow. At that point the oldest sander burned out it's bearings and had to be replaced. A couple of days later the sanding pad base on the other sanders began to wear out and wouldn't hold the sandpaper so I needed to use some contact spray adhesive to hold the sandpaper in place.
It was looking good and time to move on. This was dirty work. We had to change sanding disks every 10 minutes and vacuum up our mess to keep the sawdust down so my neighbors didn't complain too much. The Marina owner came by each day to ensure that we were keeping a clean workplace and nothing was going in the water. My neighbors were pretty good about all the noise and dust although one fellow who came in for the weekend was not happy about the whine of the sanders and all of the dust. We quit early for the day and didn't start up again until 10:00am the next day to give him a little peace but he soon asked the Marina owner to move him to another slip. I can't say that I blame him. I probably should have waited until I was in a boatyard somewhere to tackle a project of this scope. The rest of my neighbors were away for the Thanksgiving weekend so we pressed on. A few days later we were almost finished and we sanded out the last few square feet of deck.
We then sanded the deck 3 times by hand to get the planks as nice as possible. I did find a few boards that needed to be repaired as I went along. I didn't want to get side tracked too much but these boards couldn't be ignored so t I mixed up some epoxy and thickened it with west system 403 and some teak sawdust to patch a few of the worst cracks. Once everything was ready I put on two coats of Semco and let it dry. I finished about 6 hours before the rain started. We'd had beautiful weather for about 10 days for the project and I just managed to get everything done before a series of 4 winter storms blew through. When the rain had departed and the decks dried out I went over the deck to inspect our work. The first thing I noticed was how fast the decks dried after the rain. The second thing I noticed is that the sealer had worked its way into the wood and it now had a nice raw look to it like it was freshly sanded.
I probably should have tackled this project in a boat yard but we worked carefully and kept the work space a clean as we could. We emptied the vacuum I gallon canister at least 20 times so we captured a lot of the dust. Most of my neighbors are speaking to me again and I'm trying to keep a low profile for the next few weekends.
-It did cost more than I had planned
• Labor- $1,600
• Sanders- $100
• Sandpaper and other supplies- $200
• Semco- 4 Quarts at $50 each- $200
In total it added up to more than $2000 for a project that really wasn't on my critical path right now. But it did give me a tremendous psychological lift. I get happy every time I look at the deck now. It's a great back drop for the other work I need to do.
-But that's not the end of the story .Semco needs to be reapplied every 6-12 months. So there will be more light sanding and sealing in my future but hopefully nothing like this again for a few years.
Summary
The deck looks pretty good. Is it perfect? No, but it looks good enough that I am encouraged to tackle the other problems I have with the deck. I've already started putting in new bungs. After that I'll re-caulk it on a section by section . In some places I will need to use a router to clean out the seam so it will be slow going. Ultimately I will have to replace some wood and check out some soft spots in the deck but for now an 80% solution looks pretty good to me. In fact it is giving me the energy to keep working on it. I really like the contrast between the deck and the varnished trim. As Voltaire once said "don't let the perfect be the enemy of the good" and right now an 80% solution is good enough to keep me focused. A complete deck replacement would have cost me $30K plus and taken my entire repair budget. For 10% of that amount I can keep my project moving forward. Even my grumpy neighbor , who originally said I should scrap the deck admitted that there might be some life left in the old decks after all. So if you stop by my boat please say something nice about my deck even if you don't mean it. It makes me happy and keeps me working!
| Vessel Name: | Moonshadow |
| Vessel Make/Model: | Hudson Force 50 |
| Hailing Port: | Marina del Rey, CA |
| Crew: | Dale and Wendy |
| About: | Dale- IT Industry Veteran Wendy- Yoga Instructor |
| Extra: | Getting Moonshadow ready for an extended blue water cruise |
Moonshadow's Photos - Americas Cup


S/V Moonshadow
Who: Dale and Wendy
Port: Marina del Rey, CA
Gallery
Favorites
No Links Added Yet
SailBlogs Friends
