Life Afloat on SV Light Reach Two Sailors and a Sea Dog
05 November 2021 | Enroute to Stuart
04 November 2021
03 November 2021 | Indiantown
24 October 2021 | Indiantown
09 September 2021 | Treasure Coast Florida
07 August 2021 | Finger Lakes region NYS
28 July 2021 | South Jersey Shore
14 May 2021 | St Lucie River
09 May 2021 | Stuart Fl
05 April 2021 | Stuart Florida
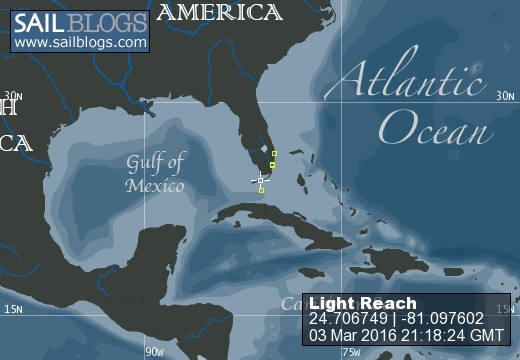
02 March 2021 | Stuart Fl
01 February 2021 | Stuart
30 January 2021 | Boca Raton
29 January 2021 | Stuart Fl
21 January 2021 | Boynton
19 January 2021 | Stuart
29 December 2020 | Stuart F:
25 December 2020 | Sampe as we have been Ho Ho Ho
17 December 2020 | Stuart
16 December 2020 | Sunset Bay Stuart
Installing the evaporator
22 November 2020 | Stuart Fl
Sally | sunny and beautiful
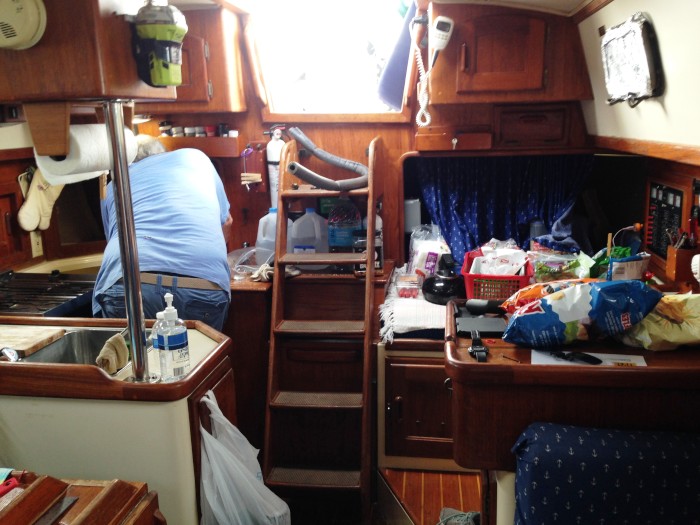
The copper tubing comes in a neat coil about 1.5 feet in diameter. It is already attached to the evaporator plate aka freezer. You must be extremely careful not to break that connection, not perforate the coil or bend it in such a way that it fatiques the metal and cracks. The installation instructions tell you to lay the coil out flat as possible and gently thead it through to the condenser. The evaporator is a rectangular box that mounts to the port side of the fridge box in a space that leaves no room for your fingers to hold the screws. The thermostat (I've forgotten to mention it before) is delicate little wire that has to be mounted to between two plates on the bottom of the back side of the evaporator in a J configuration. We argued about that for a bit but got it sorted and mounted. We unrolled the copper tube ending up with the evaporator sitting on the salon table and the copper wire running through the galley into the fridge. We needed to push the tubing through the fridge hole and out the cabinet into the lazerette. This required the tube to make the 90 degree exit out of the fridge. We're talking about 15 ft of tube. That little exercise required me to get inside the fridge box and maneuver the tube through the above stated path all without damaging it. Scott pulled from the cockpit while I pushed from the fridge. Meanwhile as we progressed the evaporator box was making its way closer to the actual fridge box. That necessitated me to crawl in and out of the box several times. Who could make this shit up? When we finally had the evaporator close enough to the box to mount it Scott did the honors. We weren't done with the contortions yet as I had to get back into the box to route the remaining tubing and try to make it look reasonably decent without breaking it and making sure the insulation was in tact. That required me sticking my head in the cabinet while sitting in the fridge. Don't you wish you could live the romantic exciting life of a cruiser? We got the sucker in there though and I had the honor of using the silly putty errr pipe goop to seal the hole.
As if that wasn't exciting enough I had the pleasure of getting in the lazarette yet again to coil and insulate the excess tubing that will now reside there. Finally we were ready for the final connect but not before the captain swore at the manufacture for telling him to buy the wrong size wrench. This was the moment of truth you only get one chance to get the condenser connections threaded onto the evaporator coils. Holding our breath Scott did the job and voila, hallelujah come to Jesus it worked. Yee haw!! We'll let her run until tomorrow to insure it does get cold before we unload the coolers.
The picture shows Scott installing the evaporator and the carnage we created in the boat. What a job!
Comments
| Vessel Name: | Light Reach |
| Vessel Make/Model: | Pacific Seacraft 37 |
| Hailing Port: | Annapolis Md |
| Crew: | Scott and Sally and missing our CSO India the wonder Schnauzer she sails on in our hearts |
| About: | |
| Extra: | "I must go down to the sea again, to the lonely sea and the sky; and all I ask is a tall ship and a star to steer her by." John Masefield |
Light Reach's Photos - Main
 |
August 2015 visit to Keuka Lake (New York Finger Lakes)
1 Photo
Created 2 September 2015
|
S/V Light Reach
Who: Scott and Sally and missing our CSO India the wonder Schnauzer she sails on in our hearts
Port: Annapolis Md