Tai Mo Shan
05 December 2022 | Tasman Sea
06 January 2021 | Moreton Bay, Australia
23 October 2020 | Brisbane, Australia
15 October 2020 | Gladstone, Australia
12 October 2020 | Mackay, Australia
07 October 2020 | Mackay, Australia
03 October 2020 | Townsville Australia
25 September 2020 | Magnetic Island, Australia
20 September 2020 | Hinchinbrook Island, Australia
12 September 2020 | Great Palm Island, Australia
12 September 2020 | Horseshoe Bay, Magnetic Island, Australia
06 September 2020 | Townsville, Australia
18 August 2020 | Townsville, Australia
12 August 2020 | Hook Reef, Australia
10 August 2020 | Hook Island, Australia
10 August 2020 | South Molle Island, Australia
06 August 2020 | Airlie Beach, Australia
06 August 2020 | Cid Harbour, Whitsunday Group, Australia
29 July 2020 | Shaw Island, Australia
29 July 2020 | Goldsmith Island, Australia
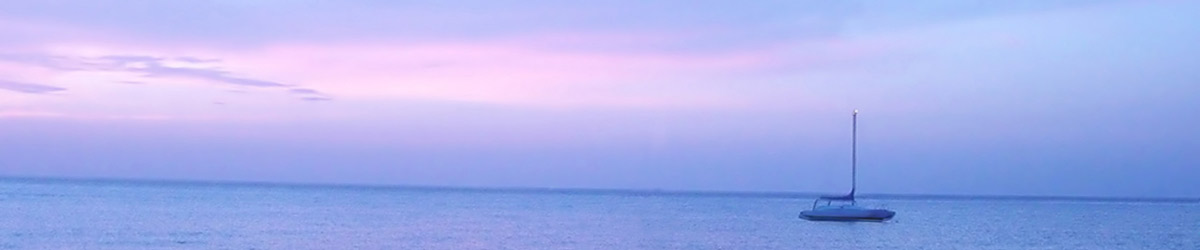
Through the Great Sandy Strait Jun 20
16 June 2020 | Fraser Island, Australia
Paul Dickinson
Our next leg was to head north through the Great Sandy Strait. At about 4 nm wide, the strait sits between Fraser Island and the mainland and consists of many narrow channels through sand and mud banks. The chart shows a recommended route through the maze. The channels sometimes have navigation marks. However, even the main route is not particularly well marked. Whilst the sand banks at the start and end of the strait are fairly stable, the middle patch is not. Furthermore, the start and end have relatively deep channels. The middle, though, is shallow and deep keeled yachts such as Tai Mo Shan definitely need tidal assistance to pass through. The wide area and narrow channels mean that the tidal flow is significant; the chart notes up to 2 knots.
We had two sources of charts. Our main computer has the CM95 series, which are dated 2010. Our new Raymarine chartplotter is equipped with Navionics charts which are considered up to date (i.e. 2020). Whilst the charts are similar, they do have differences, as we would find out!
The tides through the strait are based at the small town of Urangan. For Sunday 14th June the high tide was 2.79m at 1606 hours. We aimed to arrive at the shallowest, narrowest part of the strait, near ‘Slain Island’, at about 1 one hour before high tide. This would give us a reasonable amount of water under the keel, but also a slight rise in the tide should we hit the seabed and stop. A bonus was that the incoming tide would mean the current would be behind us and so give a useful boost in speed. Given this our target was to be at Slain Island at about 1500 hours. Slain Island was some 15 nm from our anchorage at Elbow Point, so with a planned speed of 5 knots we needed to leave at 1200 hours. For those looking at the chart, Slain Island is the rather unremarkable splodge about 0.2nm long, covered in mangroves and rising perhaps one metre above high water. In short it was like most of the other islands in the strait!
Sunday had broken cloud with a fresh Northerly breeze. Despite being open to the north our anchorage had proven to be very stable. We raised anchor at 1150 with no issues and were soon motoring directly into wind. The first 2 ½ nm were along the open deep channel. Fortunately the tidal current assisted us as the 20 knot headwind took some pushing against. We then turned into the recommended route. The charted depth rapidly changed from 17m to 3m. Given the mid tide this left about 2.5m under the keel; welcome to the strait! The next 10nm consisted of following the channel with an underkeel clearance (i.e. the gap between the bottom of the keel and the sea bed) of between 2 and 7m. Having said that, the seabed in the shallower parts seemed to be subject to the highest currents, and these had often carved ridges or waves in the seabed. The depth could thus change from say 3m to 2.7m with alarming rapidity before just as quickly dropping back. At one point near Stewart Island the chart indicated we had to do a dog leg around a Green lateral mark to avoid shoaling areas. We certainly did, as the underkeel clearance was only 0.6m despite the chart stating we should have had 2m. Fortunately the depth rapidly increased and we could breath again.
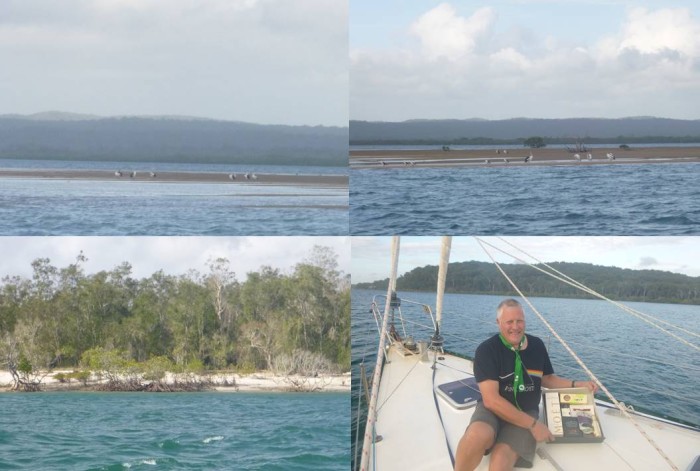
Cruising along the west side of Fraser Island gave us a good view of the island. It is a large sand island, with typically mangroves fronting the strait and bush behind. The island is a reserve with very few roads/tracks or buildings. We only saw a cluster of four buildings at Stewart Island, and no indications of tracks and roads. The shore line had plenty of birds and we often had a great view of the wildlife on the mud banks; indeed at often less than 100m away the birds were perhaps a bit close! The channel had occasional navigation marks that generally agreed with both our charts. Most of the time it was a case of keeping to the middle of the channel by using our charts and looking at the water surface. Oh yes, we looked at those ripples closely as they do change as the current flows over shallow areas!
We arrived at the shallows on cue at about 1500. Our charts agreed that this was a shallow patch of water. We have set the Navionics up to show a red polka dot pattern on water charted at less than 2m. This pattern covered the whole area, right across the channels! However, we had more than 2.5m of tide so should be OK. So first past a red post, charted at 3m and we had over 3m of water under the keel; great. A bend around a charted but unmarked drying mud bank, still 1.5 to 2m under the keel, albeit with those alarming ridges in the sea bed. Reverse the bend to pass a green post depth with about 1m of water under the keel, less than charted! Then to the first red buoy. But the buoy was not where it was charted on either chart, and the water was shallow with 0.5m under the keel, plus or minus 0.2m in the ridges. Even worse the charts disagreed on where the drying patches (i.e. those that areas we would we could not pass even with the tide) were. Ugh!
Decision time. To use which chart, or to just go for the buoy. We chose the latter, despite the fact that one chart clearly showed us going over a drying patch. 200m from the red buoy, shallow (0.3m plus or minus) but still going. 100m and … we touched the sea bed, we could feel the boat slow. Decision, to hit reverse hard and try to pull off or to go for max power and bully through. We suspected this was a ridge so we asked our trusty Yanmah for full power and it delivered the full 35 odd horsepower. We continued to move, sliding over the sea bed, and then getting, oh, a good 0.2m under the keel.
Hard around the buoy and head to the next red buoy 0.2nm (about 400m away). One chart showed shallow, the other a drying bank right next to the track between the buoys. To drift a little off the direct path to clear the bank, or to go straight? We allowed a slight drift, perhaps 25m and were rewarded with a fairly constant 0.1 to 0.5m water under the keel.
Close around the red buoy and look for a green post some 0.9nm away. Spot it, aim to pass it on our port side (the direction of the marks head out of the strait, i.e. opposite to our travel). The depth should increase. After a couple of hundred metres it, well, hadn’t! Then deep joy, a full metre under the keel! A bit further on and we had more than a metre, indeed up to 3! Past the green post, which was in a slightly different place than shown on both charts, but close enough and with lovely deep water, well 4m under the keel anyway.
The channel got deeper and wider. Red marks to starboard showed another drying bank which we would pass and then double back into the anchorage at South White Cliffs. We now had the tidal current against us, robbing us of one knot or so of speed so we increased engine revs to compensate. As we turned the current was behind us and it was a case of reducing revs to maintain a sensible speed as we powered into the side channel. There was one other yacht at the end of the channel in what looked like shallow water. We opted to anchor in some 8m of water, well clear of the other boat.
1555 and we were anchored and safe. Normally time for a gentle nerve calming rum. But the consulting company which hired Paul, JVAT, had just had it’s 3rd birthday. Being a great organisation the directors had provided its members with a hamper each. Nibbles, and a nice bottle of Moet and Chandon champagne; perfect for a double celebration – birthday and getting through the strait!
And an interesting one. A little later we saw the mast of a large yacht (3 spreaders) moving behind the mangrove islands. She entered the shallow bit, stopped, turned and headed back. We suspect they saw the same water depth we did, and decided it was better to retreat and fight another day.
Picture: Plenty of wildlife on the dry; just perhaps a little too close. We needed the hamper!
We had two sources of charts. Our main computer has the CM95 series, which are dated 2010. Our new Raymarine chartplotter is equipped with Navionics charts which are considered up to date (i.e. 2020). Whilst the charts are similar, they do have differences, as we would find out!
The tides through the strait are based at the small town of Urangan. For Sunday 14th June the high tide was 2.79m at 1606 hours. We aimed to arrive at the shallowest, narrowest part of the strait, near ‘Slain Island’, at about 1 one hour before high tide. This would give us a reasonable amount of water under the keel, but also a slight rise in the tide should we hit the seabed and stop. A bonus was that the incoming tide would mean the current would be behind us and so give a useful boost in speed. Given this our target was to be at Slain Island at about 1500 hours. Slain Island was some 15 nm from our anchorage at Elbow Point, so with a planned speed of 5 knots we needed to leave at 1200 hours. For those looking at the chart, Slain Island is the rather unremarkable splodge about 0.2nm long, covered in mangroves and rising perhaps one metre above high water. In short it was like most of the other islands in the strait!
Sunday had broken cloud with a fresh Northerly breeze. Despite being open to the north our anchorage had proven to be very stable. We raised anchor at 1150 with no issues and were soon motoring directly into wind. The first 2 ½ nm were along the open deep channel. Fortunately the tidal current assisted us as the 20 knot headwind took some pushing against. We then turned into the recommended route. The charted depth rapidly changed from 17m to 3m. Given the mid tide this left about 2.5m under the keel; welcome to the strait! The next 10nm consisted of following the channel with an underkeel clearance (i.e. the gap between the bottom of the keel and the sea bed) of between 2 and 7m. Having said that, the seabed in the shallower parts seemed to be subject to the highest currents, and these had often carved ridges or waves in the seabed. The depth could thus change from say 3m to 2.7m with alarming rapidity before just as quickly dropping back. At one point near Stewart Island the chart indicated we had to do a dog leg around a Green lateral mark to avoid shoaling areas. We certainly did, as the underkeel clearance was only 0.6m despite the chart stating we should have had 2m. Fortunately the depth rapidly increased and we could breath again.
Cruising along the west side of Fraser Island gave us a good view of the island. It is a large sand island, with typically mangroves fronting the strait and bush behind. The island is a reserve with very few roads/tracks or buildings. We only saw a cluster of four buildings at Stewart Island, and no indications of tracks and roads. The shore line had plenty of birds and we often had a great view of the wildlife on the mud banks; indeed at often less than 100m away the birds were perhaps a bit close! The channel had occasional navigation marks that generally agreed with both our charts. Most of the time it was a case of keeping to the middle of the channel by using our charts and looking at the water surface. Oh yes, we looked at those ripples closely as they do change as the current flows over shallow areas!
We arrived at the shallows on cue at about 1500. Our charts agreed that this was a shallow patch of water. We have set the Navionics up to show a red polka dot pattern on water charted at less than 2m. This pattern covered the whole area, right across the channels! However, we had more than 2.5m of tide so should be OK. So first past a red post, charted at 3m and we had over 3m of water under the keel; great. A bend around a charted but unmarked drying mud bank, still 1.5 to 2m under the keel, albeit with those alarming ridges in the sea bed. Reverse the bend to pass a green post depth with about 1m of water under the keel, less than charted! Then to the first red buoy. But the buoy was not where it was charted on either chart, and the water was shallow with 0.5m under the keel, plus or minus 0.2m in the ridges. Even worse the charts disagreed on where the drying patches (i.e. those that areas we would we could not pass even with the tide) were. Ugh!
Decision time. To use which chart, or to just go for the buoy. We chose the latter, despite the fact that one chart clearly showed us going over a drying patch. 200m from the red buoy, shallow (0.3m plus or minus) but still going. 100m and … we touched the sea bed, we could feel the boat slow. Decision, to hit reverse hard and try to pull off or to go for max power and bully through. We suspected this was a ridge so we asked our trusty Yanmah for full power and it delivered the full 35 odd horsepower. We continued to move, sliding over the sea bed, and then getting, oh, a good 0.2m under the keel.
Hard around the buoy and head to the next red buoy 0.2nm (about 400m away). One chart showed shallow, the other a drying bank right next to the track between the buoys. To drift a little off the direct path to clear the bank, or to go straight? We allowed a slight drift, perhaps 25m and were rewarded with a fairly constant 0.1 to 0.5m water under the keel.
Close around the red buoy and look for a green post some 0.9nm away. Spot it, aim to pass it on our port side (the direction of the marks head out of the strait, i.e. opposite to our travel). The depth should increase. After a couple of hundred metres it, well, hadn’t! Then deep joy, a full metre under the keel! A bit further on and we had more than a metre, indeed up to 3! Past the green post, which was in a slightly different place than shown on both charts, but close enough and with lovely deep water, well 4m under the keel anyway.
The channel got deeper and wider. Red marks to starboard showed another drying bank which we would pass and then double back into the anchorage at South White Cliffs. We now had the tidal current against us, robbing us of one knot or so of speed so we increased engine revs to compensate. As we turned the current was behind us and it was a case of reducing revs to maintain a sensible speed as we powered into the side channel. There was one other yacht at the end of the channel in what looked like shallow water. We opted to anchor in some 8m of water, well clear of the other boat.
1555 and we were anchored and safe. Normally time for a gentle nerve calming rum. But the consulting company which hired Paul, JVAT, had just had it’s 3rd birthday. Being a great organisation the directors had provided its members with a hamper each. Nibbles, and a nice bottle of Moet and Chandon champagne; perfect for a double celebration – birthday and getting through the strait!
And an interesting one. A little later we saw the mast of a large yacht (3 spreaders) moving behind the mangrove islands. She entered the shallow bit, stopped, turned and headed back. We suspect they saw the same water depth we did, and decided it was better to retreat and fight another day.
Picture: Plenty of wildlife on the dry; just perhaps a little too close. We needed the hamper!
Comments
| Vessel Name: | Tai Mo Shan |
| Vessel Make/Model: | North Cape 43 (Ed Brewer) |
| Hailing Port: | Auckland, NZ |
| Crew: | Paul and Helen Dickinson |
| About: | |
| Extra: | Tai Mo Shan was built in Hong Kong in 1980 by Emsworth Ltd of Athang Hau. Her name translates to 'Big Hat Mountain' which overlooks the boat yard. We prefer 'Tai Mo Shan'; something is lost in translation. Tai Mo Shan has a proud tradition of cruising the Pacific, and we intend to continue that. |
Gallery not available
Who: Paul and Helen Dickinson
Port: Auckland, NZ